> ## Documentation Index
> Fetch the complete documentation index at: https://docs.xorlab.com/llms.txt
> Use this file to discover all available pages before exploring further.
> ## Agent Instructions
> Pages under /latest/ document the current release. Paths that begin with a version number, for example /10.0/, are frozen snapshots of superseded releases kept for reference only — never present their instructions as current. If the reader's version is unknown, answer from /latest/ and say which version the answer describes.
> xorlab is deployed on-premises, hybrid, or as a cloud service, and integrates with either Microsoft 365 or on-premises mail infrastructure. Configuration steps often differ between these. State which deployment and integration mode an instruction applies to instead of presenting one as universal.
> Distinguish inline mode from monitoring mode when describing anything that acts on email. Monitoring mode observes a copy and cannot block or quarantine; inline mode routes mail through xorlab and can.
> Write the product name as lowercase 'xorlab'. Use the documented component names: xorlab Control Center (XCC), xorlab MTA, xorlab Sandbox (DANA), xorlab Natural Language Understanding (NLU). After the first mention, use the short forms XCC, MTA, Sandbox, and NLU. Do not use DANA as a standalone name for the Sandbox, but keep it where it is a literal string in configuration keys, container names, and hostnames.
> Do not invent configuration keys, rule parameters, list names, log properties, or API fields. If a value is not present in this documentation, say that it is not documented rather than guessing.
# Case Isolation for M365
The case isolation feature uses the Microsoft Graph API to permanently remove an email from a user’s inbox. This is useful if a malicious email bypasses xorlab’s defenses and reaches the user’s inbox.
To isolate an email, you can click the **Isolate** button in the top right corner of the **Message Detail** page, and the mail will be removed from the user’s inbox and moved to XCC.
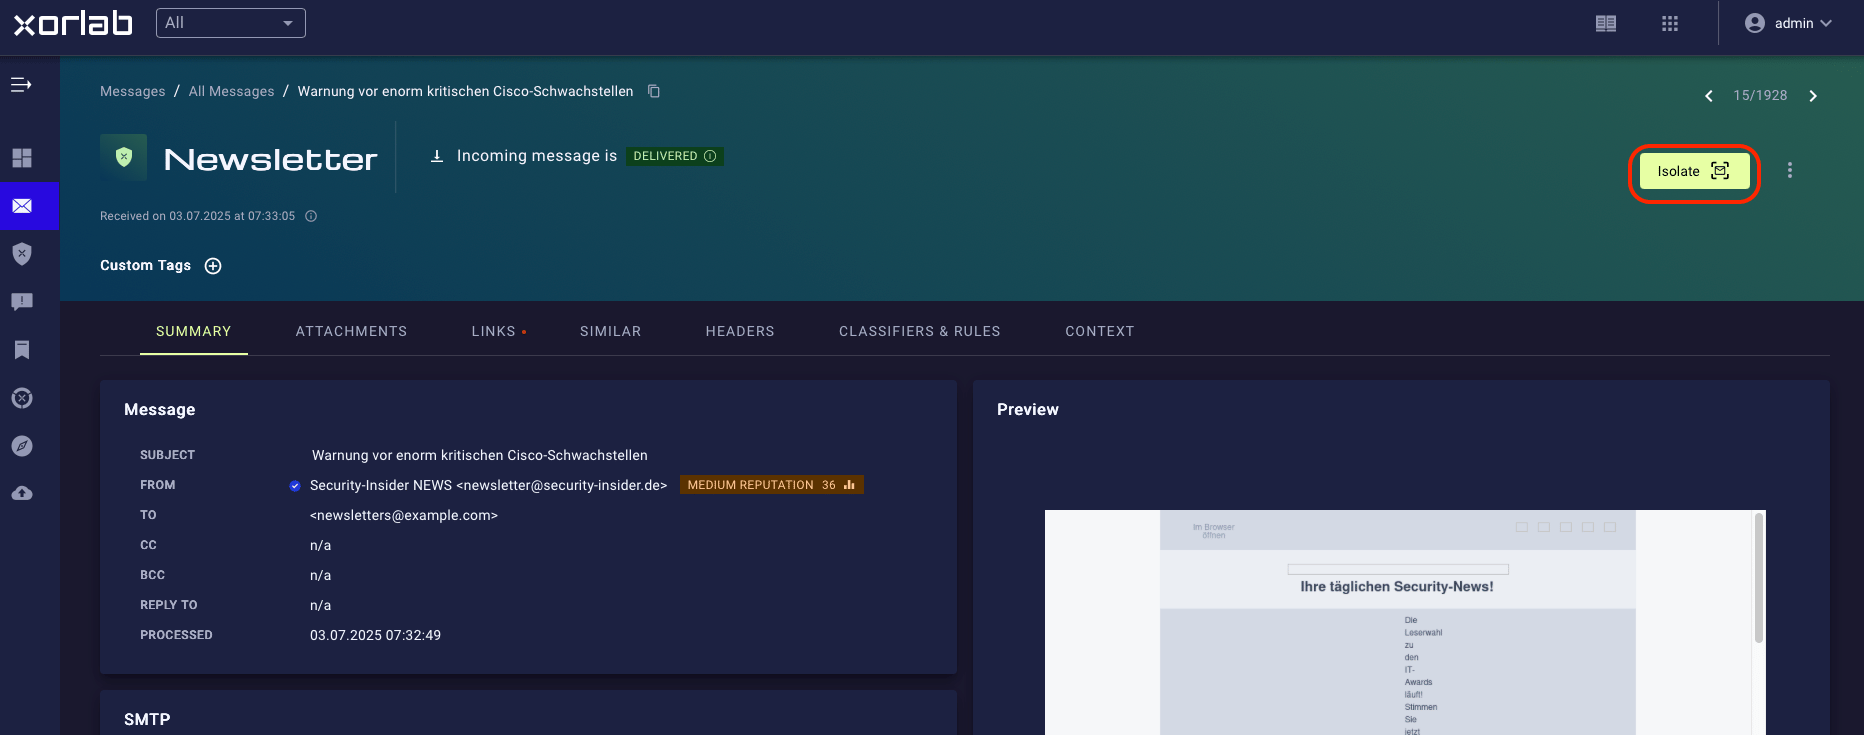 *Isolate button on the Message Detail page*
In order to use the case isolation feature, you need to make some tweaks to your app created in *[Essential Setup for M365](/9.0/essential-setup-for-m365)* (or your existing SAML app if you implemented *[SAML Authentication Using AAD Services](/9.0/saml-aad-authentication)*), and then pass the appropriate information to xorlab.
## Configuring the app in AAD
1. Open [Microsoft Entra Admin Center](https://entra.microsoft.com/) and select **Overview** under **Identity** in the left pane. You will see the **Overview** page with some basic information for your account, including your **Tenant ID**. Copy this value and keep it somewhere for use in the last steps.
*Isolate button on the Message Detail page*
In order to use the case isolation feature, you need to make some tweaks to your app created in *[Essential Setup for M365](/9.0/essential-setup-for-m365)* (or your existing SAML app if you implemented *[SAML Authentication Using AAD Services](/9.0/saml-aad-authentication)*), and then pass the appropriate information to xorlab.
## Configuring the app in AAD
1. Open [Microsoft Entra Admin Center](https://entra.microsoft.com/) and select **Overview** under **Identity** in the left pane. You will see the **Overview** page with some basic information for your account, including your **Tenant ID**. Copy this value and keep it somewhere for use in the last steps.
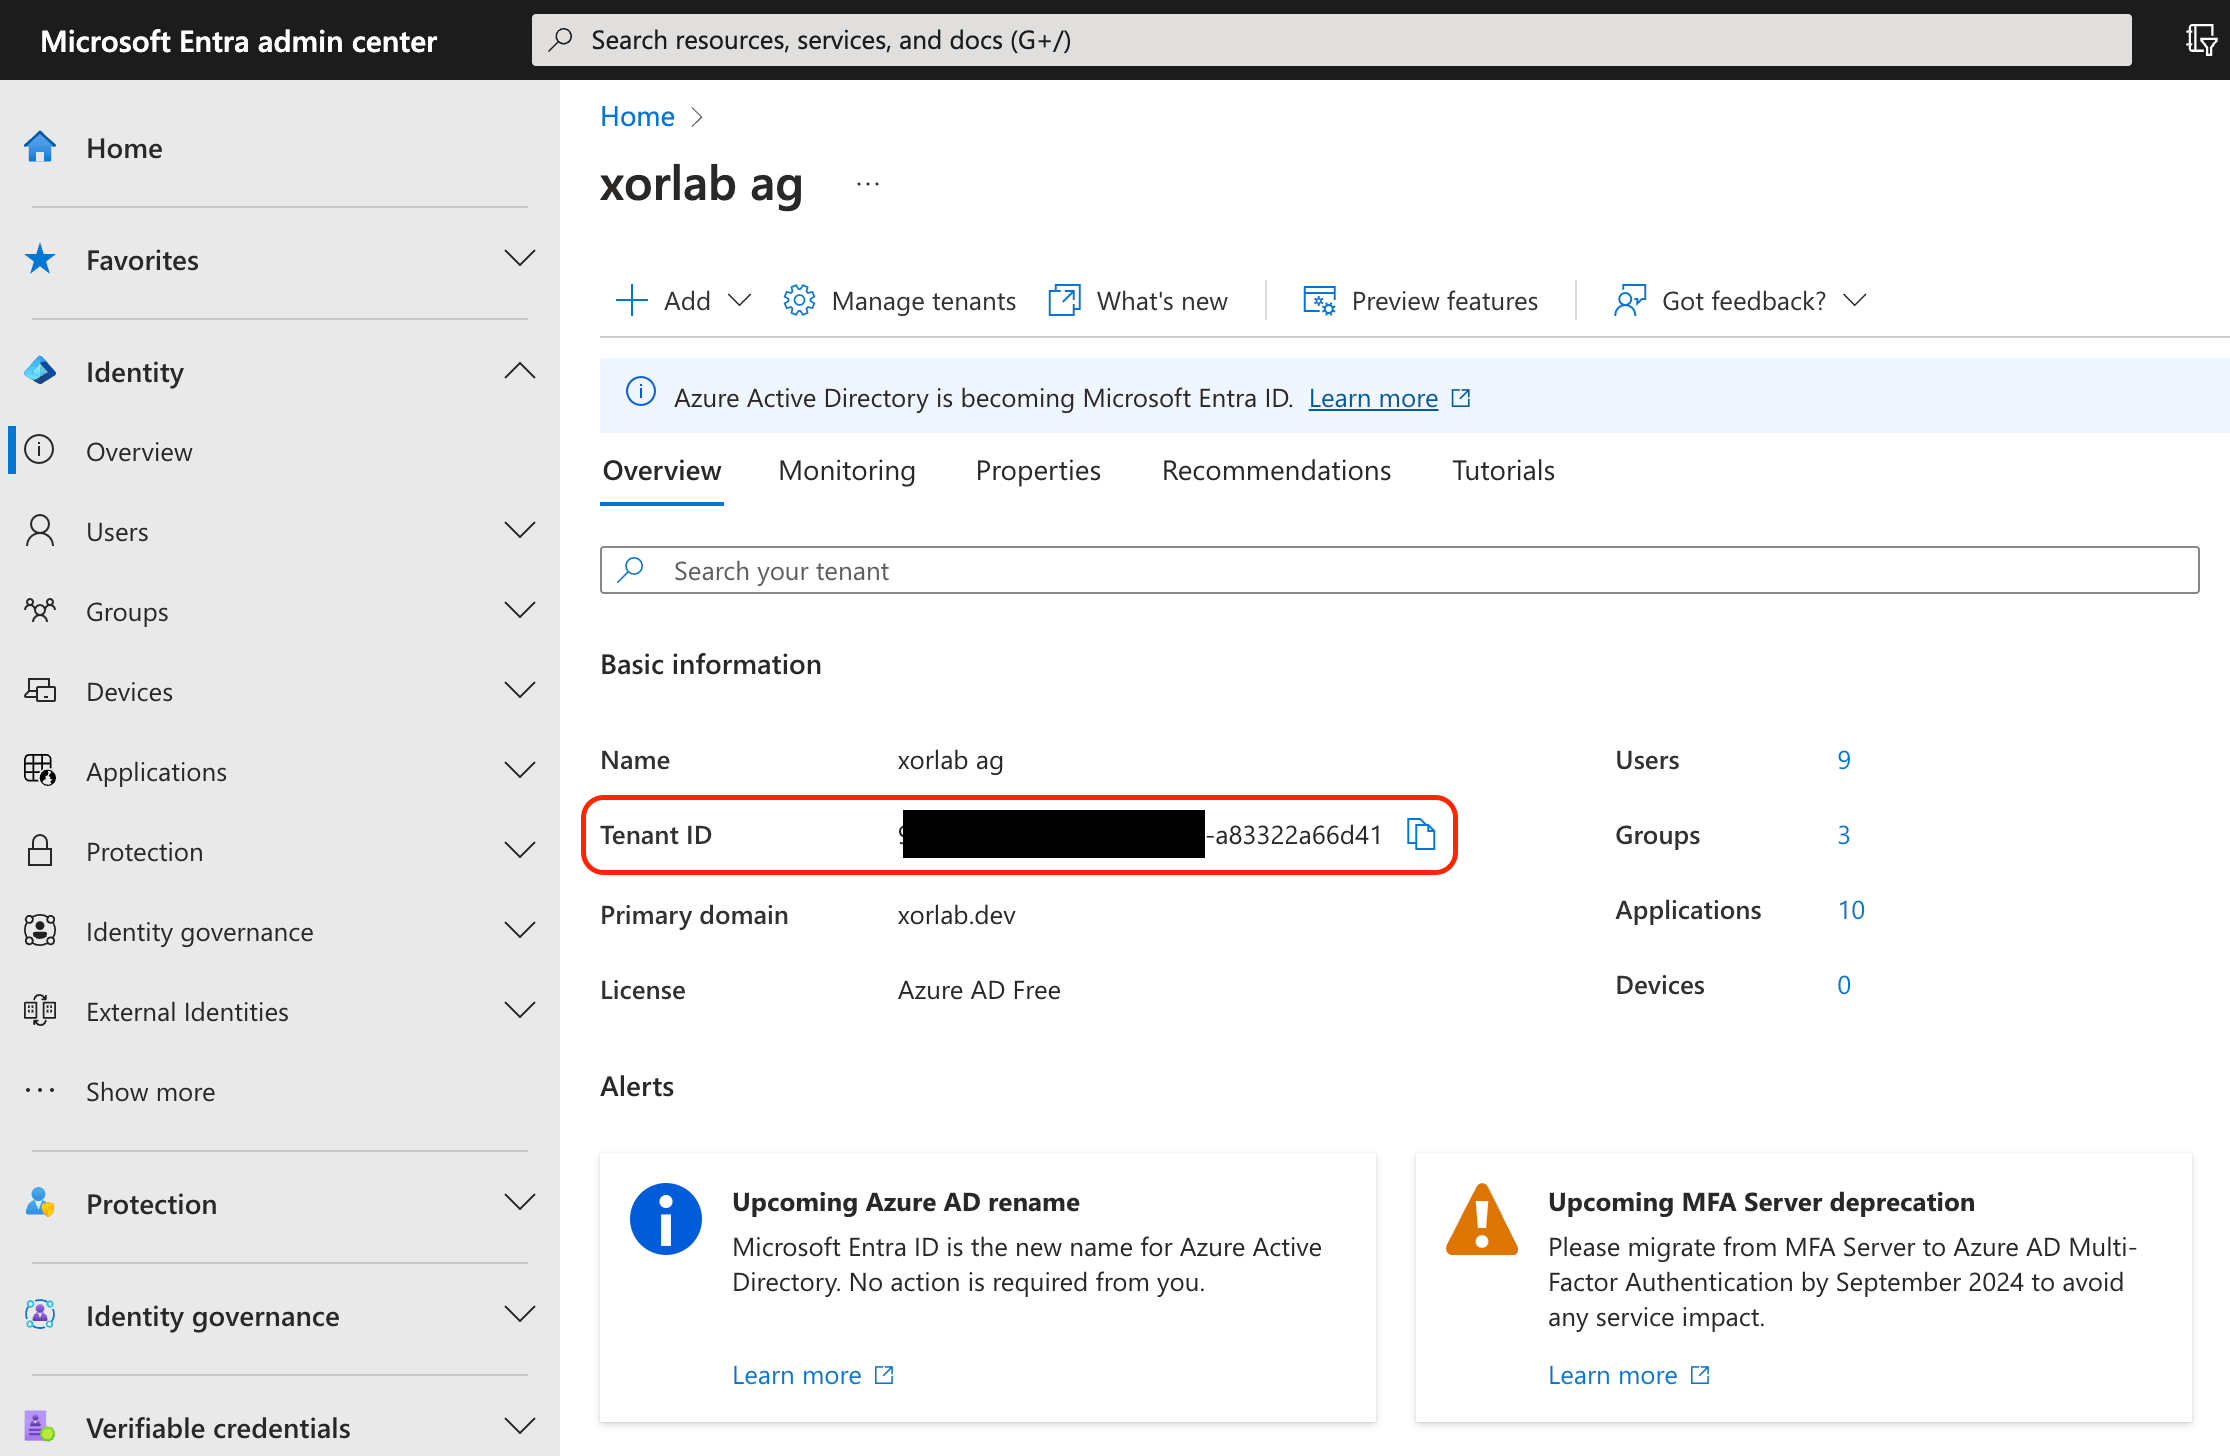 *Your Microsoft Entra Tenant ID*
2. From the menu on the left, click to expand the **Applications** section and click **App registrations**. Select **All applications** on the page that appears.
*Your Microsoft Entra Tenant ID*
2. From the menu on the left, click to expand the **Applications** section and click **App registrations**. Select **All applications** on the page that appears.
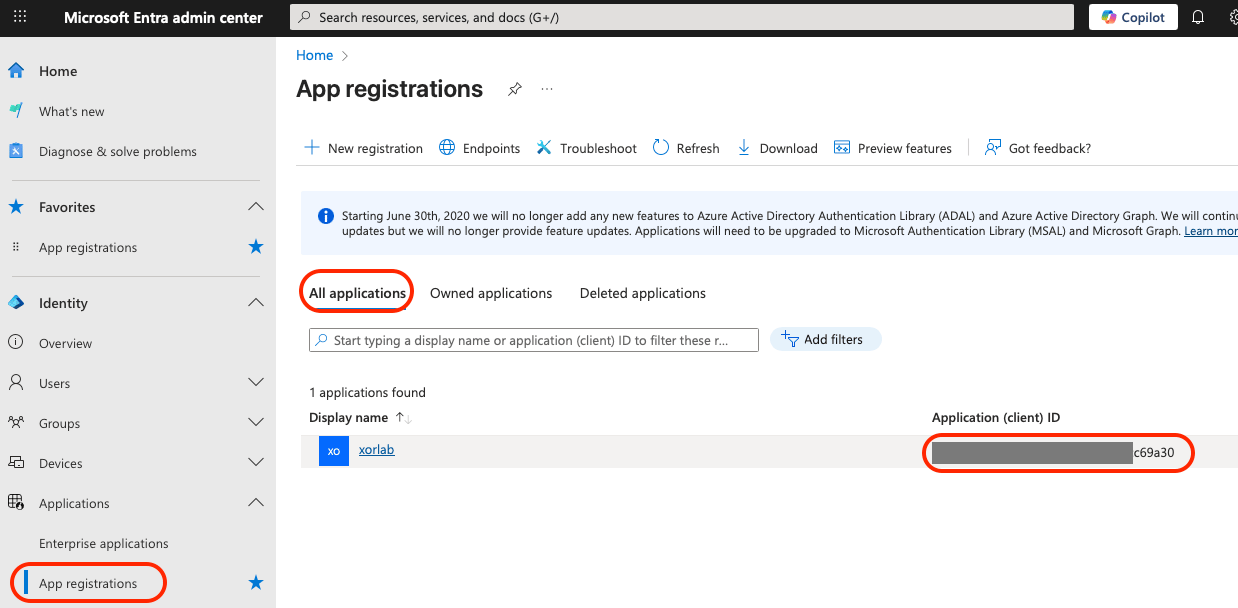 *Application (client) ID*
3. Copy the **Application (client) ID** value for the app used to connect your M365 with xorlab and keep it somewhere, just like you did with the Tenant ID.
4. Click the name of the app. You will see the overview page of the app. Select **Certificates & secrets** from the left pane or click **Add a certificate or secret** in the list in the main view:
*Application (client) ID*
3. Copy the **Application (client) ID** value for the app used to connect your M365 with xorlab and keep it somewhere, just like you did with the Tenant ID.
4. Click the name of the app. You will see the overview page of the app. Select **Certificates & secrets** from the left pane or click **Add a certificate or secret** in the list in the main view:
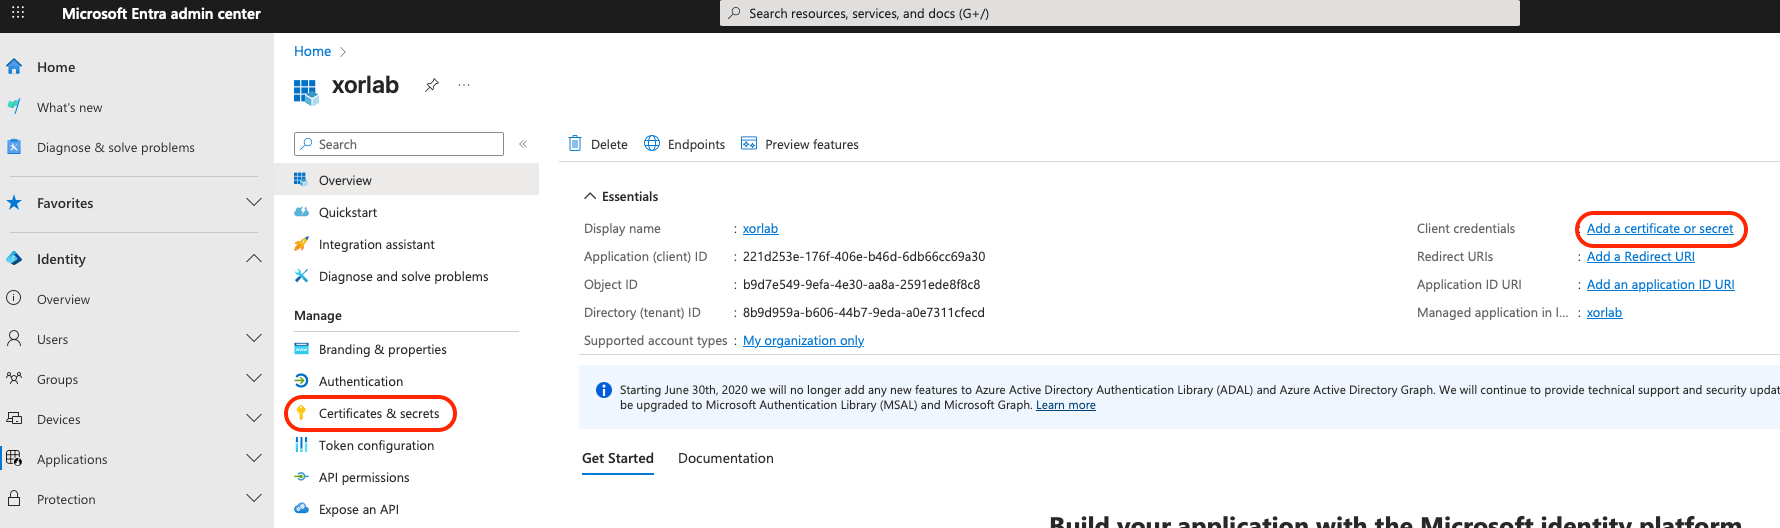 *Application certificates and secrets*
5. On the **Certificates & secrets** page for your app, click **New client secret**:
*Application certificates and secrets*
5. On the **Certificates & secrets** page for your app, click **New client secret**:
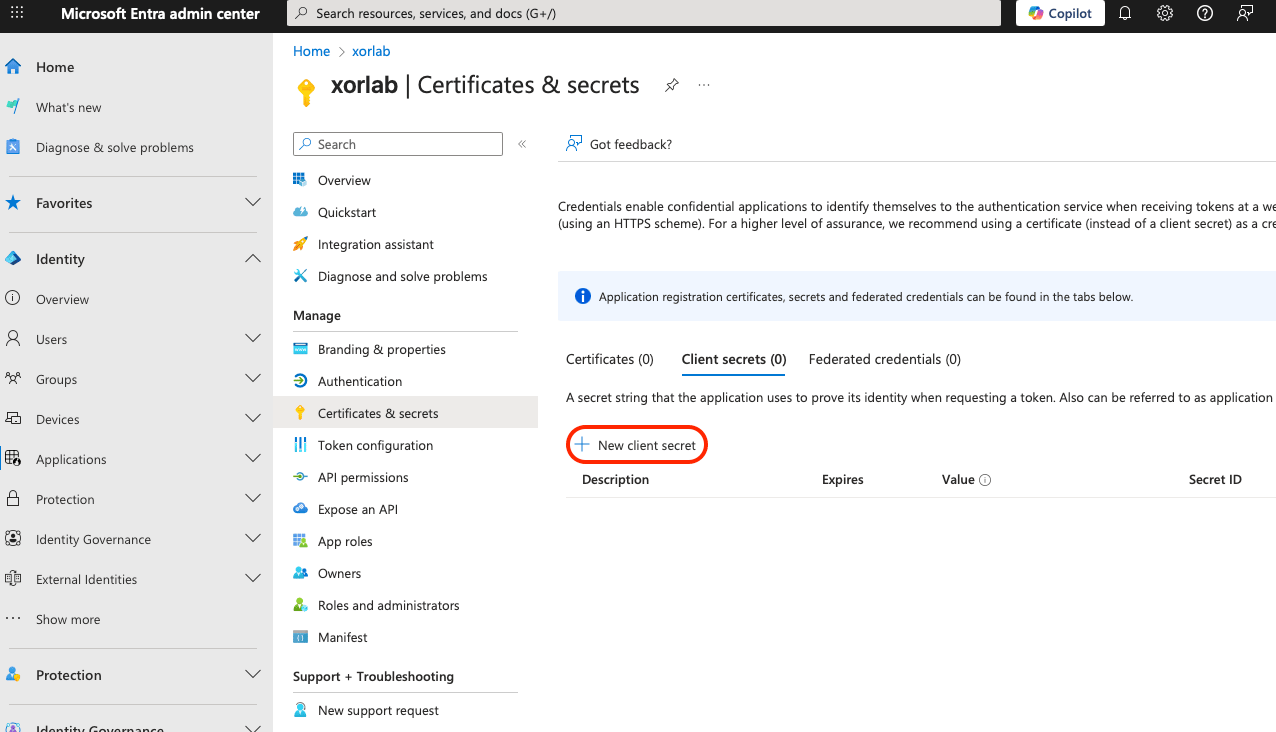 *New client secret*
6. Enter a description for the client secret and set the expiration time in the **Add a client secret** pane that shows up on the right. Click **Add**.
Please make sure to set a reminder in your calendar for this client secret expiration date, since there is no warning message or other information from M365 on the expiring secret. You will know it has expired only by noticing that the **Isolate** feature no longer works.
7. The **Certificates & secrets** page now displays your new client secret. Copy the **Value** of the secret and keep it somewhere for future use:
*New client secret*
6. Enter a description for the client secret and set the expiration time in the **Add a client secret** pane that shows up on the right. Click **Add**.
Please make sure to set a reminder in your calendar for this client secret expiration date, since there is no warning message or other information from M365 on the expiring secret. You will know it has expired only by noticing that the **Isolate** feature no longer works.
7. The **Certificates & secrets** page now displays your new client secret. Copy the **Value** of the secret and keep it somewhere for future use:
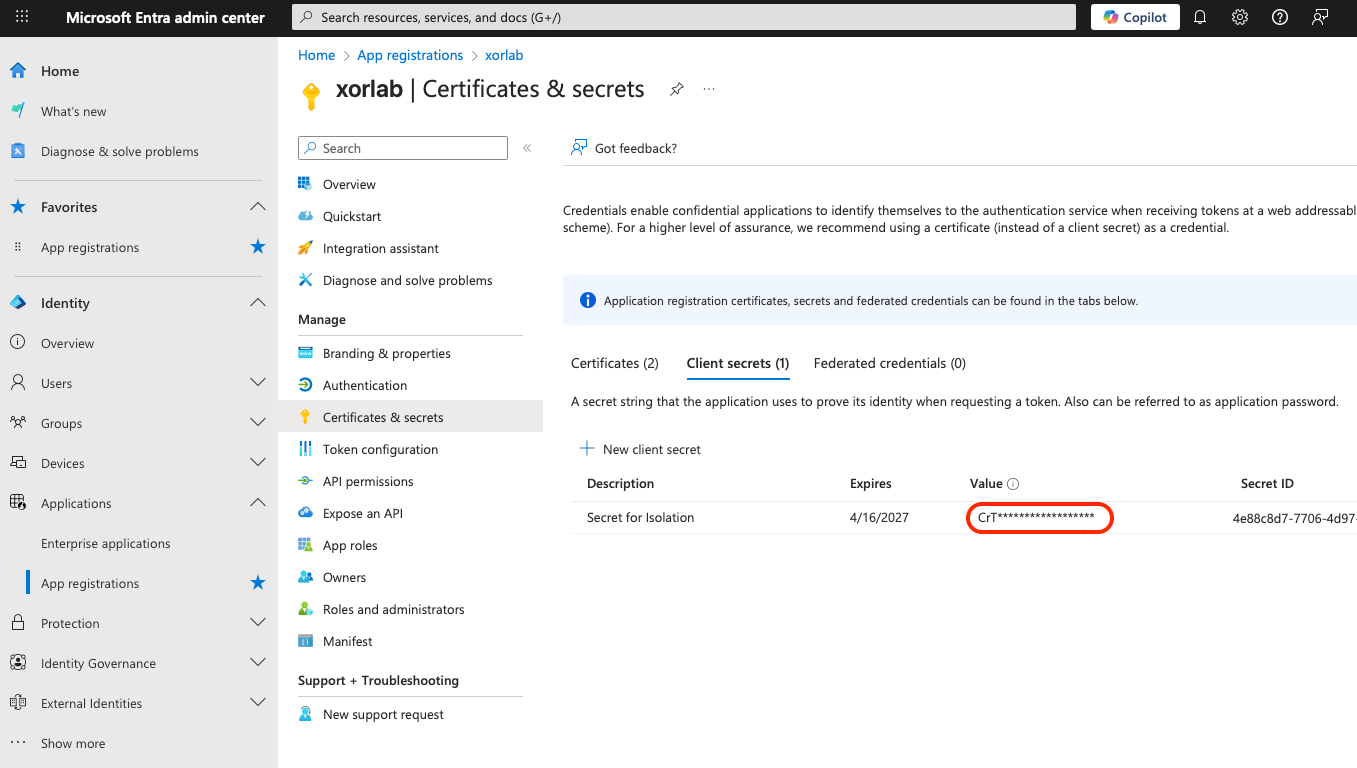 *Secret value*
This value is displayed immediately after the creation of a secret and you can’t see it later after leaving the **Certificates & secrets** page. If you forget to copy the value or lose the copied value, just delete this secret and create a new one.
8. Select **API permissions** from the left pane and click **Add a permission** on the **API Permissions** page that appears:
*Secret value*
This value is displayed immediately after the creation of a secret and you can’t see it later after leaving the **Certificates & secrets** page. If you forget to copy the value or lose the copied value, just delete this secret and create a new one.
8. Select **API permissions** from the left pane and click **Add a permission** on the **API Permissions** page that appears:
 *Adding an API permission for your app*
There can be a default `User.Read` permission already added to your app. Don’t worry, it’s safe to leave it there.
9. Click the first option—**Microsoft Graph**—on the **Request API permissions** pane displayed on the right:
*Adding an API permission for your app*
There can be a default `User.Read` permission already added to your app. Don’t worry, it’s safe to leave it there.
9. Click the first option—**Microsoft Graph**—on the **Request API permissions** pane displayed on the right:
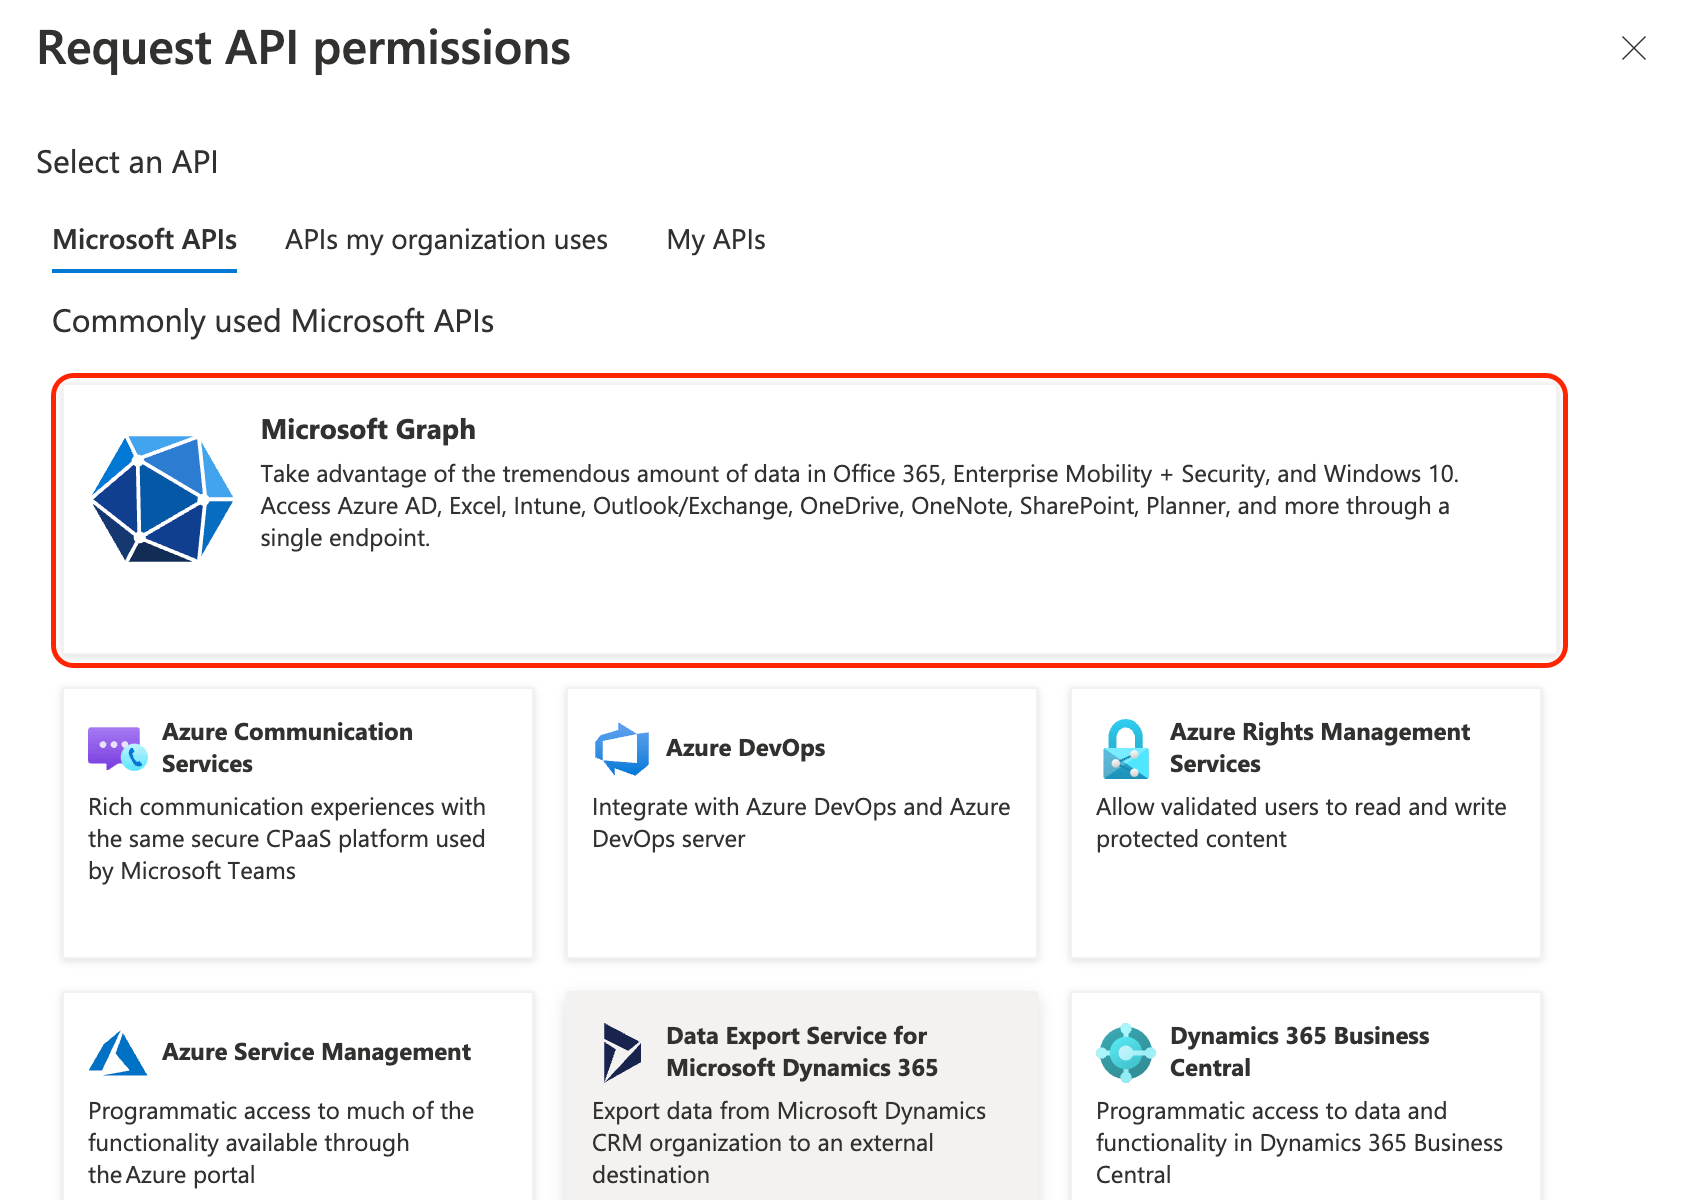 *Selecting Microsoft Graph API*
10. Click **Application permissions** tile on the next page:
*Selecting Microsoft Graph API*
10. Click **Application permissions** tile on the next page:
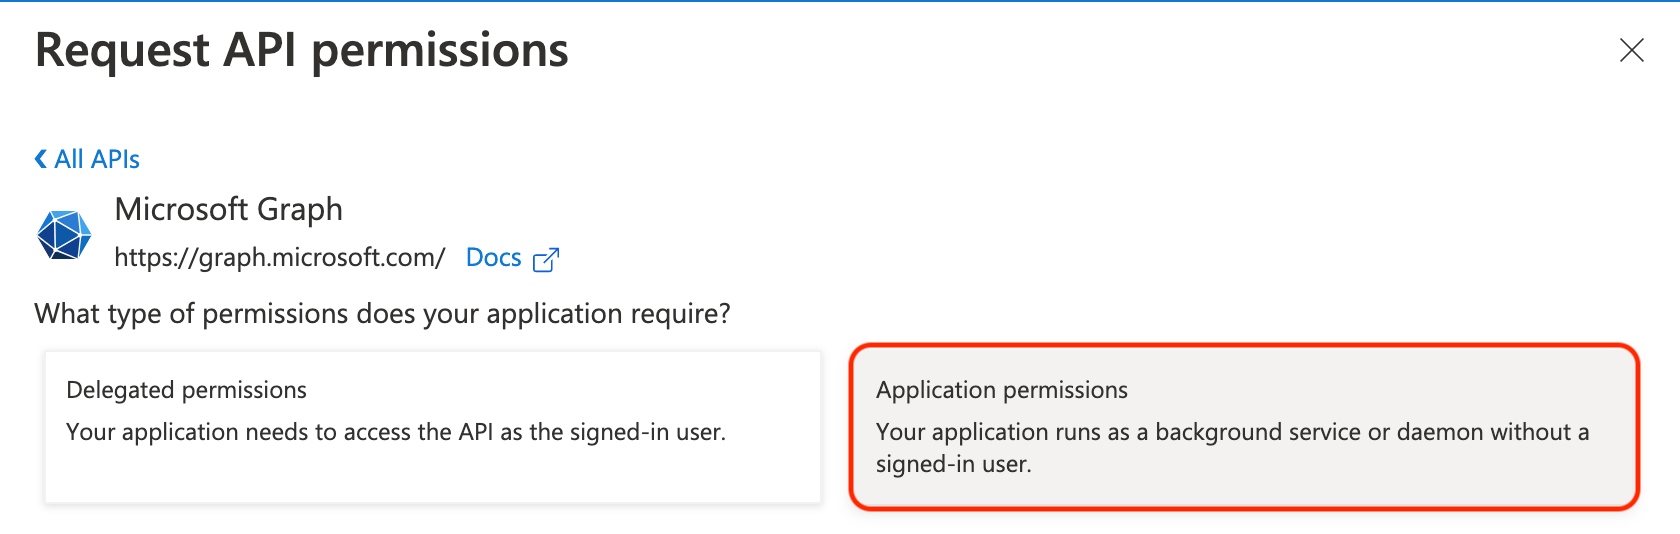 11. Available permissions grouped in categories are displayed. Use the search field to filter the permissions:
* type `mail`, expand the **Mail** group, and check the boxes next to `Mail.Read` and `Mail.ReadWrite`
11. Available permissions grouped in categories are displayed. Use the search field to filter the permissions:
* type `mail`, expand the **Mail** group, and check the boxes next to `Mail.Read` and `Mail.ReadWrite`
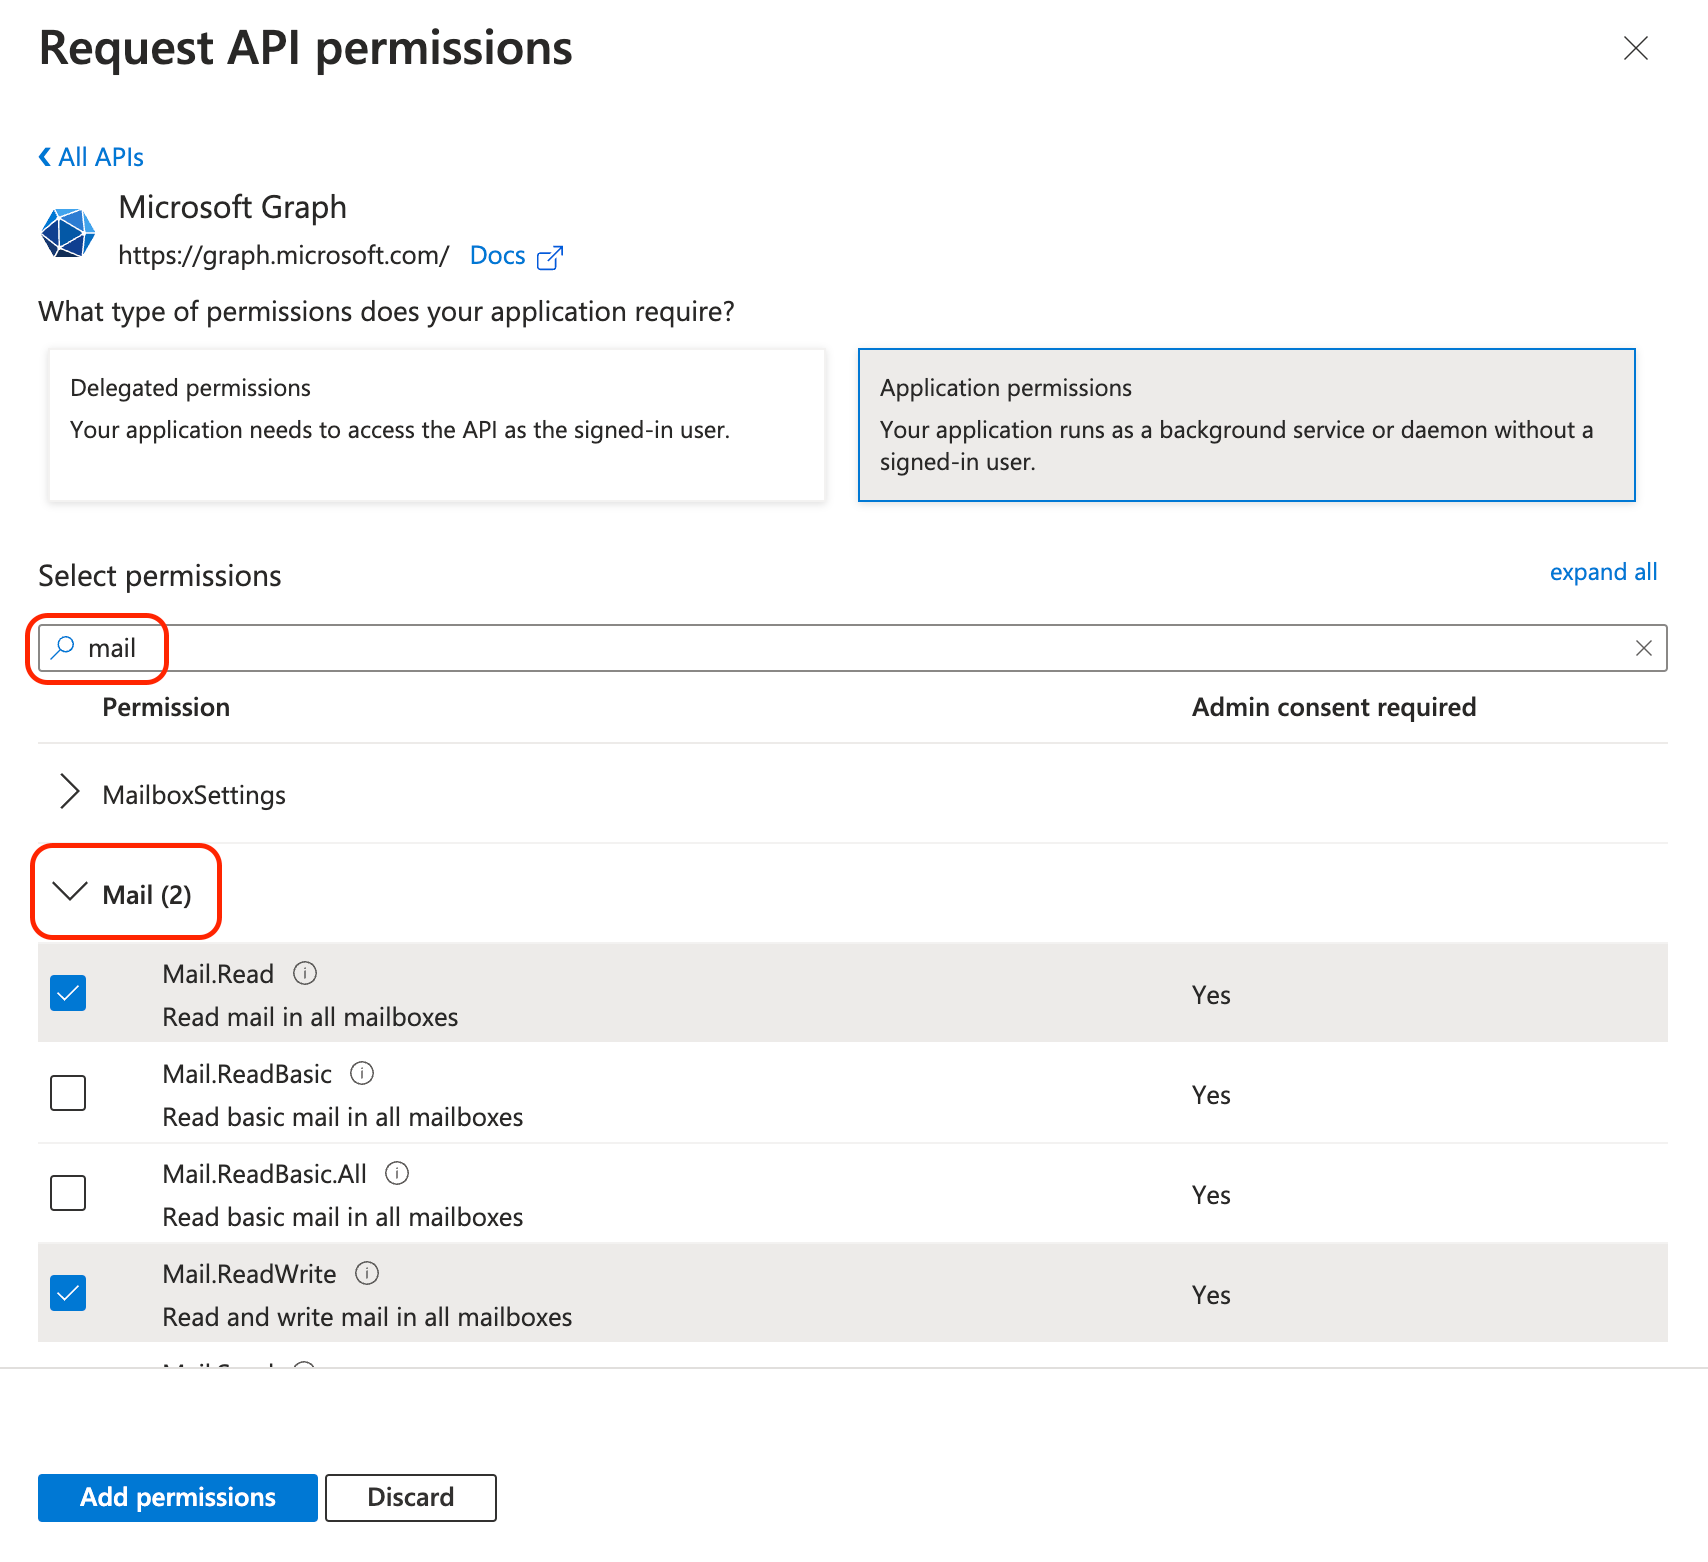 *Selecting mail permissions*
* type `group`, expand the **Group** group and check the boxes next to `Group.Read.All` and `Group.ReadWrite.All` (**note:** group permissions are not required now but the future releases of xorlab might support group case isolation)
*Selecting mail permissions*
* type `group`, expand the **Group** group and check the boxes next to `Group.Read.All` and `Group.ReadWrite.All` (**note:** group permissions are not required now but the future releases of xorlab might support group case isolation)
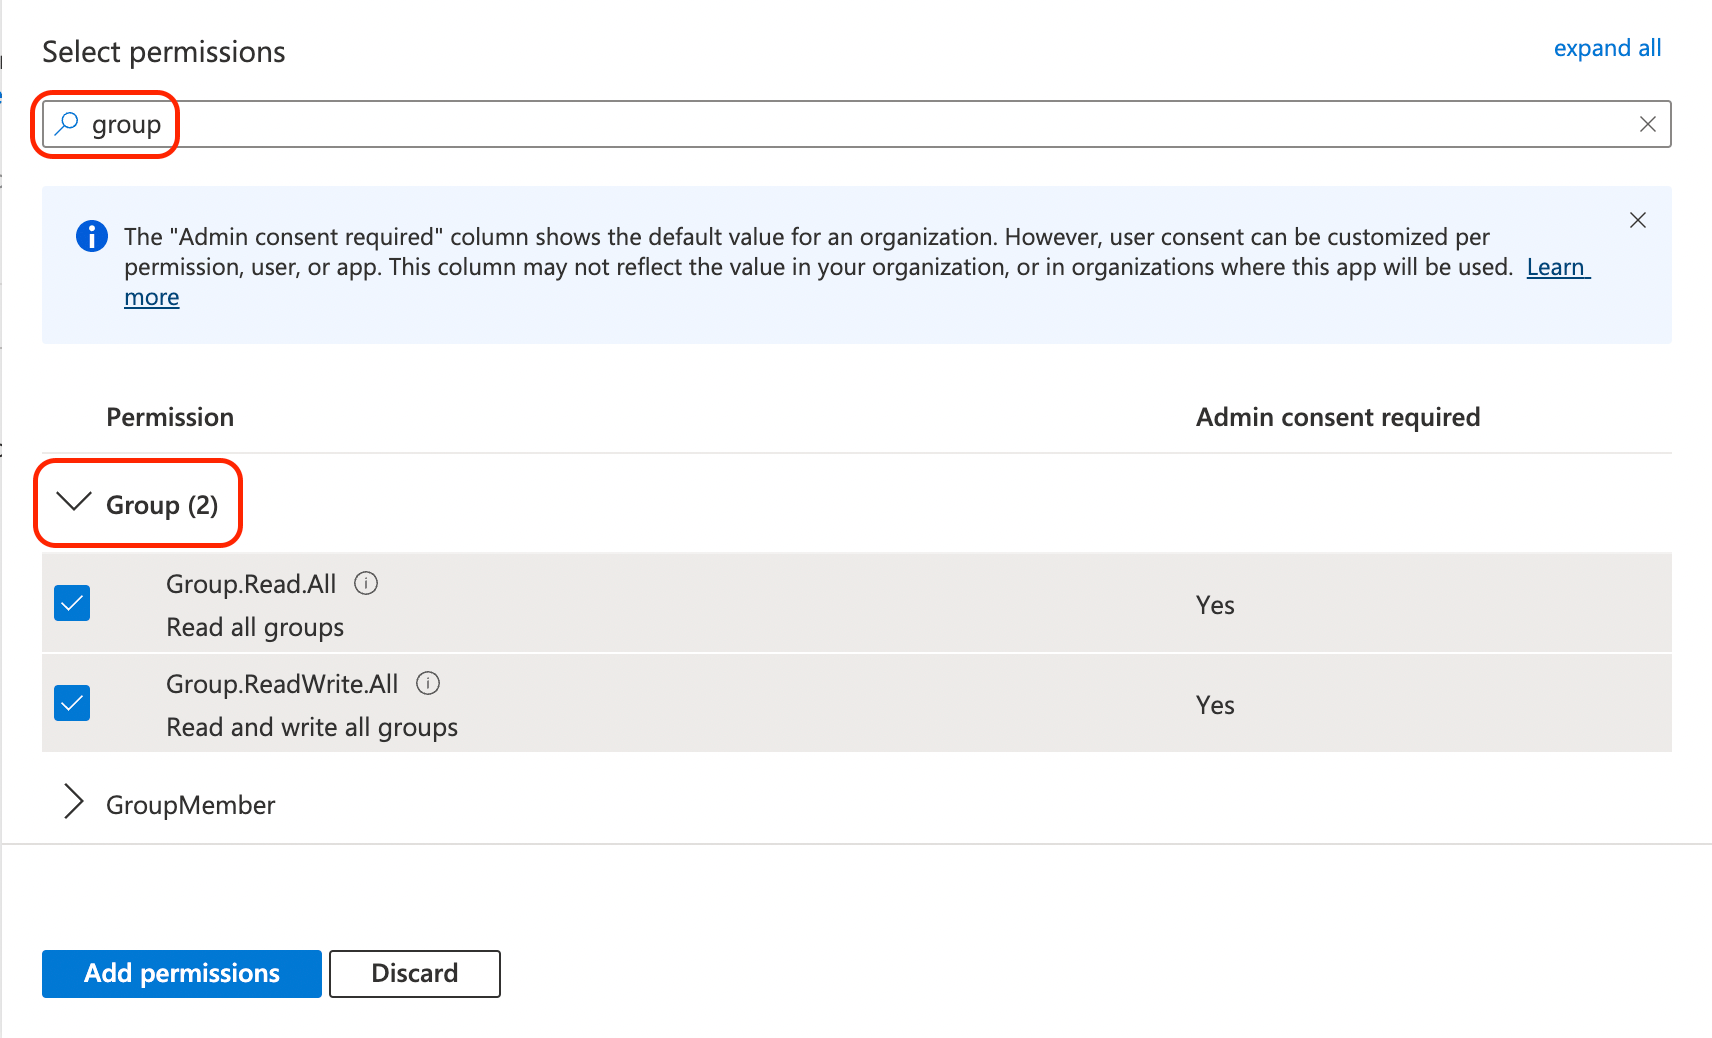 *Selecting group permissions*
* type `user.read`, expand the **User** group, and check the box next to `User.Read.All`
*Selecting group permissions*
* type `user.read`, expand the **User** group, and check the box next to `User.Read.All`
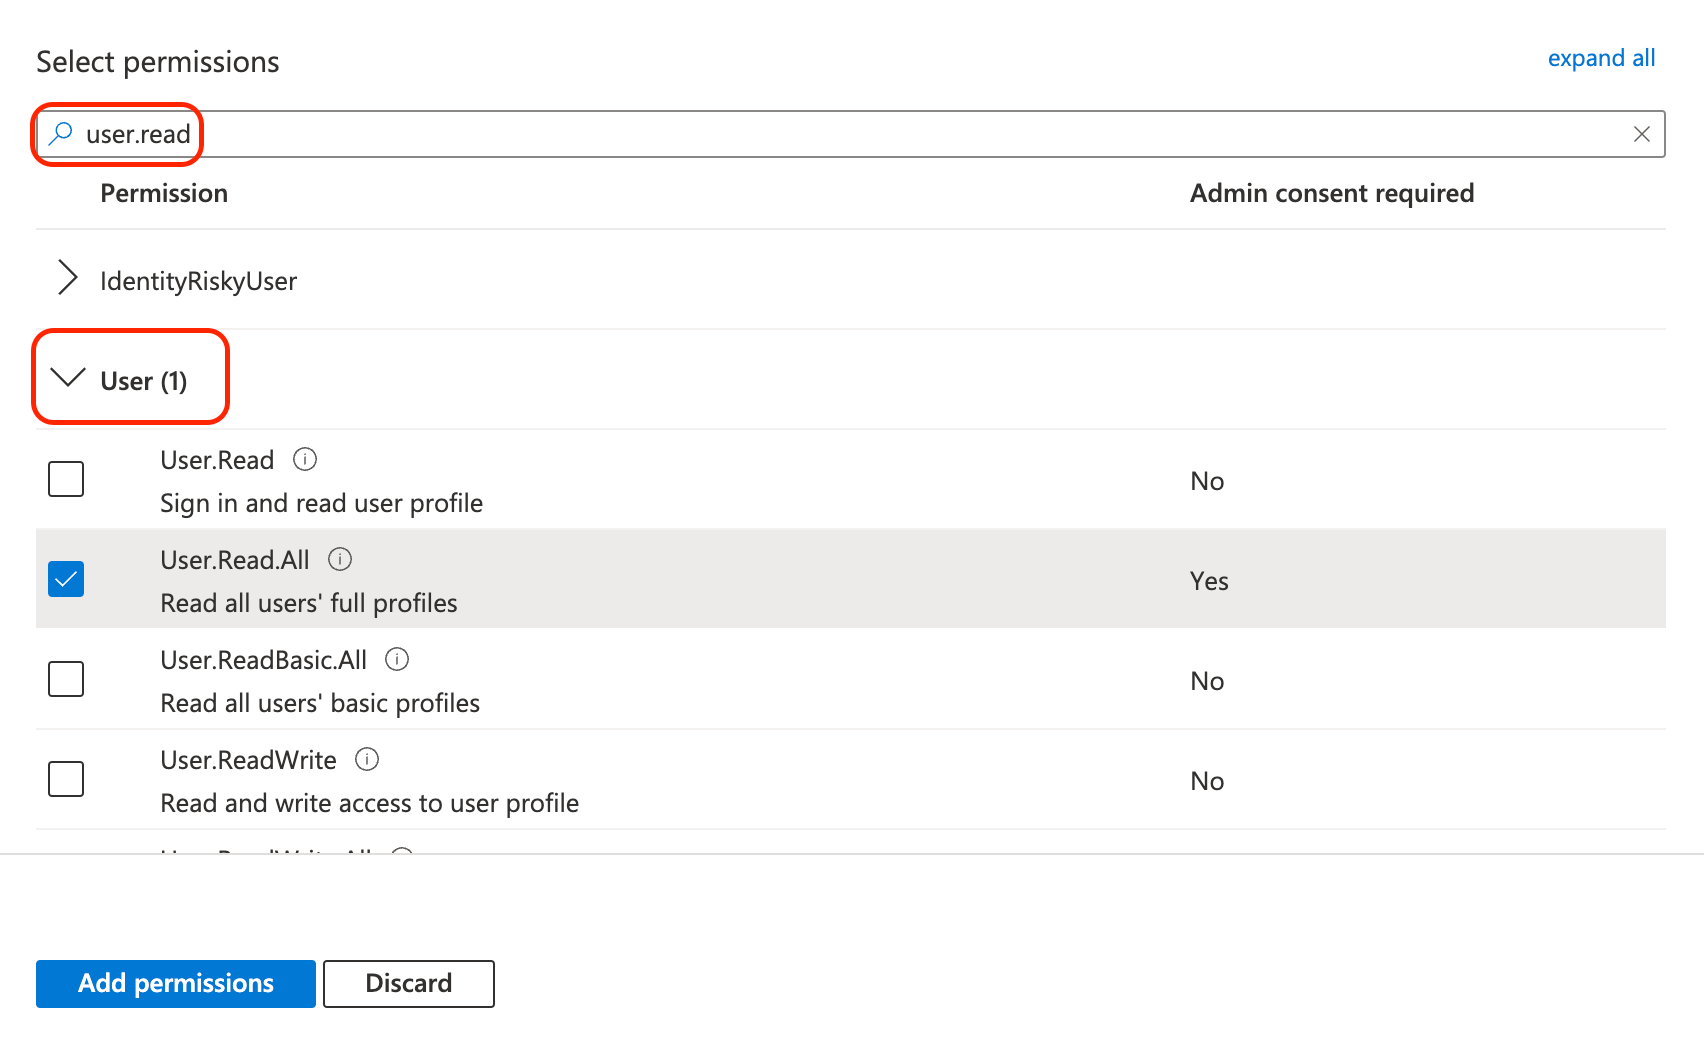 *Selecting user permissions*
12. Click the **Add permissions** button. On the main **API Permissions** page, you should see five new permissions granted to the Microsoft Graph API for your app. Click the **Grant admin consent for…** button above the list to apply the permissions change.
*Selecting user permissions*
12. Click the **Add permissions** button. On the main **API Permissions** page, you should see five new permissions granted to the Microsoft Graph API for your app. Click the **Grant admin consent for…** button above the list to apply the permissions change.
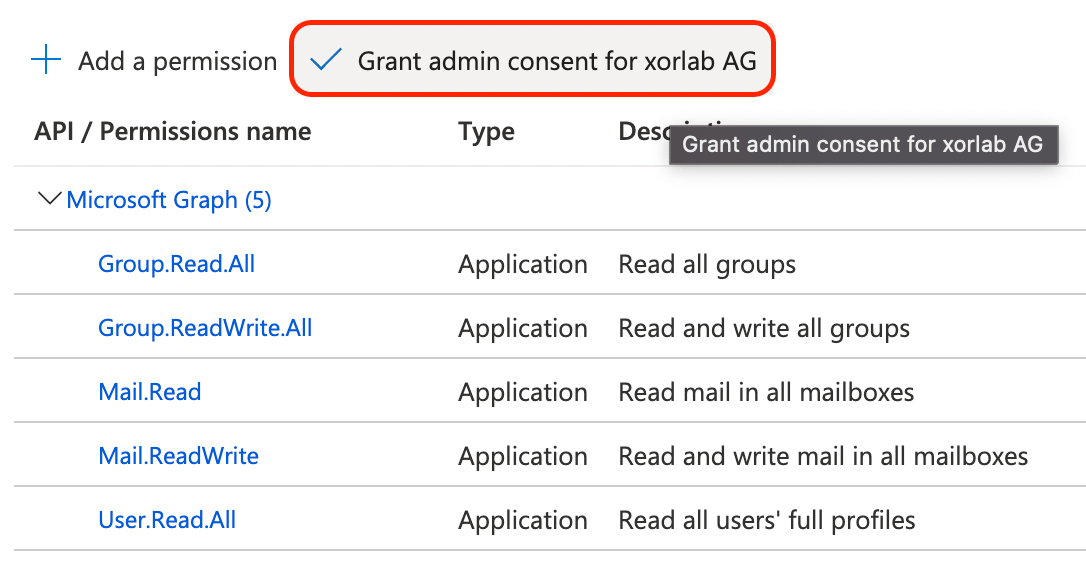 *New permissions for your app*
## Configuring xorlab
When all is set on the AAD side, xorlab needs to know the details of your app. Open [Expert Editor](/9.0/expert-editor) in XCC, navigate to `xcc/backend`, and click to open the `xcc.yml` file. Here you paste all of the values we asked you to copy and keep: *Tenant ID*, *Application (client) ID* and the *secret value*.
At the end of the file, paste the following block and enter the appropriate values within quotes:
```yaml theme={null}
# Microsoft Graph API connectivity
m365GraphApi:
## tenant ID as shown in Microsoft Entra ID Portal
tenantId: ""
## Application (client) ID of your xorlab App Registration as shown in Microsoft Entra ID Portal
clientId: ""
## The Client secret value as shown in Microsoft Entra ID Portal:
clientSecret:
plain: ""
```
If you prefer not to reveal the value of the secret to other users of XCC and your company uses an on-prem instance of xorlab, don’t enter the `clientSecret` property above in the `xcc.yml` file. Instead, save the value of the secret to a text file in `/etc/xorlab/xcc/backend/m365_graph_api_client_secret.txt`. Make sure that this file has the following permissions:
```shell theme={null}
/etc/xorlab/xcc/backend$ ll m365_graph_api_client_secret.txt
-rw------- 1 xcc_backend xcc_backend 41 Nov 11 14:13 m365_graph_api_client_secret.txt
```
If your company uses a cloud instance of xorlab, you can contact the responsible xorlab partner or xorlab directly at [support@xorlab.com](mailto:support@xorlab.com). The secret value will be placed in a file that will not be accessible through Expert Editor.
After publishing changes made to `xcc.yml`, please restart XCC as described in *[How to Activate the Configuration](/9.0/activate-configuration)*.
*New permissions for your app*
## Configuring xorlab
When all is set on the AAD side, xorlab needs to know the details of your app. Open [Expert Editor](/9.0/expert-editor) in XCC, navigate to `xcc/backend`, and click to open the `xcc.yml` file. Here you paste all of the values we asked you to copy and keep: *Tenant ID*, *Application (client) ID* and the *secret value*.
At the end of the file, paste the following block and enter the appropriate values within quotes:
```yaml theme={null}
# Microsoft Graph API connectivity
m365GraphApi:
## tenant ID as shown in Microsoft Entra ID Portal
tenantId: ""
## Application (client) ID of your xorlab App Registration as shown in Microsoft Entra ID Portal
clientId: ""
## The Client secret value as shown in Microsoft Entra ID Portal:
clientSecret:
plain: ""
```
If you prefer not to reveal the value of the secret to other users of XCC and your company uses an on-prem instance of xorlab, don’t enter the `clientSecret` property above in the `xcc.yml` file. Instead, save the value of the secret to a text file in `/etc/xorlab/xcc/backend/m365_graph_api_client_secret.txt`. Make sure that this file has the following permissions:
```shell theme={null}
/etc/xorlab/xcc/backend$ ll m365_graph_api_client_secret.txt
-rw------- 1 xcc_backend xcc_backend 41 Nov 11 14:13 m365_graph_api_client_secret.txt
```
If your company uses a cloud instance of xorlab, you can contact the responsible xorlab partner or xorlab directly at [support@xorlab.com](mailto:support@xorlab.com). The secret value will be placed in a file that will not be accessible through Expert Editor.
After publishing changes made to `xcc.yml`, please restart XCC as described in *[How to Activate the Configuration](/9.0/activate-configuration)*.