> ## Documentation Index
> Fetch the complete documentation index at: https://docs.xorlab.com/llms.txt
> Use this file to discover all available pages before exploring further.
> ## Agent Instructions
> Pages under /latest/ document the current release. Paths that begin with a version number, for example /10.0/, are frozen snapshots of superseded releases kept for reference only — never present their instructions as current. If the reader's version is unknown, answer from /latest/ and say which version the answer describes.
> xorlab is deployed on-premises, hybrid, or as a cloud service, and integrates with either Microsoft 365 or on-premises mail infrastructure. Configuration steps often differ between these. State which deployment and integration mode an instruction applies to instead of presenting one as universal.
> Distinguish inline mode from monitoring mode when describing anything that acts on email. Monitoring mode observes a copy and cannot block or quarantine; inline mode routes mail through xorlab and can.
> Write the product name as lowercase 'xorlab'. Use the documented component names: xorlab Control Center (XCC), xorlab MTA, xorlab Sandbox (DANA), xorlab Natural Language Understanding (NLU). After the first mention, use the short forms XCC, MTA, Sandbox, and NLU. Do not use DANA as a standalone name for the Sandbox, but keep it where it is a literal string in configuration keys, container names, and hostnames.
> Do not invent configuration keys, rule parameters, list names, log properties, or API fields. If a value is not present in this documentation, say that it is not documented rather than guessing.
# Step-by-Step Configuration Guide
This guide leads system administrators step-by-step through the configuration of xorlab Security Platform. After completing this guide, your XSP will be customized to your needs and ready to process emails.
First, you will go through the mandatory configuration needed to run XSP properly. The next article describes optional configuration steps to further customize your XSP.
**On-premise xorlab Security Platform**
In case you are operating XSP on-premises, please follow the [*xorlab Security Platform VM Setup Guide*](/9.0/vm-setup-guide) first.
**Applying the changes**
Please read the [*How to Activate the Configuration*](/9.0/activate-configuration) article to know how the configuration changes in this guide can be applied.
## Basic settings
1. Log in to the Control Center GUI with the URL address and credentials provided by xorlab.
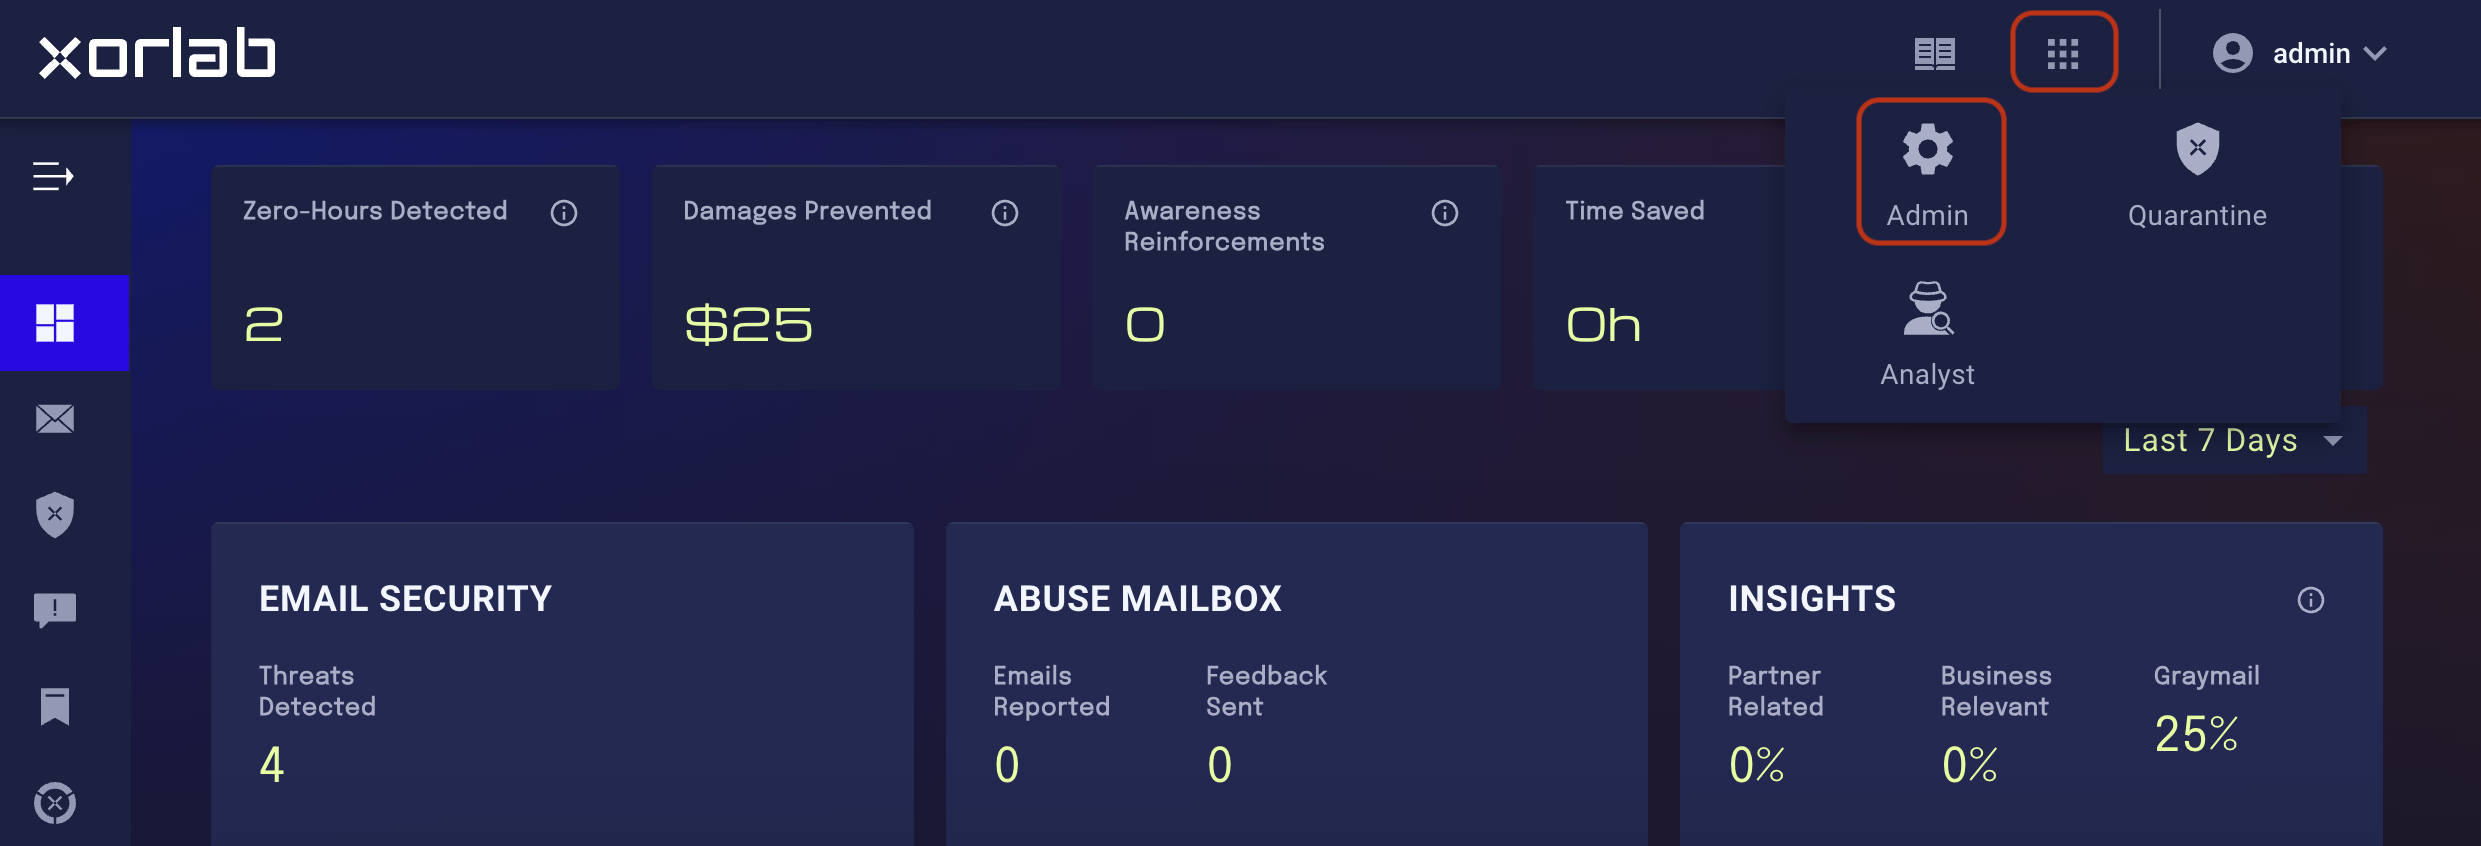
2. On the main screen, click the tiles icon next to your account name and click the **Admin** icon in the displayed menu:
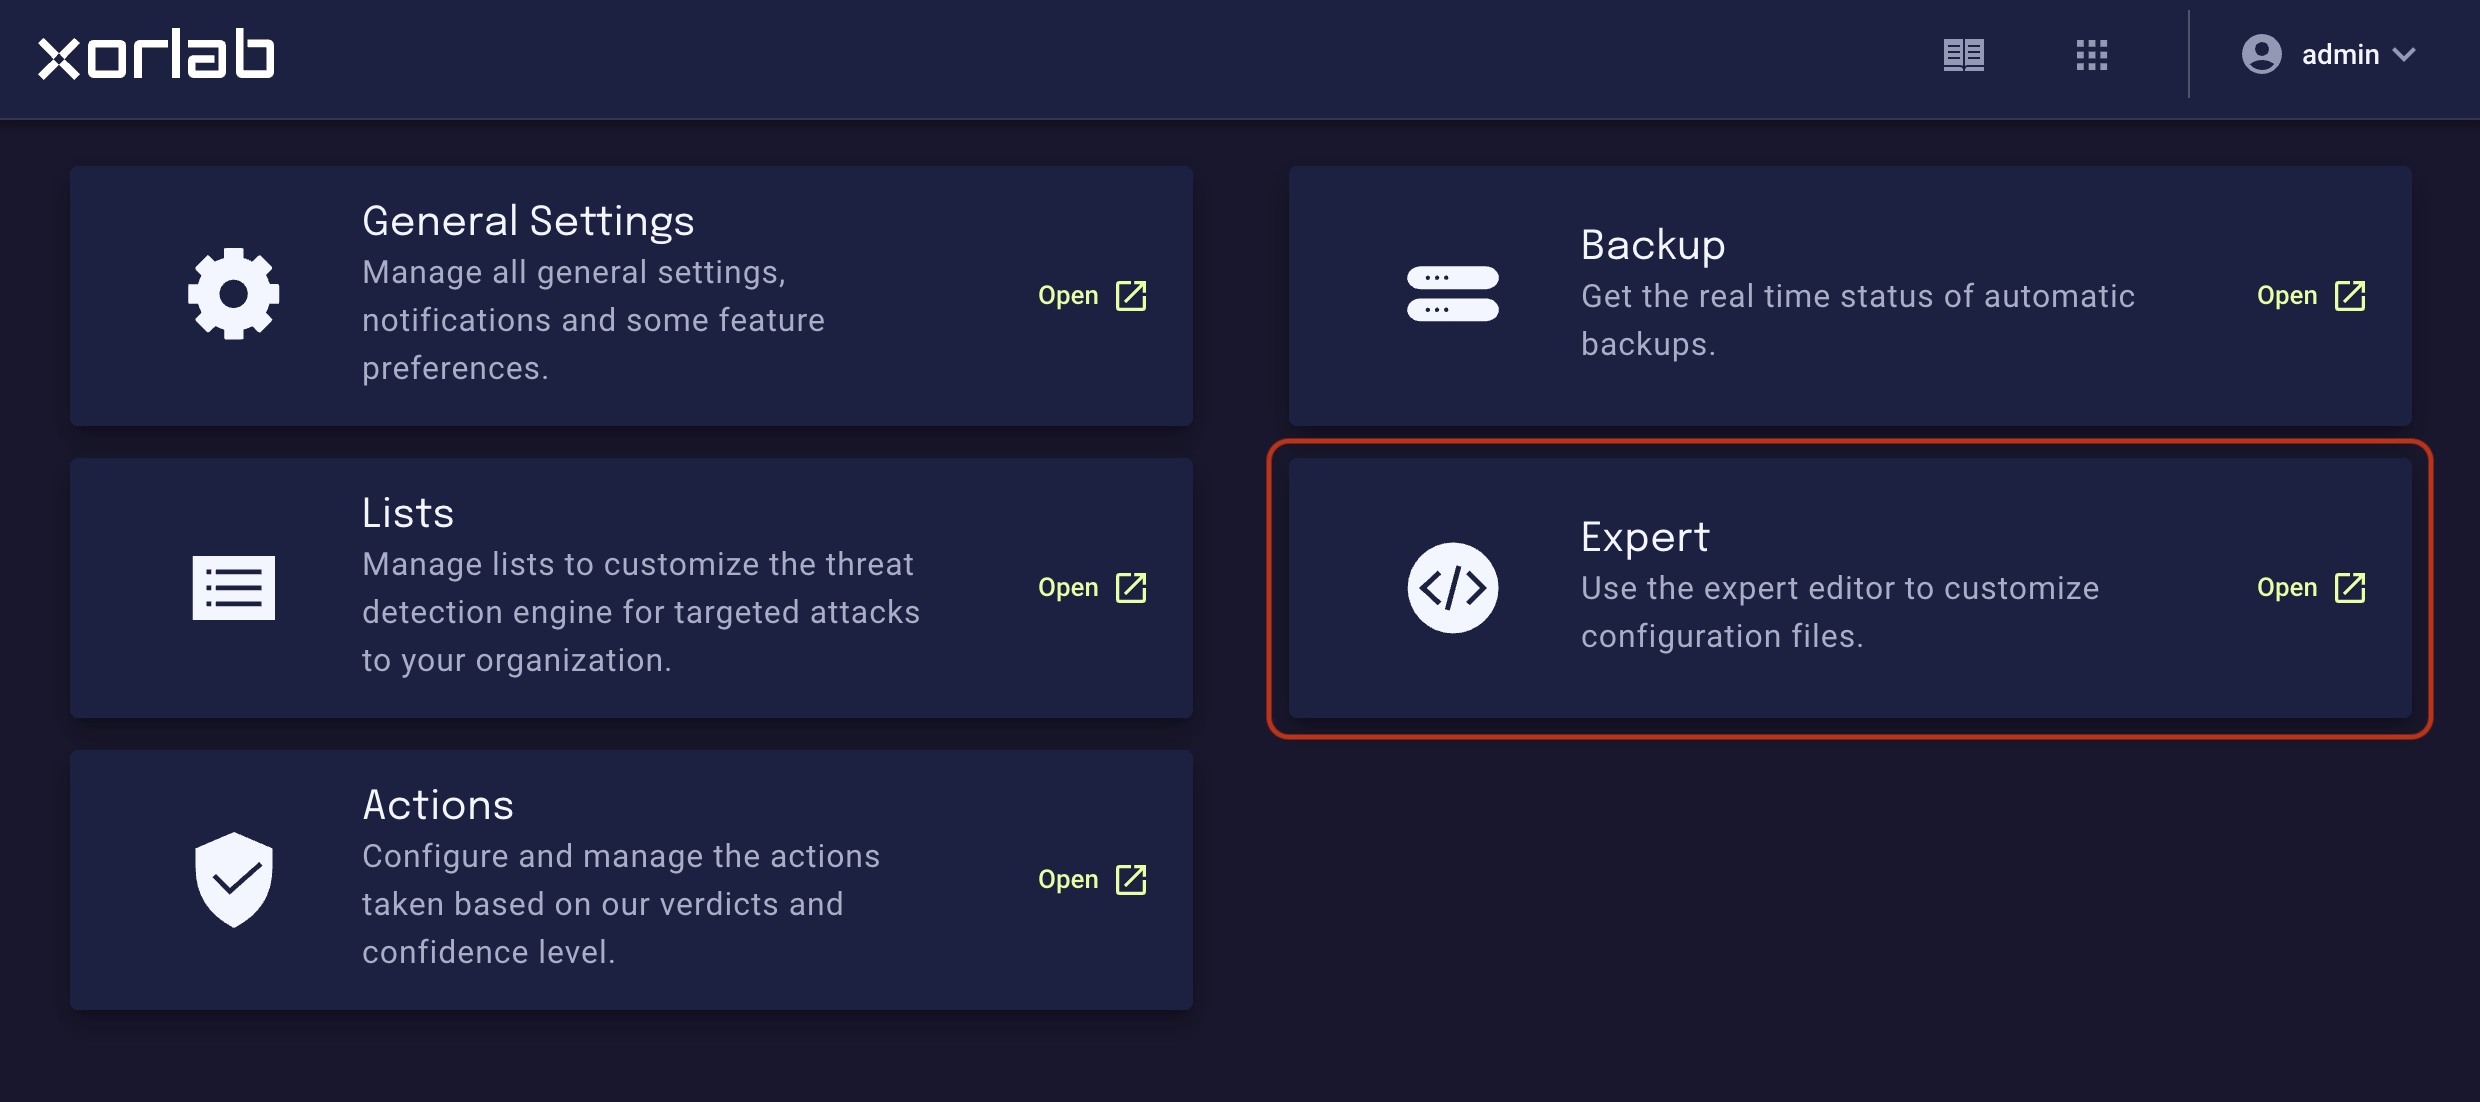
 3. On the resulting **Admin** page, click the **Expert** tile:
 4. In the folder view in the left pane, expand the `shared` folder, then click the `guarded_tenants.yml` file:
5. Under the `domains` section, enter the list of [guarded tenant domains](/9.0/terminology#guarded-tenant-domains). If you need to include subdomains for a domain, add an extra entry with wildcards. Set the `bccFallbackDomain` to your main domain:
```yaml title="shared/guarded_tenants.yml" theme={null}
tenants:
- name: xorlab
bccFallbackDomain: xorlab.com
domains:
- xorlab.com
- "**.xorlab.com" # To include subdomains; note the required quotes
```
6. Navigate to the `shared` folder, expand it and open the `guarded_tenants.yml` file. Set the value of `deliveredTtlDays` to the number of days xorlab should keep the metadata of processed emails if it differs from the default (90 days). After this time, emails are not searchable and are not shown in the GUI anymore. Also, you can adjust `reportedTtlDays` to configure the retention time of reported emails (default is two years):
```yaml title="shared/guarded_tenants.yml" theme={null}
tenants:
- name: xorlab
bccFallbackDomain: xorlab.com
domains:
- xorlab.com
## Data retention configuration
dataRetention:
## Duration after which benign mails are deleted.
deliveredTtlDays: 90
## Duration after which reported messages are deleted.
reportedTtlDays: 730
```
**Retention time**
If you are unsure about the retention time, please contact [support@xorlab.com](mailto:support@xorlab.com). The retention time directly influences the required disk space on the XCC. If you choose the retention time too high, you might run out of disk space.
To get an idea about the required disk space, please refer to the [*xorlab Security Platform Sizing Guide*](/9.0/sizing-guide)—it provides the required disk space for the Control Center with the retention time set to the default of 90 days.
**Quarantined emails**
These values do not influence the retention of quarantined emails. This is configured separately in [*Quarantines*](data-retention.md/#quarantines). Follow the instructions there to adjust the retention of quarantined emails.
7. Now, open the `active_guard.yml` file located in the `activeguard/core/` folders. Set the `templateDomain` property to the domain that resolves to the MTAs through (possibly internal) MX records:
```yaml theme={null}
templateDomain: mx.xor.activeguard.cloud
```
For **on-premises xorlab Security Platform**, this domain has been setup as a part of the [*xorlab Security Platform VM Setup Guide*](/9.0/vm-setup-guide). For **xorlab Security Platform (SaaS)**, this domain is provided to you by xorlab as a part of the onboarding.
### Trusted MTAs
Now we need to configure the trusted MTAs—please read [*Trusted MTAs*](/9.0/trusted-mtas) first.
**Microsoft 365**
For Microsoft 365 integrations, the trusted MTA configuration in xorlab Security Platform does not need to be changed and comes already preconfigured with xorlab Security Platform.
1. Open the `activeguard/core/active_guard.yml` file and configure the `trustedMTAProfiles` according to your setup. Please take a look at the [examples](/9.0/trusted-mtas#common-examples) as they might already cover what you need.
2. Open the `activeguard/core/startup_cfg/spamass/local.cf` file and add the IP address or the IP range of all trusted MTAs in the following way:
```shell theme={null}
# Set which networks or MTAs are considered 'trusted'
trusted_networks 1.2/16 5/8 # all in 1.2.*.* and 5.*.*.*
trusted_networks 212.17.35.15 # specific address
trusted_networks 1. # all in 1.*.*.*
```
Note that this is not required if the trusted MTA sends emails to xorlab Security Platform with a private IP address (RFC1918).
### Email routing
The email routing configuration for xorlab Security Platform is described in *[SMTP Configuration](/9.0/smtp-configuration)*. Please follow the instructions there to configure the email routing according to your setup. The page includes additional configuration like TLS policies or the maximum allowed message size.
**Microsoft 365**
For Microsoft 365 integration, have a look at [M365 SMTP Configuration](/9.0/smtp-configuration#microsoft-365).
Now, apply all previous configuration by clicking the **Publish** button and entering a comment. Afterwards, restart the corresponding components as described in [*How to Activate the Configuration*](/9.0/activate-configuration) to activate the changes.
### List configuration
In the next step, inform XSP about special mailboxes that exist in your organization. This will allow XSP better detecting targeted attacks on high-value targets as well as display name impersonation (e.g., CEO fraud). For this, please read [*VIP Impersonation, High-Value Targets, and Exposed Accounts*](/9.0/vips) and fill at least the following lists:
* **VIP names**
* **High-value targets**
* **Exposed accounts**
### Integration options
You can integrate xorlab Security Platform with your mailing system in a couple of ways. First of all, you can choose either [inline or monitoring mode](/9.0/inline-and-monitoring-mode): the first actively filters emails, and the latter just monitors the traffic (all messages are delivered to recipients). This mode is independent of the actual type of integration and can be applied to almost all solutions.
As you can see from the [diagrams in the *Integration* chapter](/9.0/integrations-overview), XSP can be integrated both with on-prem and SaaS systems: [Microsoft 365](/9.0/essential-setup-for-m365) (also using [Azure AD services for SAML authentication](/9.0/saml-aad-authentication)), on-prem [Exchange 2016/2019 server](/9.0/exchange-20162019-inline), and [Cisco ESA](/9.0/cisco-esa-monitor) (in monitoring mode). The reporting feature which allows users to report suspicious messages for further analysis (by admins or automatically), [can be added to any app](/9.0/reporting-integration) that offers a configurable Report Message button. In M365, [case isolation](/9.0/case-isolation-for-o365) feature is available: admins can delete a delivered suspicious message from a user’s mailbox just by clicking a button in xorlab Control Center (XCC).
### Learning phase
xorlab Security Platform requires an initial learning phase in the beginning, during which it builds up the relationship models and local reputations. In the course of this phase, XSP must already see (i.e., process) all incoming as well as outgoing emails of your organization.
The learning phase is configured by activating a predefined set of learning profiles. To get more information about profiles and see all available configurations, you can read *[Actions, Rules and Profiles](/9.0/actions-rules-and-profiles)*.
If you have already completed the learning phase, you can skip the next few instructions and go directly to [*Activating inbound email security*](#activating-inbound-email-security).
During the learning phase, xorlab Security Platform can either run with an active but reduced inbound email security or completely passive “toothless” mode (xorlab Security Platform will not do any actions on the email traffic). According to your preference, configure the corresponding mode as described here:
* [*Learning with active defense*](/9.0/actions-rules-and-profiles#learning-phase-with-active-defense)
* [*Learning with passive defense*](/9.0/actions-rules-and-profiles#learning-phase-with-passive-defense-evaluation-mode)
Afterwards, you can start forwarding your emails to xorlab Security Platform to begin the learning phase.
**Passive learning phase**
During a passive learning phase, you can still see what xorlab Security Platform would have done with the email (e.g., if it would have been quarantined). It is therefore a good opportunity to verify that emails will be handled as expected without actually impacting the traffic.
After two weeks, you can proceed with the next step to activate the default inbound email security.
### Activating inbound email security
To activate the normal inbound email security, configure the default profiles according to the [*Standard profile*](/9.0/actions-rules-and-profiles#standard). With this, xorlab Security Platform is ready and the inbound email defense is fully functioning.
### Fine-tuning the system
Next, you can configure the global policies that should be active for different classifications of xorlab Security Platform by visiting the [Actions panel](/9.0/actions-rules-and-profiles#actions-panel) in the XCC. You can also manually enter the [rule parameters](/9.0/actions-rules-and-profiles#rule-parameters) and their values into the `local.properties` file.
We recommend you to check the [*Detection Tuning*](/9.0/detection-tuning) guide to customize the detection to your environment.
## Reporting integration
For an additional layer of defense, your users can report suspicious emails that appeared in their inboxes. Reporting is a built-in feature of xorlab Security Platform and requires just a few [configuration steps](/9.0/reporting-integration).
## Additional configuration
When you are done with the basic configuration of XSP, proceed to the [next article](/9.0/additional-config), which covers additional settings that you might find useful, such as event logging or user authentication.
4. In the folder view in the left pane, expand the `shared` folder, then click the `guarded_tenants.yml` file:
5. Under the `domains` section, enter the list of [guarded tenant domains](/9.0/terminology#guarded-tenant-domains). If you need to include subdomains for a domain, add an extra entry with wildcards. Set the `bccFallbackDomain` to your main domain:
```yaml title="shared/guarded_tenants.yml" theme={null}
tenants:
- name: xorlab
bccFallbackDomain: xorlab.com
domains:
- xorlab.com
- "**.xorlab.com" # To include subdomains; note the required quotes
```
6. Navigate to the `shared` folder, expand it and open the `guarded_tenants.yml` file. Set the value of `deliveredTtlDays` to the number of days xorlab should keep the metadata of processed emails if it differs from the default (90 days). After this time, emails are not searchable and are not shown in the GUI anymore. Also, you can adjust `reportedTtlDays` to configure the retention time of reported emails (default is two years):
```yaml title="shared/guarded_tenants.yml" theme={null}
tenants:
- name: xorlab
bccFallbackDomain: xorlab.com
domains:
- xorlab.com
## Data retention configuration
dataRetention:
## Duration after which benign mails are deleted.
deliveredTtlDays: 90
## Duration after which reported messages are deleted.
reportedTtlDays: 730
```
**Retention time**
If you are unsure about the retention time, please contact [support@xorlab.com](mailto:support@xorlab.com). The retention time directly influences the required disk space on the XCC. If you choose the retention time too high, you might run out of disk space.
To get an idea about the required disk space, please refer to the [*xorlab Security Platform Sizing Guide*](/9.0/sizing-guide)—it provides the required disk space for the Control Center with the retention time set to the default of 90 days.
**Quarantined emails**
These values do not influence the retention of quarantined emails. This is configured separately in [*Quarantines*](data-retention.md/#quarantines). Follow the instructions there to adjust the retention of quarantined emails.
7. Now, open the `active_guard.yml` file located in the `activeguard/core/` folders. Set the `templateDomain` property to the domain that resolves to the MTAs through (possibly internal) MX records:
```yaml theme={null}
templateDomain: mx.xor.activeguard.cloud
```
For **on-premises xorlab Security Platform**, this domain has been setup as a part of the [*xorlab Security Platform VM Setup Guide*](/9.0/vm-setup-guide). For **xorlab Security Platform (SaaS)**, this domain is provided to you by xorlab as a part of the onboarding.
### Trusted MTAs
Now we need to configure the trusted MTAs—please read [*Trusted MTAs*](/9.0/trusted-mtas) first.
**Microsoft 365**
For Microsoft 365 integrations, the trusted MTA configuration in xorlab Security Platform does not need to be changed and comes already preconfigured with xorlab Security Platform.
1. Open the `activeguard/core/active_guard.yml` file and configure the `trustedMTAProfiles` according to your setup. Please take a look at the [examples](/9.0/trusted-mtas#common-examples) as they might already cover what you need.
2. Open the `activeguard/core/startup_cfg/spamass/local.cf` file and add the IP address or the IP range of all trusted MTAs in the following way:
```shell theme={null}
# Set which networks or MTAs are considered 'trusted'
trusted_networks 1.2/16 5/8 # all in 1.2.*.* and 5.*.*.*
trusted_networks 212.17.35.15 # specific address
trusted_networks 1. # all in 1.*.*.*
```
Note that this is not required if the trusted MTA sends emails to xorlab Security Platform with a private IP address (RFC1918).
### Email routing
The email routing configuration for xorlab Security Platform is described in *[SMTP Configuration](/9.0/smtp-configuration)*. Please follow the instructions there to configure the email routing according to your setup. The page includes additional configuration like TLS policies or the maximum allowed message size.
**Microsoft 365**
For Microsoft 365 integration, have a look at [M365 SMTP Configuration](/9.0/smtp-configuration#microsoft-365).
Now, apply all previous configuration by clicking the **Publish** button and entering a comment. Afterwards, restart the corresponding components as described in [*How to Activate the Configuration*](/9.0/activate-configuration) to activate the changes.
### List configuration
In the next step, inform XSP about special mailboxes that exist in your organization. This will allow XSP better detecting targeted attacks on high-value targets as well as display name impersonation (e.g., CEO fraud). For this, please read [*VIP Impersonation, High-Value Targets, and Exposed Accounts*](/9.0/vips) and fill at least the following lists:
* **VIP names**
* **High-value targets**
* **Exposed accounts**
### Integration options
You can integrate xorlab Security Platform with your mailing system in a couple of ways. First of all, you can choose either [inline or monitoring mode](/9.0/inline-and-monitoring-mode): the first actively filters emails, and the latter just monitors the traffic (all messages are delivered to recipients). This mode is independent of the actual type of integration and can be applied to almost all solutions.
As you can see from the [diagrams in the *Integration* chapter](/9.0/integrations-overview), XSP can be integrated both with on-prem and SaaS systems: [Microsoft 365](/9.0/essential-setup-for-m365) (also using [Azure AD services for SAML authentication](/9.0/saml-aad-authentication)), on-prem [Exchange 2016/2019 server](/9.0/exchange-20162019-inline), and [Cisco ESA](/9.0/cisco-esa-monitor) (in monitoring mode). The reporting feature which allows users to report suspicious messages for further analysis (by admins or automatically), [can be added to any app](/9.0/reporting-integration) that offers a configurable Report Message button. In M365, [case isolation](/9.0/case-isolation-for-o365) feature is available: admins can delete a delivered suspicious message from a user’s mailbox just by clicking a button in xorlab Control Center (XCC).
### Learning phase
xorlab Security Platform requires an initial learning phase in the beginning, during which it builds up the relationship models and local reputations. In the course of this phase, XSP must already see (i.e., process) all incoming as well as outgoing emails of your organization.
The learning phase is configured by activating a predefined set of learning profiles. To get more information about profiles and see all available configurations, you can read *[Actions, Rules and Profiles](/9.0/actions-rules-and-profiles)*.
If you have already completed the learning phase, you can skip the next few instructions and go directly to [*Activating inbound email security*](#activating-inbound-email-security).
During the learning phase, xorlab Security Platform can either run with an active but reduced inbound email security or completely passive “toothless” mode (xorlab Security Platform will not do any actions on the email traffic). According to your preference, configure the corresponding mode as described here:
* [*Learning with active defense*](/9.0/actions-rules-and-profiles#learning-phase-with-active-defense)
* [*Learning with passive defense*](/9.0/actions-rules-and-profiles#learning-phase-with-passive-defense-evaluation-mode)
Afterwards, you can start forwarding your emails to xorlab Security Platform to begin the learning phase.
**Passive learning phase**
During a passive learning phase, you can still see what xorlab Security Platform would have done with the email (e.g., if it would have been quarantined). It is therefore a good opportunity to verify that emails will be handled as expected without actually impacting the traffic.
After two weeks, you can proceed with the next step to activate the default inbound email security.
### Activating inbound email security
To activate the normal inbound email security, configure the default profiles according to the [*Standard profile*](/9.0/actions-rules-and-profiles#standard). With this, xorlab Security Platform is ready and the inbound email defense is fully functioning.
### Fine-tuning the system
Next, you can configure the global policies that should be active for different classifications of xorlab Security Platform by visiting the [Actions panel](/9.0/actions-rules-and-profiles#actions-panel) in the XCC. You can also manually enter the [rule parameters](/9.0/actions-rules-and-profiles#rule-parameters) and their values into the `local.properties` file.
We recommend you to check the [*Detection Tuning*](/9.0/detection-tuning) guide to customize the detection to your environment.
## Reporting integration
For an additional layer of defense, your users can report suspicious emails that appeared in their inboxes. Reporting is a built-in feature of xorlab Security Platform and requires just a few [configuration steps](/9.0/reporting-integration).
## Additional configuration
When you are done with the basic configuration of XSP, proceed to the [next article](/9.0/additional-config), which covers additional settings that you might find useful, such as event logging or user authentication.