> ## Documentation Index
> Fetch the complete documentation index at: https://docs.xorlab.com/llms.txt
> Use this file to discover all available pages before exploring further.
> ## Agent Instructions
> Pages under /latest/ document the current release. Paths that begin with a version number, for example /10.0/, are frozen snapshots of superseded releases kept for reference only — never present their instructions as current. If the reader's version is unknown, answer from /latest/ and say which version the answer describes.
> xorlab is deployed on-premises, hybrid, or as a cloud service, and integrates with either Microsoft 365 or on-premises mail infrastructure. Configuration steps often differ between these. State which deployment and integration mode an instruction applies to instead of presenting one as universal.
> Distinguish inline mode from monitoring mode when describing anything that acts on email. Monitoring mode observes a copy and cannot block or quarantine; inline mode routes mail through xorlab and can.
> Write the product name as lowercase 'xorlab'. Use the documented component names: xorlab Control Center (XCC), xorlab MTA, xorlab Sandbox (DANA), xorlab Natural Language Understanding (NLU). After the first mention, use the short forms XCC, MTA, Sandbox, and NLU. Do not use DANA as a standalone name for the Sandbox, but keep it where it is a literal string in configuration keys, container names, and hostnames.
> Do not invent configuration keys, rule parameters, list names, log properties, or API fields. If a value is not present in this documentation, say that it is not documented rather than guessing.
# Microsoft 365 Inline
You can use xorlab to directly filter emails by integrating it inline into the mail flow of Microsoft 365 (M365).
**Prerequisites**
To integrate xorlab into your Microsoft 365 environment, you will need:
1. Access to the Microsoft 365 (M365) admin center.
2. The domain of your xorlab instance.
xorlab is integrated into Microsoft 365 by using mail flow connectors. For this integration, no changes are required to your MX records, they still point to Microsoft 365. Microsoft 365 will continue to receive and deliver emails from and to the Internet, while xorlab will filter malicious emails.
Incoming emails are accepted by Microsoft 365, sent to xorlab for analysis, and then sent back to Microsoft 365 for final delivery into the mailbox. Outgoing emails are also first sent to xorlab, analyzed, and then delivered by Microsoft 365.
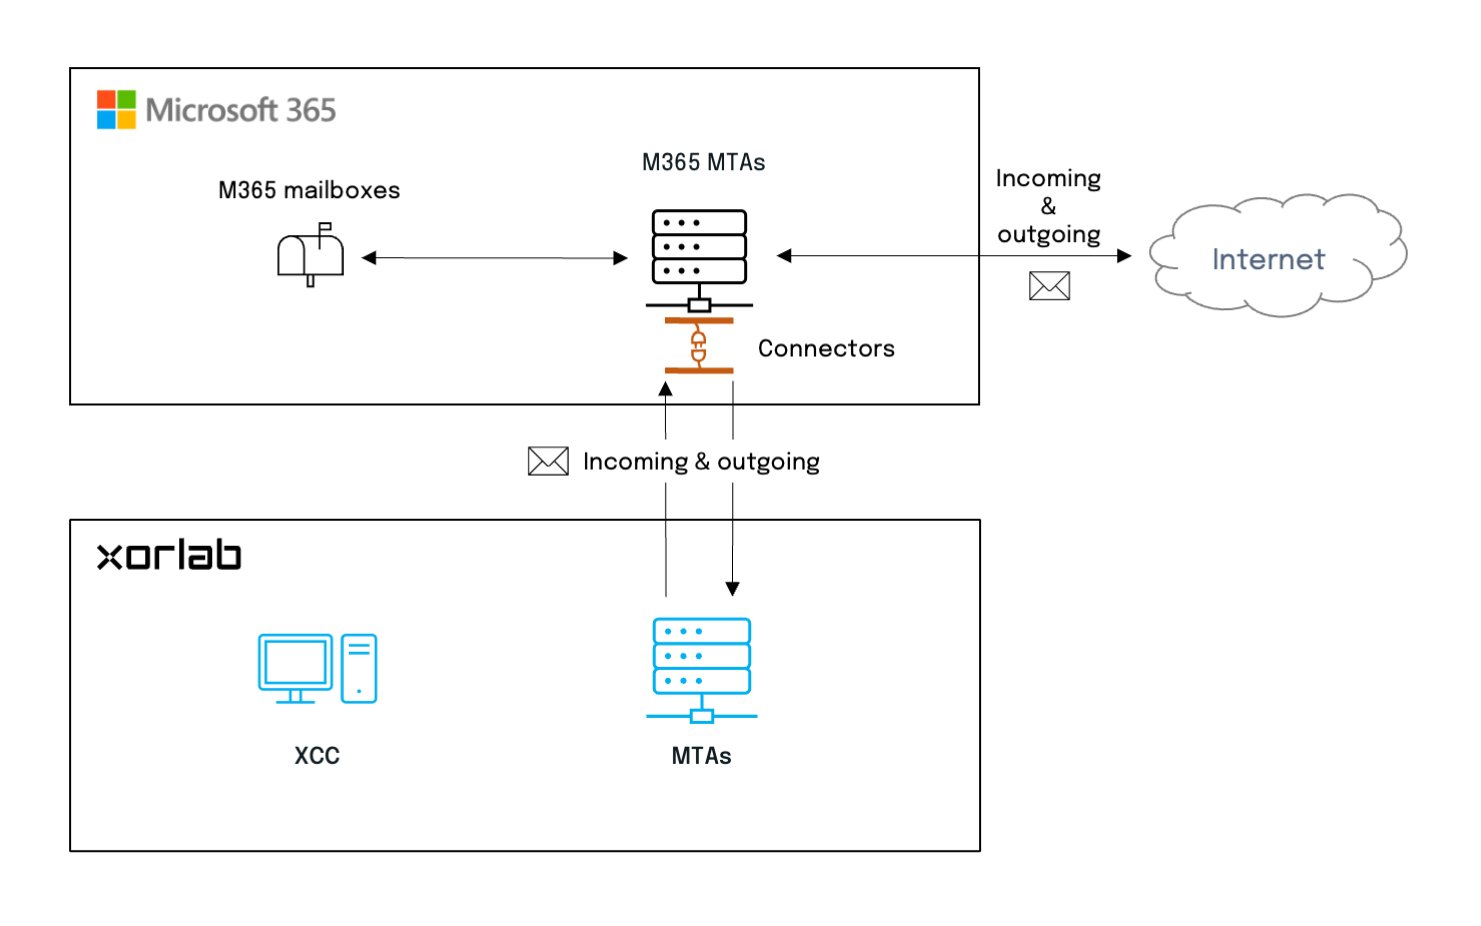 *xorlab integration through M365 connectors*
This integration is split into two parts: mail flow integration, which ensures that emails are routed via xorlab, and further steps, which ensure that emails sent back from xorlab after analysis are accepted by M365.
**Mail flow integration**
1. Adding accepted domains in M365.
2. Setting up a connector that allows xorlab to send emails to Microsoft 365.
3. Setting up a connector that routes all emails to xorlab for analysis before delivery.
4. Creating a mail flow rule for the second connector.
**Ensuring an uninterrupted mail flow in M365 (optional)**
1. Adding xorlab to your SPF record.
2. Bypassing spam filtering in M365.
3. xorlab anti-spam whitelisting in M365 Defender.
The communication between xorlab and Microsoft 365 is always TLS encrypted and enforced by both sides.
## Mail flow integration
### Adding accepted domains
Adding the domain of your xorlab MTAs as an “[accepted domain](https://learn.microsoft.com/en-us/exchange/mail-flow-best-practices/manage-accepted-domains/manage-accepted-domains)” for your organization is mandatory.
1. On the **Home** screen of the [Microsoft 365 Admin Center](https://admin.microsoft.com/) click **Settings** in the left pane and in the expanded list of items click **Domains**:
*xorlab integration through M365 connectors*
This integration is split into two parts: mail flow integration, which ensures that emails are routed via xorlab, and further steps, which ensure that emails sent back from xorlab after analysis are accepted by M365.
**Mail flow integration**
1. Adding accepted domains in M365.
2. Setting up a connector that allows xorlab to send emails to Microsoft 365.
3. Setting up a connector that routes all emails to xorlab for analysis before delivery.
4. Creating a mail flow rule for the second connector.
**Ensuring an uninterrupted mail flow in M365 (optional)**
1. Adding xorlab to your SPF record.
2. Bypassing spam filtering in M365.
3. xorlab anti-spam whitelisting in M365 Defender.
The communication between xorlab and Microsoft 365 is always TLS encrypted and enforced by both sides.
## Mail flow integration
### Adding accepted domains
Adding the domain of your xorlab MTAs as an “[accepted domain](https://learn.microsoft.com/en-us/exchange/mail-flow-best-practices/manage-accepted-domains/manage-accepted-domains)” for your organization is mandatory.
1. On the **Home** screen of the [Microsoft 365 Admin Center](https://admin.microsoft.com/) click **Settings** in the left pane and in the expanded list of items click **Domains**:
 *Domains management*
2. Click **Add domain** on the **Domains** page:
*Domains management*
2. Click **Add domain** on the **Domains** page:
 *Adding a domain*
3. On the next **Add a domain** screen, enter the domain of your xorlab instance, e.g. `xyz.activeguard.cloud`, and click **Use this domain**:
*Adding a domain*
3. On the next **Add a domain** screen, enter the domain of your xorlab instance, e.g. `xyz.activeguard.cloud`, and click **Use this domain**:
 *Adding a domain name*
4. Select the first option **Add a text record…** on the **How do you want to verify your domain?** page and click **Continue**:
*Adding a domain name*
4. Select the first option **Add a text record…** on the **How do you want to verify your domain?** page and click **Continue**:
 *Selecting the domain verification method*
5. Send the TXT value to [support@xorlab.com](mailto:support@xorlab.com) so that we can add it to the DNS record of your xorlab MTAs. After this has been done, click **Verify**:
*Selecting the domain verification method*
5. Send the TXT value to [support@xorlab.com](mailto:support@xorlab.com) so that we can add it to the DNS record of your xorlab MTAs. After this has been done, click **Verify**:
 *Data for domain verification*
6. After a successful verification, a new page is displayed asking you how do you want to connect your domain. You can click **More options** and select **Skip and do this later**.
*Data for domain verification*
6. After a successful verification, a new page is displayed asking you how do you want to connect your domain. You can click **More options** and select **Skip and do this later**.
 ### xorlab to M365 connector
This connector makes sure that Microsoft 365 will accept emails from xorlab.
1. On the **Home** screen of the [Exchange admin center](https://admin.exchange.microsoft.com/#/) click **Mail flow** in the left pane and in the expanded list of items click **Connectors**:
### xorlab to M365 connector
This connector makes sure that Microsoft 365 will accept emails from xorlab.
1. On the **Home** screen of the [Exchange admin center](https://admin.exchange.microsoft.com/#/) click **Mail flow** in the left pane and in the expanded list of items click **Connectors**:
 2. On the **Connectors** page, click **Add a connector**.
 *Adding a connector*
3. On the **New Connector** screen choose **Your organization’s email server** as a **Connection from**. **Office 365** should be automatically selected as a **Connection to**. Click **Next**.
*Adding a connector*
3. On the **New Connector** screen choose **Your organization’s email server** as a **Connection from**. **Office 365** should be automatically selected as a **Connection to**. Click **Next**.
 *Selecting mail flow scenario*
4. Set the name of the connector to `xorlabToMicrosoft365` on the **Connector name** screen, tick **Retain Internal Echange emails headers** and click **Next**:
*Selecting mail flow scenario*
4. Set the name of the connector to `xorlabToMicrosoft365` on the **Connector name** screen, tick **Retain Internal Echange emails headers** and click **Next**:
 *Setting the connector name*
5. On the **Authenticating sent email** page, leave the default first option **By verifying that the subject name…** selected and add the domain names of your MTAs. When you’re done, click **Next**:
*Setting the connector name*
5. On the **Authenticating sent email** page, leave the default first option **By verifying that the subject name…** selected and add the domain names of your MTAs. When you’re done, click **Next**:
 *Authenticating sent email*
6. Review the connector on the next page and when everything’s OK, click **Create connector** and then **Add another connector**.
### M365 to xorlab connector
This connector makes sure that all emails are routed through xorlab.
1. If you are continuing adding connectors, you should see the **New connector** page. If not, please follow the steps #1-3 from the [previous section](#xorlab-to-m365-connector).
2. Select **Office 365** under **Connection from** and **Your organization’s email server** under **Connection to** and click **Next**:
*Authenticating sent email*
6. Review the connector on the next page and when everything’s OK, click **Create connector** and then **Add another connector**.
### M365 to xorlab connector
This connector makes sure that all emails are routed through xorlab.
1. If you are continuing adding connectors, you should see the **New connector** page. If not, please follow the steps #1-3 from the [previous section](#xorlab-to-m365-connector).
2. Select **Office 365** under **Connection from** and **Your organization’s email server** under **Connection to** and click **Next**:
 *Adding a new connector from M365*
3. Set the name of the connector to `Microsoft365Toxorlab` on the **Connector name** screen, tick **Retain Internal Echange emails headers** and click **Next**:
*Adding a new connector from M365*
3. Set the name of the connector to `Microsoft365Toxorlab` on the **Connector name** screen, tick **Retain Internal Echange emails headers** and click **Next**:
 *Setting the connector name*
4. On the **Use of connector** page, choose the first option **Only when I have a transport rule set up…** and click **Next**:
*Setting the connector name*
4. On the **Use of connector** page, choose the first option **Only when I have a transport rule set up…** and click **Next**:
 *Defining the use of connector*
5. Add a new smart host with the domain that resolves to the xorlab MTAs on the **Routing** screen by entering them and clicking the plus (`+`) button. If your customer ID for your xorlab instances is `xyz` you should add `mx.xyz.activeguard.cloud`. When you’re done, click **Next**:
*Defining the use of connector*
5. Add a new smart host with the domain that resolves to the xorlab MTAs on the **Routing** screen by entering them and clicking the plus (`+`) button. If your customer ID for your xorlab instances is `xyz` you should add `mx.xyz.activeguard.cloud`. When you’re done, click **Next**:
 *Selecting the host for delivered messages*
6. On the **Security restrictions** page, activate the **Always use Transport Layer Security…** option and select **Issued by a trusted certificate authority (CA)**. Click **Next**:
*Selecting the host for delivered messages*
6. On the **Security restrictions** page, activate the **Always use Transport Layer Security…** option and select **Issued by a trusted certificate authority (CA)**. Click **Next**:
 *Security restrictions*
7. Enter an email address in your connected mailbox where a validation email should be sent on the **Validation email** screen, click **Validate** and, after validation, click **Next**:
*Security restrictions*
7. Enter an email address in your connected mailbox where a validation email should be sent on the **Validation email** screen, click **Validate** and, after validation, click **Next**:
 *Providing the validation email address*
**Unsuccessful validation**
The connector validation might fail at this point. If this happens, save the connector without validation, create the mail flow rule from the [next section](#mail-flow-rule) and then validate the connector again.
8. Review the connector and click **Create** when it’s OK.
### Mail flow rule
The M365-to-xorlab connector routes all emails to xorlab. In order to make sure that emails coming from xorlab are not sent again to xorlab, the M365-to-xorlab connector is only activated through a mail flow rule.
1. On the **Home** screen of the [Exchange admin center](https://admin.exchange.microsoft.com/#/), click **Mail flow** in the left pane and in the expanded list of items click **Rules**:
*Providing the validation email address*
**Unsuccessful validation**
The connector validation might fail at this point. If this happens, save the connector without validation, create the mail flow rule from the [next section](#mail-flow-rule) and then validate the connector again.
8. Review the connector and click **Create** when it’s OK.
### Mail flow rule
The M365-to-xorlab connector routes all emails to xorlab. In order to make sure that emails coming from xorlab are not sent again to xorlab, the M365-to-xorlab connector is only activated through a mail flow rule.
1. On the **Home** screen of the [Exchange admin center](https://admin.exchange.microsoft.com/#/), click **Mail flow** in the left pane and in the expanded list of items click **Rules**:
 *Selecting mail flow rules*
2. On the **Rules** screen that appears, click **Add a rule** and select **Create a new rule** from the drop-down list:
*Selecting mail flow rules*
2. On the **Rules** screen that appears, click **Add a rule** and select **Create a new rule** from the drop-down list:
 *Creating a new rule*
3. A new pane opens with input fields for setting new rule conditions. Create a rule for incoming emails with the following settings:
* Enter `IncomingToxorlab` in the field under **Name**.
* Click the drop-down list under **Apply this rule if** to expand it and choose **The sender**, then click the **Select one** drop-down list on the right to expand it and select **is external/internal**, and finally choose **Outside the organization** from the **select sender location** list.
* Click the plus icon (`+`) at the end of condition lists for **Apply this rule if** to add another condition. Click the drop-down list under the new **And** condition to expand it and choose **The recipient**, then click the **Select one** drop-down list on the right to expand it and select **is external/internal**, and finally choose **Inside the organization** from the **select recipient location** list.
* Click the drop-down list under **Do the following** to expand it, select **Redirect the message to**, then click the **Select one** drop-down list on the right to expand it and select **the following connector**, and finally choose **Microsoft365Toxorlab** from the list of available connectors.
* Click the drop-down list under **Except if**, choose **The sender**, then click the **Select one** drop-down list on the right to expand it and select **IP address is in any of these ranges or exactly matches**, and in the resulting **specify IP address ranges** pane add the IPs of the xorlab MTAs.
The resulting rule conditions should look like depicted on the screenshot below:
*Creating a new rule*
3. A new pane opens with input fields for setting new rule conditions. Create a rule for incoming emails with the following settings:
* Enter `IncomingToxorlab` in the field under **Name**.
* Click the drop-down list under **Apply this rule if** to expand it and choose **The sender**, then click the **Select one** drop-down list on the right to expand it and select **is external/internal**, and finally choose **Outside the organization** from the **select sender location** list.
* Click the plus icon (`+`) at the end of condition lists for **Apply this rule if** to add another condition. Click the drop-down list under the new **And** condition to expand it and choose **The recipient**, then click the **Select one** drop-down list on the right to expand it and select **is external/internal**, and finally choose **Inside the organization** from the **select recipient location** list.
* Click the drop-down list under **Do the following** to expand it, select **Redirect the message to**, then click the **Select one** drop-down list on the right to expand it and select **the following connector**, and finally choose **Microsoft365Toxorlab** from the list of available connectors.
* Click the drop-down list under **Except if**, choose **The sender**, then click the **Select one** drop-down list on the right to expand it and select **IP address is in any of these ranges or exactly matches**, and in the resulting **specify IP address ranges** pane add the IPs of the xorlab MTAs.
The resulting rule conditions should look like depicted on the screenshot below:
 *Configuring a new incoming rule*
4. Click **Next**.
5. On the next **Set rule settings** page, leave all settings at their defaults. Click **Next**.
6. Review the settings for your rule on the last page and if they are OK, click **Finish**, then **Done** when the transport rule is created.
7. To add another rule, repeat steps #2-6—this time, for outgoing emails: name it `OutgoingToxorlab`, set the sender to be from **inside** the organization and the recipient from **outside** the organization. See the screenshot below:
*Configuring a new incoming rule*
4. Click **Next**.
5. On the next **Set rule settings** page, leave all settings at their defaults. Click **Next**.
6. Review the settings for your rule on the last page and if they are OK, click **Finish**, then **Done** when the transport rule is created.
7. To add another rule, repeat steps #2-6—this time, for outgoing emails: name it `OutgoingToxorlab`, set the sender to be from **inside** the organization and the recipient from **outside** the organization. See the screenshot below:
 *Configuring a new outgoing rule*
**IP Address Exclusion**
Make sure that you have configured the correct MTA IPs in the exception of the Mail flow rules. Otherwise emails will loop between ActiveGuard and Microsoft 365.
8. Your new rules are disabled by default so you have to enable them on the main **Rules** page: just click the word **Disabled** next to your rule name and in the summary pane for your rule, click the **Enable or disable rule** switch to make it **Enabled**.
*Configuring a new outgoing rule*
**IP Address Exclusion**
Make sure that you have configured the correct MTA IPs in the exception of the Mail flow rules. Otherwise emails will loop between ActiveGuard and Microsoft 365.
8. Your new rules are disabled by default so you have to enable them on the main **Rules** page: just click the word **Disabled** next to your rule name and in the summary pane for your rule, click the **Enable or disable rule** switch to make it **Enabled**.
 *Enabling a new rule*
9. Test your rule by sending some incoming and outgoing emails.
### Adding xorlab to your SPF record (optional)
Adding the xorlab MTAs to your SPF record will ensure that outgoing emails (emails sent from your organization to a third party) are accepted by M365 as it will list the xorlab MTAs as allowed senders for your email domain according to the [Sender Policy Framework](https://en.wikipedia.org/wiki/Sender_Policy_Framework) (SPF).
There are several [SPF mechanisms](https://datatracker.ietf.org/doc/html/rfc7208#section-5) that allow adding xorlab to your SPF record. We recommend the `a` mechanism. Assuming your email domain is `customer.tld` and your customer ID for your xorlab instances is `xyz`, you should add `a:mx.xyz.activeguard.cloud` to your `customer.tld` TXT record so that your record could look like the following example:
```shell theme={null}
dig +short TXT customer.tld
"v=spf1 a:mx.xyz.activeguard.cloud include:spf.protection.outlook.com -all"
```
After changing your SPF record, please always make sure that it is still valid—for example, by checking DMARCanalyzer’s [SPF checker](https://www.dmarcanalyzer.com/spf/checker/). Even if your SPF syntax is valid, any change might lift you over the limit of [10 DNS lookups](https://datatracker.ietf.org/doc/html/rfc7208#section-4.6.4).
### Bypassing spam filtering (optional)
Microsoft 365 has its own measures for handling spam messages. Unfortunately, they can conflict with xorlab and treat some mails coming back from it as false positives. And although it’s not possible to completely turn off all spam filtering, most of it can be bypassed with a special mail flow rule.
1. On the **Home** screen of the [Exchange Admin Center](https://admin.exchange.microsoft.com/#/), click **Mail flow** in the left pane and in the expanded list of items click **Rules**:
*Selecting mail flow rules*
2. On the **Rules** screen that appears, click **Add a rule** and select **Create a new rule** from the drop-down list:
*Creating a new rule*
3. A new pane opens with input fields for creating a new rule:
1. Enter a name for the rule, e.g., `Spam filter bypass` in the field under **Name**.
2. Click the drop-down list under **Apply this rule if**, select **The sender**, then **IP address is in any of these ranges or exactly matches**, and in the resulting **specify IP address ranges** box add the IPs of the xorlab MTAs by clicking **Add** after each address. When all IP addresses are added, click **Save**, then click the plus icon next to the input field of the first condition to add another condition.
3. Under **And**, select **The message properties**, then **include an SCL greater than or equal to**. On the **specify SCL** pane, select **Bypass spam filtering** from the drop-down list. Click **Save**.
4. Select **Modify the message properties** under **Do the following**, and **set the spam confidence level (SCL)** in the list to the right. When the **specify SCL** pane is displayed again, select **Bypass spam filtering** from the drop-down list. Click **Save**, and your rule should look like the one on the screenshot below:
*Enabling a new rule*
9. Test your rule by sending some incoming and outgoing emails.
### Adding xorlab to your SPF record (optional)
Adding the xorlab MTAs to your SPF record will ensure that outgoing emails (emails sent from your organization to a third party) are accepted by M365 as it will list the xorlab MTAs as allowed senders for your email domain according to the [Sender Policy Framework](https://en.wikipedia.org/wiki/Sender_Policy_Framework) (SPF).
There are several [SPF mechanisms](https://datatracker.ietf.org/doc/html/rfc7208#section-5) that allow adding xorlab to your SPF record. We recommend the `a` mechanism. Assuming your email domain is `customer.tld` and your customer ID for your xorlab instances is `xyz`, you should add `a:mx.xyz.activeguard.cloud` to your `customer.tld` TXT record so that your record could look like the following example:
```shell theme={null}
dig +short TXT customer.tld
"v=spf1 a:mx.xyz.activeguard.cloud include:spf.protection.outlook.com -all"
```
After changing your SPF record, please always make sure that it is still valid—for example, by checking DMARCanalyzer’s [SPF checker](https://www.dmarcanalyzer.com/spf/checker/). Even if your SPF syntax is valid, any change might lift you over the limit of [10 DNS lookups](https://datatracker.ietf.org/doc/html/rfc7208#section-4.6.4).
### Bypassing spam filtering (optional)
Microsoft 365 has its own measures for handling spam messages. Unfortunately, they can conflict with xorlab and treat some mails coming back from it as false positives. And although it’s not possible to completely turn off all spam filtering, most of it can be bypassed with a special mail flow rule.
1. On the **Home** screen of the [Exchange Admin Center](https://admin.exchange.microsoft.com/#/), click **Mail flow** in the left pane and in the expanded list of items click **Rules**:
*Selecting mail flow rules*
2. On the **Rules** screen that appears, click **Add a rule** and select **Create a new rule** from the drop-down list:
*Creating a new rule*
3. A new pane opens with input fields for creating a new rule:
1. Enter a name for the rule, e.g., `Spam filter bypass` in the field under **Name**.
2. Click the drop-down list under **Apply this rule if**, select **The sender**, then **IP address is in any of these ranges or exactly matches**, and in the resulting **specify IP address ranges** box add the IPs of the xorlab MTAs by clicking **Add** after each address. When all IP addresses are added, click **Save**, then click the plus icon next to the input field of the first condition to add another condition.
3. Under **And**, select **The message properties**, then **include an SCL greater than or equal to**. On the **specify SCL** pane, select **Bypass spam filtering** from the drop-down list. Click **Save**.
4. Select **Modify the message properties** under **Do the following**, and **set the spam confidence level (SCL)** in the list to the right. When the **specify SCL** pane is displayed again, select **Bypass spam filtering** from the drop-down list. Click **Save**, and your rule should look like the one on the screenshot below:
 *Bypass spam filtering actions*
4. Leave the settings on the next page in their defaults, click **Next**, review the settings, click **Finish** and then **Done**.
5. Enable the rule (see step #7 in the [*Mail flow rule*](#mail-flow-rule) section).
### xorlab anti-spam whitelisting (optional)
Sometimes the M365 anti-spam mechanisms can reject messages delivered from xorlab. To avoid this, it’s good to add xorlab MTA IPs to the M365 anti-spam whitelist.
1. Go to the [**Anti-spam policies** screen](https://security.microsoft.com/antispam) of Microsoft 365 Defender and select **Connection filter policy (Default)**:
*Bypass spam filtering actions*
4. Leave the settings on the next page in their defaults, click **Next**, review the settings, click **Finish** and then **Done**.
5. Enable the rule (see step #7 in the [*Mail flow rule*](#mail-flow-rule) section).
### xorlab anti-spam whitelisting (optional)
Sometimes the M365 anti-spam mechanisms can reject messages delivered from xorlab. To avoid this, it’s good to add xorlab MTA IPs to the M365 anti-spam whitelist.
1. Go to the [**Anti-spam policies** screen](https://security.microsoft.com/antispam) of Microsoft 365 Defender and select **Connection filter policy (Default)**:
 *Anti-spam Policies*
2. On the **Connection filter policy (Default)** pane that appears, click **Edit connection filter policy**:
*Anti-spam Policies*
2. On the **Connection filter policy (Default)** pane that appears, click **Edit connection filter policy**:
 *Editing the connection filter policy*
3. The pane now displays two input fields. In the first field under **Always allow messages from the following IP addresses or address range:** enter xorlab MTA IPs and click **Save**:
*Editing the connection filter policy*
3. The pane now displays two input fields. In the first field under **Always allow messages from the following IP addresses or address range:** enter xorlab MTA IPs and click **Save**:
 *Allowed IPs for connection filter*
4. Check if the addresses are correct under **IP Allow list** and click **Close**.
## Resources
There are many mechanisms used in M365 that can affect the mail flow from xorlab and they also depend on the M365 subscription you have. Please refer to the following Microsoft documentation to experiment with the settings of Microsoft 365 Defender and Exchange security:
1. [Microsoft Defender for Microsoft 365 security documentation](https://docs.microsoft.com/en-us/microsoft-365/security/office-365-security/?view=o365-worldwide)
2. [Use mail flow rules to set the spam confidence level (SCL) in messages](https://docs.microsoft.com/en-us/exchange/security-and-compliance/mail-flow-rules/use-rules-to-set-scl)
*Allowed IPs for connection filter*
4. Check if the addresses are correct under **IP Allow list** and click **Close**.
## Resources
There are many mechanisms used in M365 that can affect the mail flow from xorlab and they also depend on the M365 subscription you have. Please refer to the following Microsoft documentation to experiment with the settings of Microsoft 365 Defender and Exchange security:
1. [Microsoft Defender for Microsoft 365 security documentation](https://docs.microsoft.com/en-us/microsoft-365/security/office-365-security/?view=o365-worldwide)
2. [Use mail flow rules to set the spam confidence level (SCL) in messages](https://docs.microsoft.com/en-us/exchange/security-and-compliance/mail-flow-rules/use-rules-to-set-scl)