> ## Documentation Index
> Fetch the complete documentation index at: https://docs.xorlab.com/llms.txt
> Use this file to discover all available pages before exploring further.
> ## Agent Instructions
> Pages under /latest/ document the current release. Paths that begin with a version number, for example /10.0/, are frozen snapshots of superseded releases kept for reference only — never present their instructions as current. If the reader's version is unknown, answer from /latest/ and say which version the answer describes.
> xorlab is deployed on-premises, hybrid, or as a cloud service, and integrates with either Microsoft 365 or on-premises mail infrastructure. Configuration steps often differ between these. State which deployment and integration mode an instruction applies to instead of presenting one as universal.
> Distinguish inline mode from monitoring mode when describing anything that acts on email. Monitoring mode observes a copy and cannot block or quarantine; inline mode routes mail through xorlab and can.
> Write the product name as lowercase 'xorlab'. Use the documented component names: xorlab Control Center (XCC), xorlab MTA, xorlab Sandbox (DANA), xorlab Natural Language Understanding (NLU). After the first mention, use the short forms XCC, MTA, Sandbox, and NLU. Do not use DANA as a standalone name for the Sandbox, but keep it where it is a literal string in configuration keys, container names, and hostnames.
> Do not invent configuration keys, rule parameters, list names, log properties, or API fields. If a value is not present in this documentation, say that it is not documented rather than guessing.
# SAML Authentication Using AAD Services
This article provides the necessary steps to integrate Azure SSO with xorlab so that users can be authorized in the Control Center with Microsoft Entra ID credentials.
The process consists of three main stages:
1. Creating your own SAML application in Entra ID.
2. Mapping roles from xorlab to Entra ID users/groups for this application.
3. Configuring xorlab to use the SAML app from Entra ID for authentication.
**Azure requirements**
Some of these actions require a proper Azure plan and/or user privileges, as described in the following chapter.
## Creating a SAML app in AD
In order to configure an SSO application, you need one of the following AD user roles:
* Global Administrator
* Cloud Application Administrator
* Application Administrator, or owner of the service principal.
For more information on how to enable SSO for an app, please refer to the [Microsoft documentation](https://docs.microsoft.com/en-us/azure/active-directory/manage-apps/add-application-portal-setup-sso).
**Did you create an Enterprise Application?**
Please create the xorlab enterprise application first, as described in *[Essential Setup for M365](/9.0/essential-setup-for-m365)*, then perform the following steps.
1. After creating a new enterprise application in *[Essential Setup for M365](/9.0/essential-setup-for-m365)*, go to the **Overview** page of this app, click **Single sign-on** in the left pane or **Set up single sign-on** tile in the center:
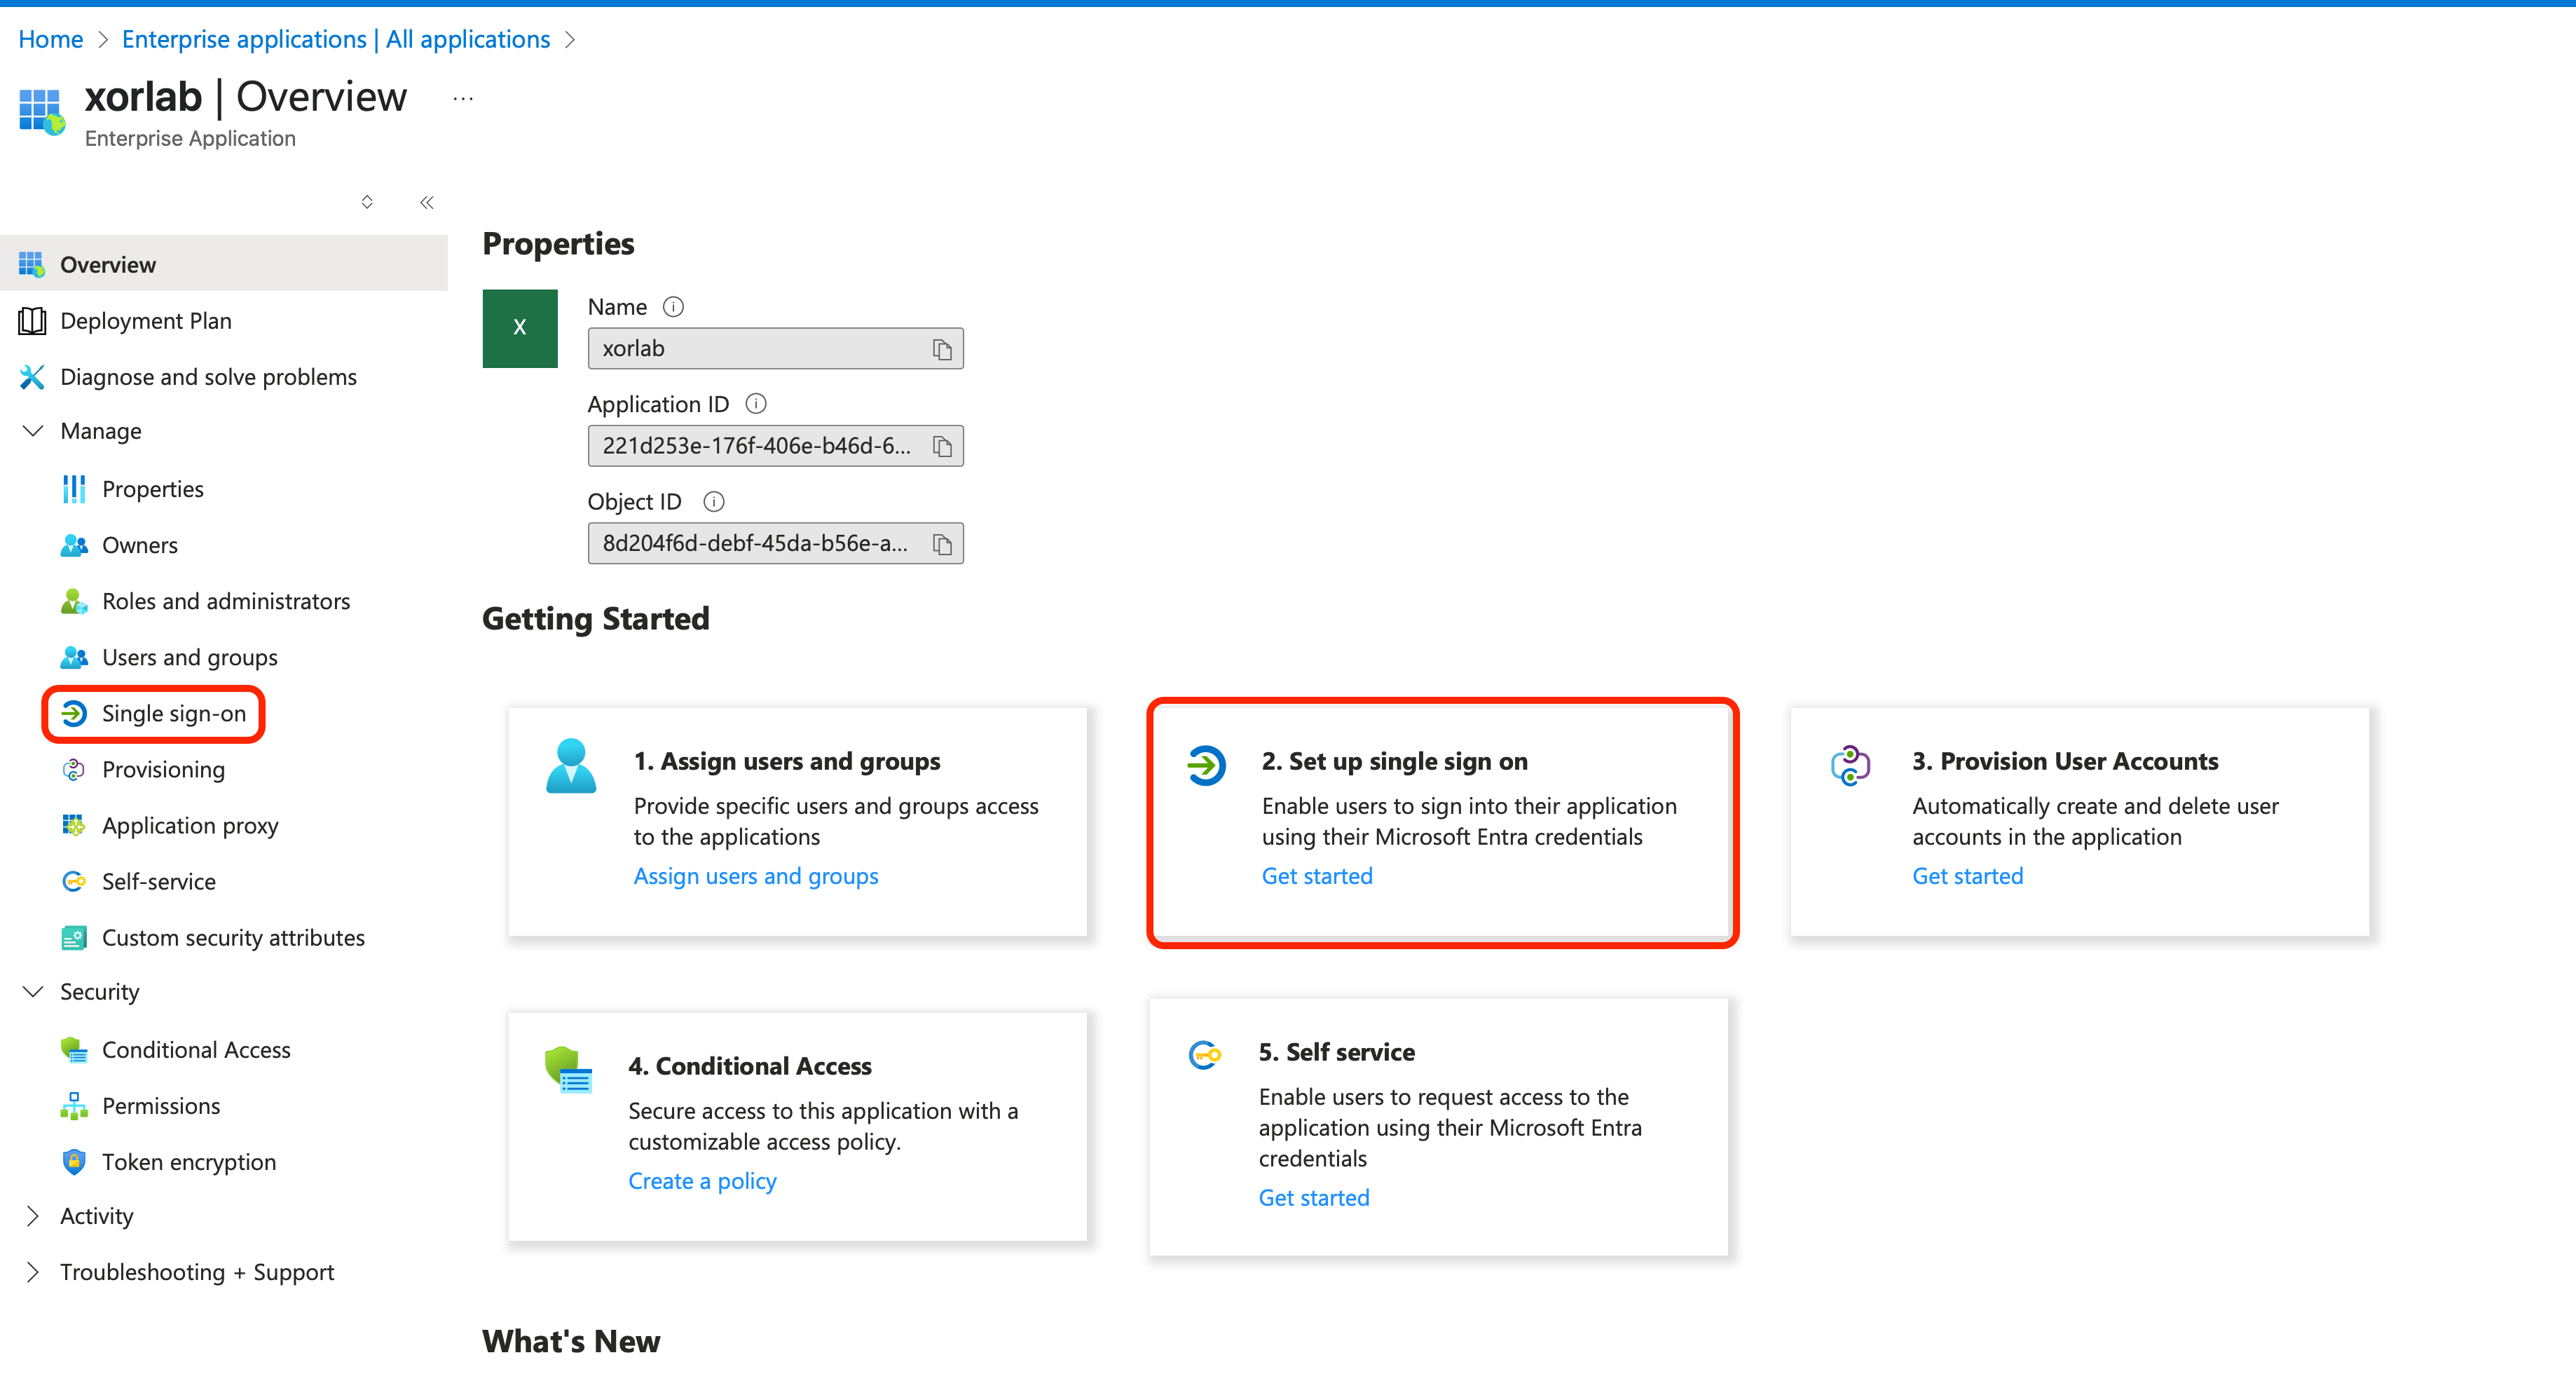 *Set up single sign-on*
2. On the **Single sign-on** page select a single sign-on method by clicking the **SAML** tile:
*Set up single sign-on*
2. On the **Single sign-on** page select a single sign-on method by clicking the **SAML** tile:
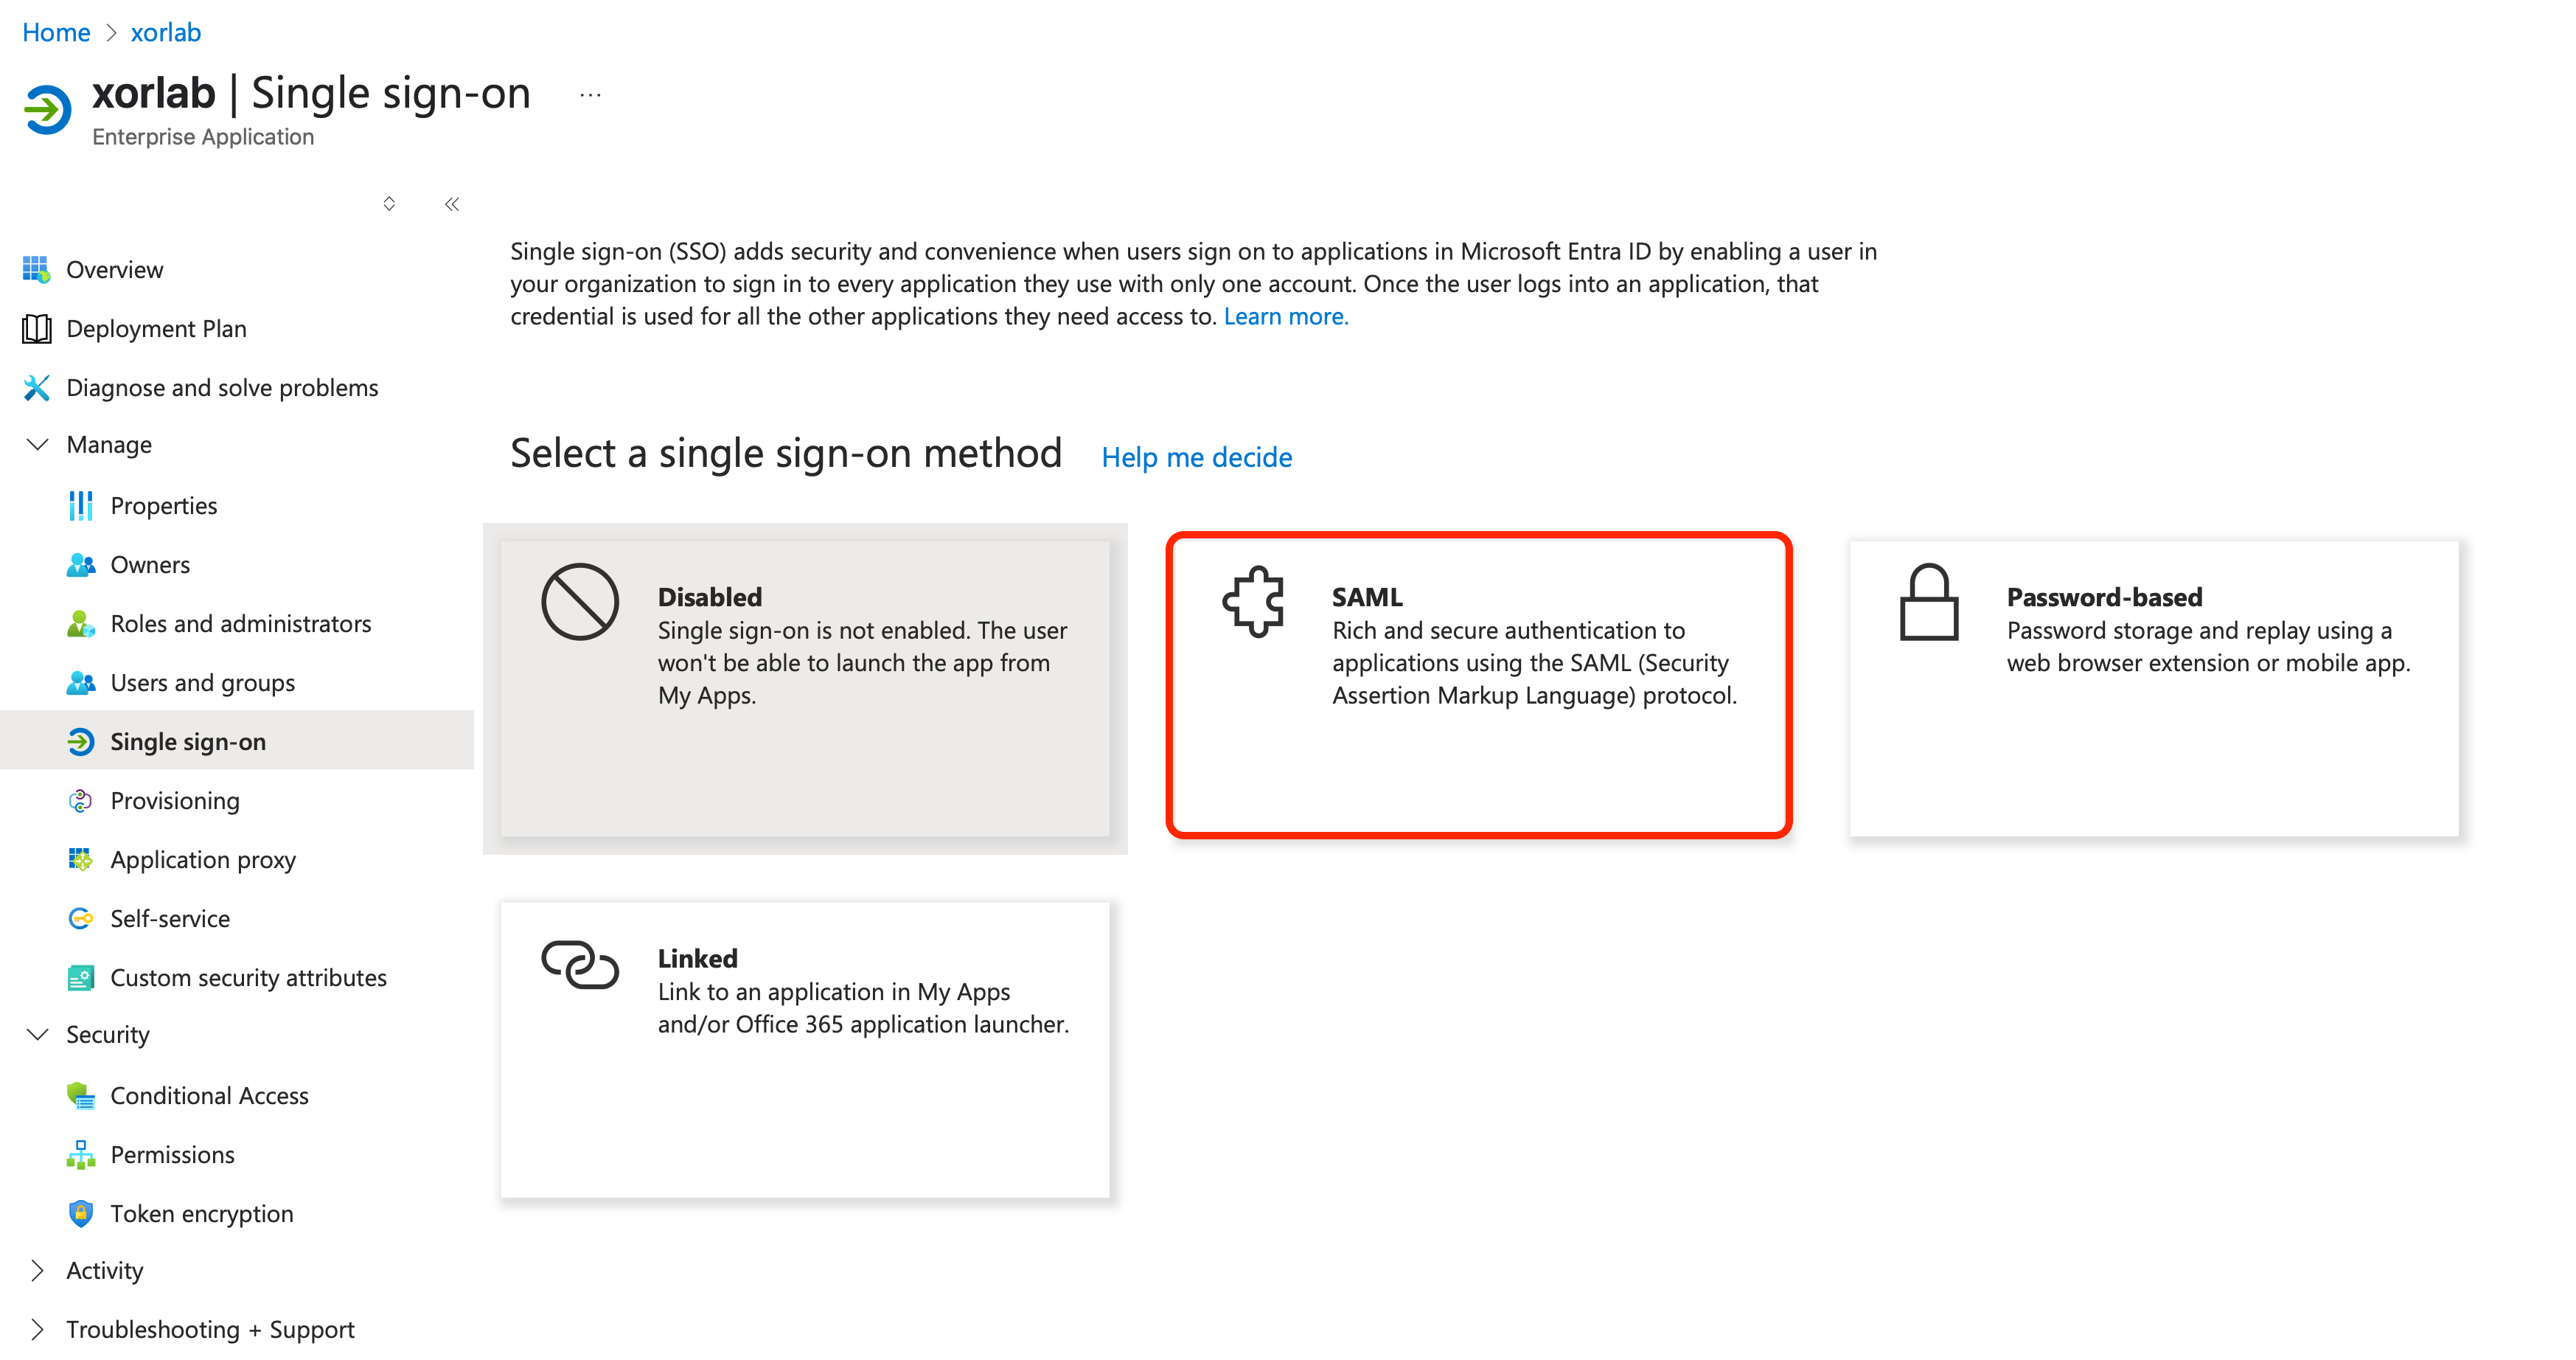 *Select the SAML method*
3. On the next page, click **Edit** in the **Basic SAML Configuration** tile:
*Select the SAML method*
3. On the next page, click **Edit** in the **Basic SAML Configuration** tile:
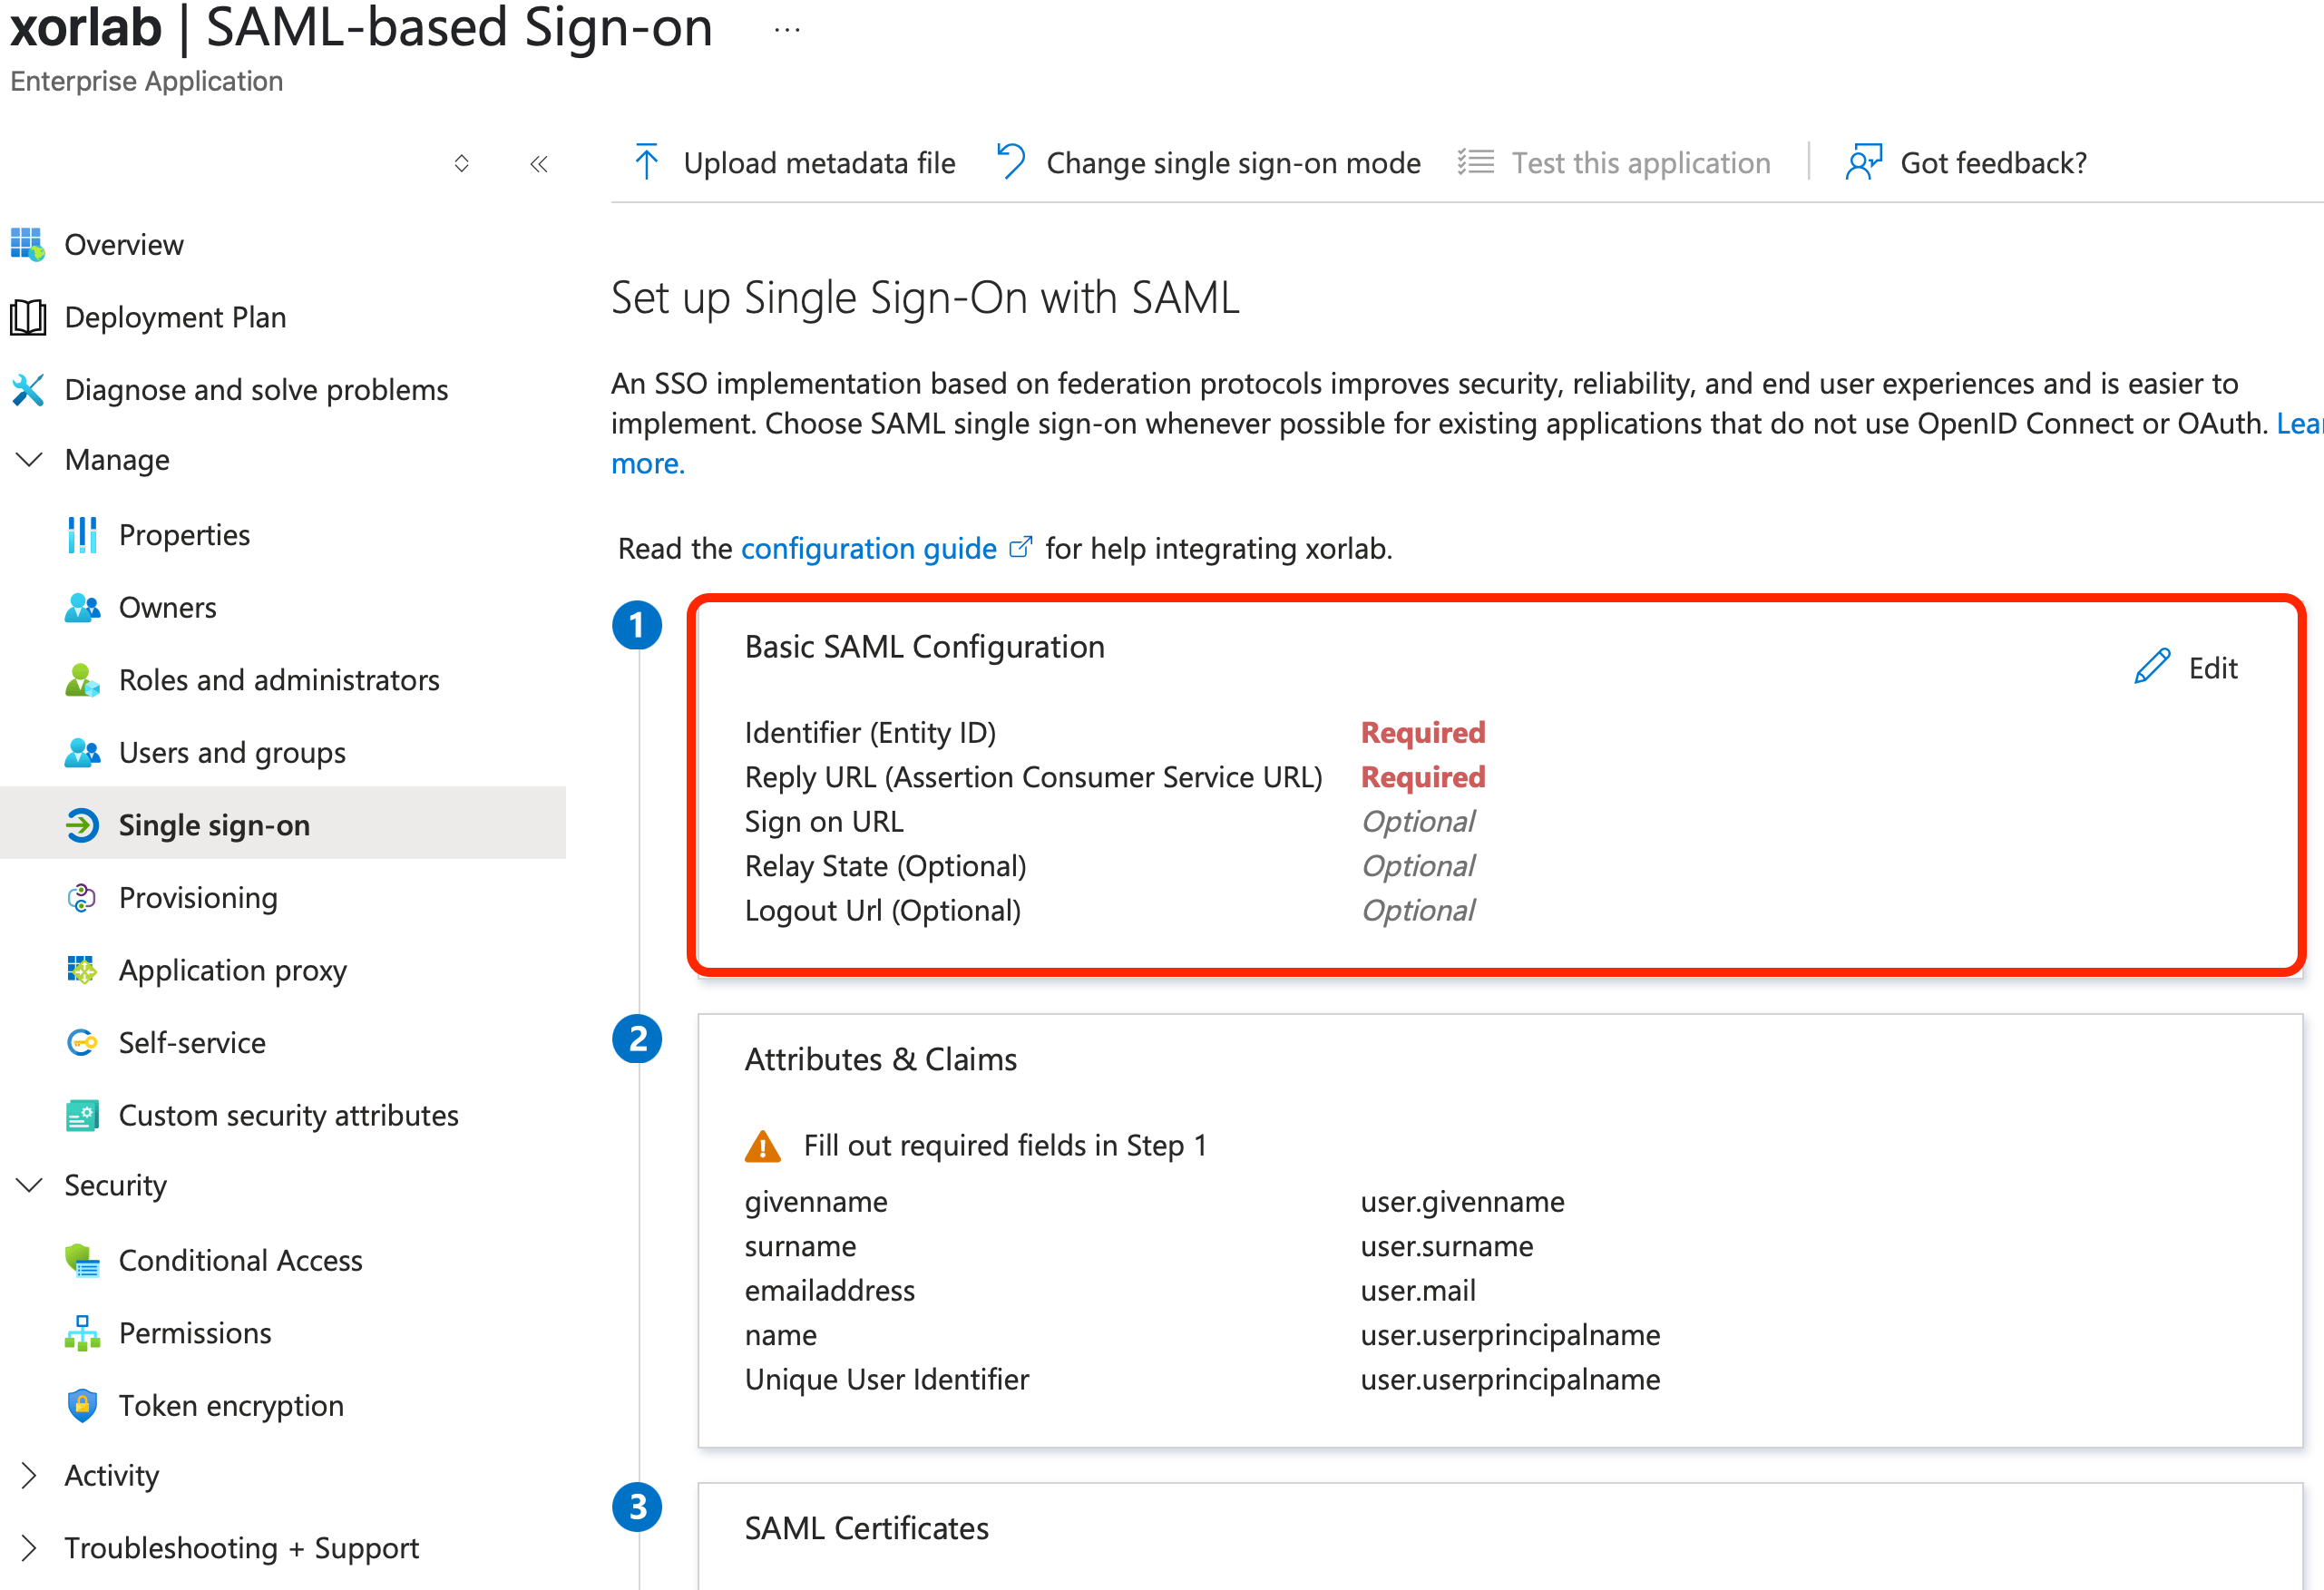 *Edit the basic SAML configuration*
4. In the **Basic SAML Configuration** pane that opens on the right, enter the following URLs in the first two input fields:
| Input field name | URL |
| :----------------------------------------- | :-------------------------------------------------------------------- |
| Identifier (Entity ID) | `https:///auth/saml2/service-provider-metadata/azureSaml` |
| Reply URL (Assertion Consumer Service URL) | `https:///auth/saml2/sso/azureSaml` |
where `xorlabHost` is the domain of the xorlab SaaS instance, e.g.,`xyz.activeguard.cloud` as in the screenshot below (for more information on SAML authorization in xorlab, please refer to *[SAML Based Authentication](/9.0/saml-based-authentication)*):
*Edit the basic SAML configuration*
4. In the **Basic SAML Configuration** pane that opens on the right, enter the following URLs in the first two input fields:
| Input field name | URL |
| :----------------------------------------- | :-------------------------------------------------------------------- |
| Identifier (Entity ID) | `https:///auth/saml2/service-provider-metadata/azureSaml` |
| Reply URL (Assertion Consumer Service URL) | `https:///auth/saml2/sso/azureSaml` |
where `xorlabHost` is the domain of the xorlab SaaS instance, e.g.,`xyz.activeguard.cloud` as in the screenshot below (for more information on SAML authorization in xorlab, please refer to *[SAML Based Authentication](/9.0/saml-based-authentication)*):
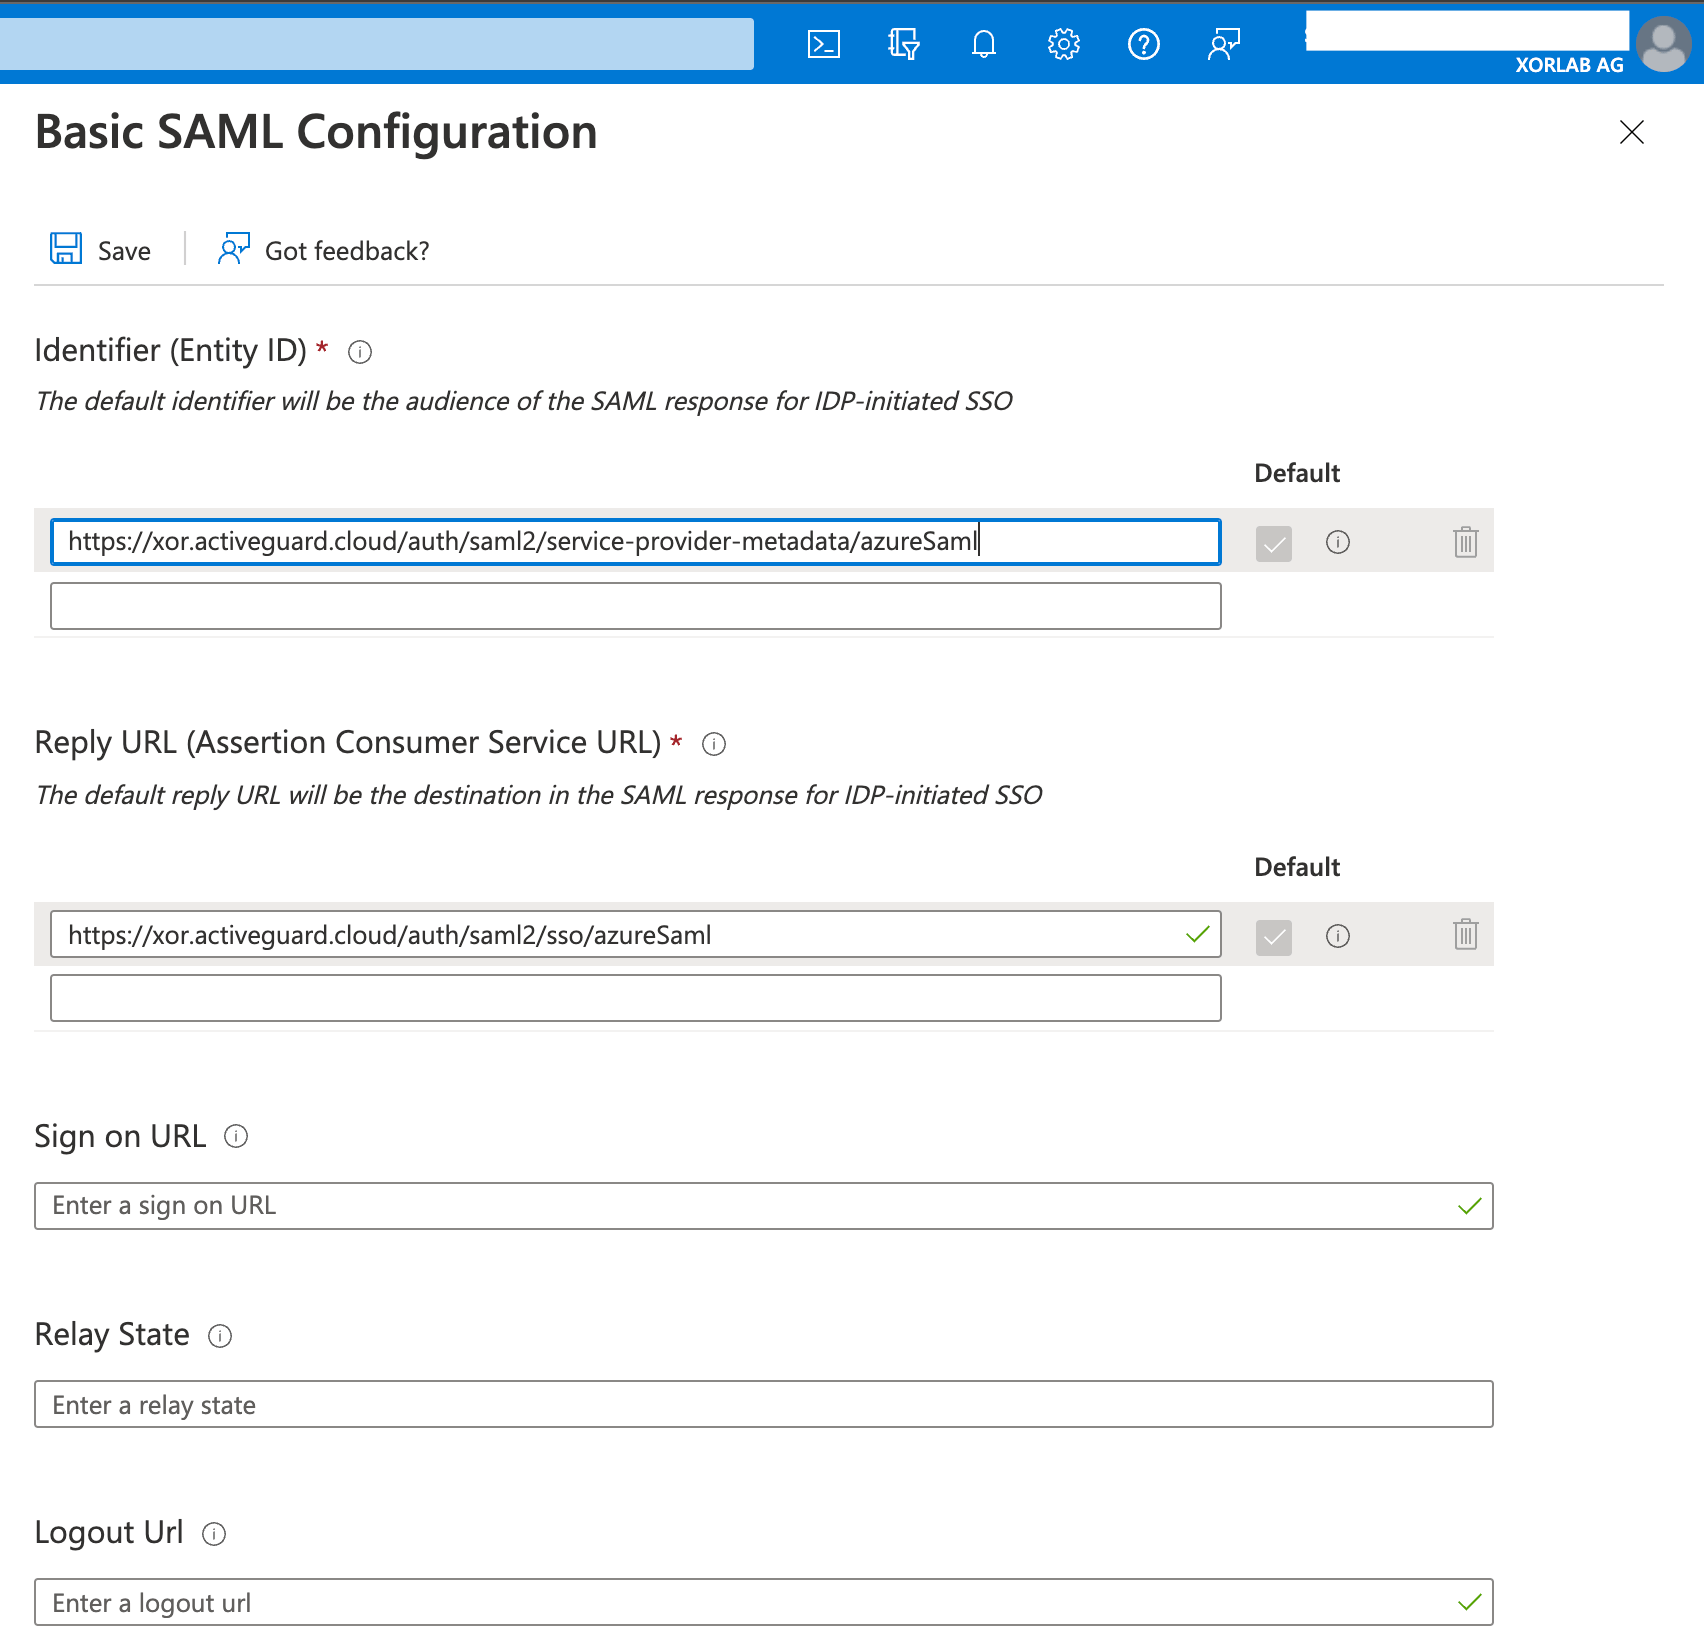 *SAML configuration*
5. Click **Save** to save changes, then click **No, I’ll test it later** in the message box (since xorlab Security Platform is not yet configured) and close this pane.
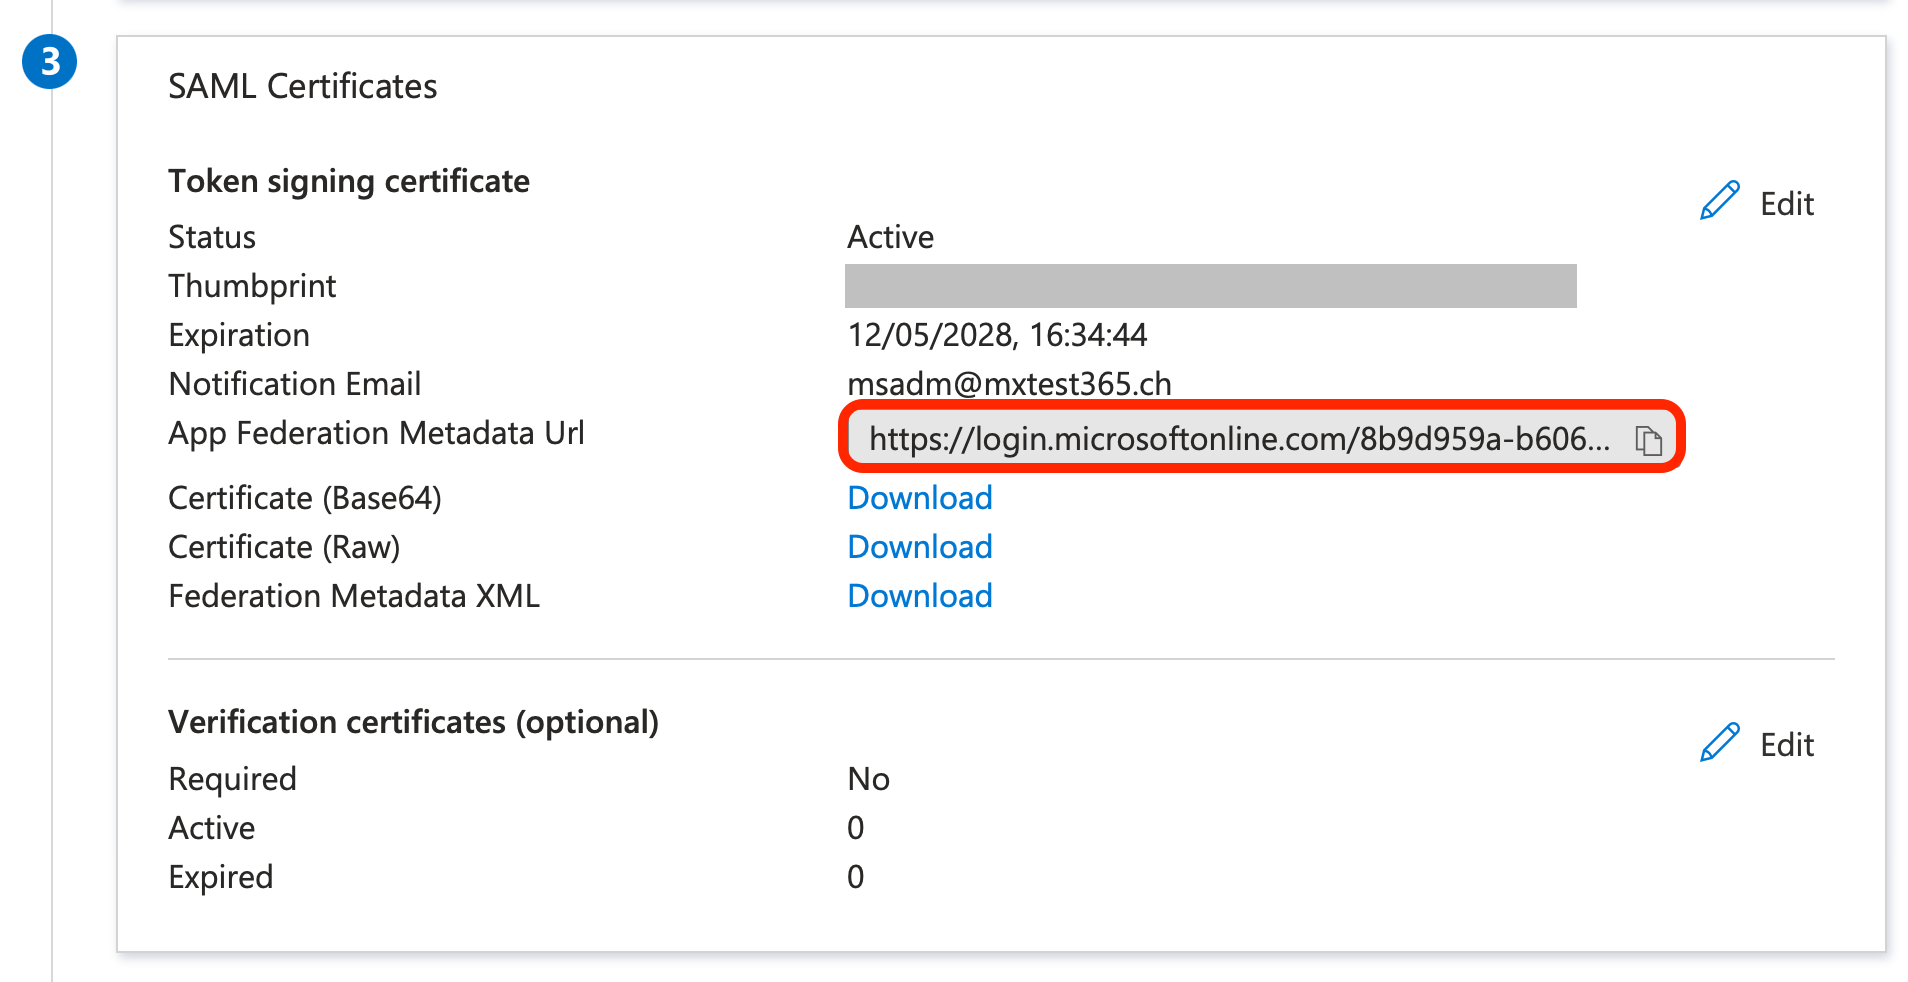
6. Copy and save the App Federation Metadata URL from **SAML Certificates**, you will need it later.
*SAML configuration*
5. Click **Save** to save changes, then click **No, I’ll test it later** in the message box (since xorlab Security Platform is not yet configured) and close this pane.
6. Copy and save the App Federation Metadata URL from **SAML Certificates**, you will need it later.
 ### Optional configuration for aliases email addresses
In case you need the aliases email addresses in the self-service quarantine (SSQ), please follow these additional steps.
With this integration, users will have access to their main (default) mailboxes in the SSQ as well as all aliases assigned to them. This is done by providing xorlab Security Platform the [`proxyAddresses` attribute](https://docs.microsoft.com/en-us/troubleshoot/azure/active-directory/proxyaddresses-attribute-populate) from M365. However, a user will not have access to [shared mailboxes](https://learn.microsoft.com/en-us/microsoft-365/admin/email/about-shared-mailboxes?view=o365-worldwide).
1. After completing the last step in the basic SAML configuration, move down to the next section of the **SAML-based Sign-on** page called **Attributes & Claims** and click **Edit**:
### Optional configuration for aliases email addresses
In case you need the aliases email addresses in the self-service quarantine (SSQ), please follow these additional steps.
With this integration, users will have access to their main (default) mailboxes in the SSQ as well as all aliases assigned to them. This is done by providing xorlab Security Platform the [`proxyAddresses` attribute](https://docs.microsoft.com/en-us/troubleshoot/azure/active-directory/proxyaddresses-attribute-populate) from M365. However, a user will not have access to [shared mailboxes](https://learn.microsoft.com/en-us/microsoft-365/admin/email/about-shared-mailboxes?view=o365-worldwide).
1. After completing the last step in the basic SAML configuration, move down to the next section of the **SAML-based Sign-on** page called **Attributes & Claims** and click **Edit**:
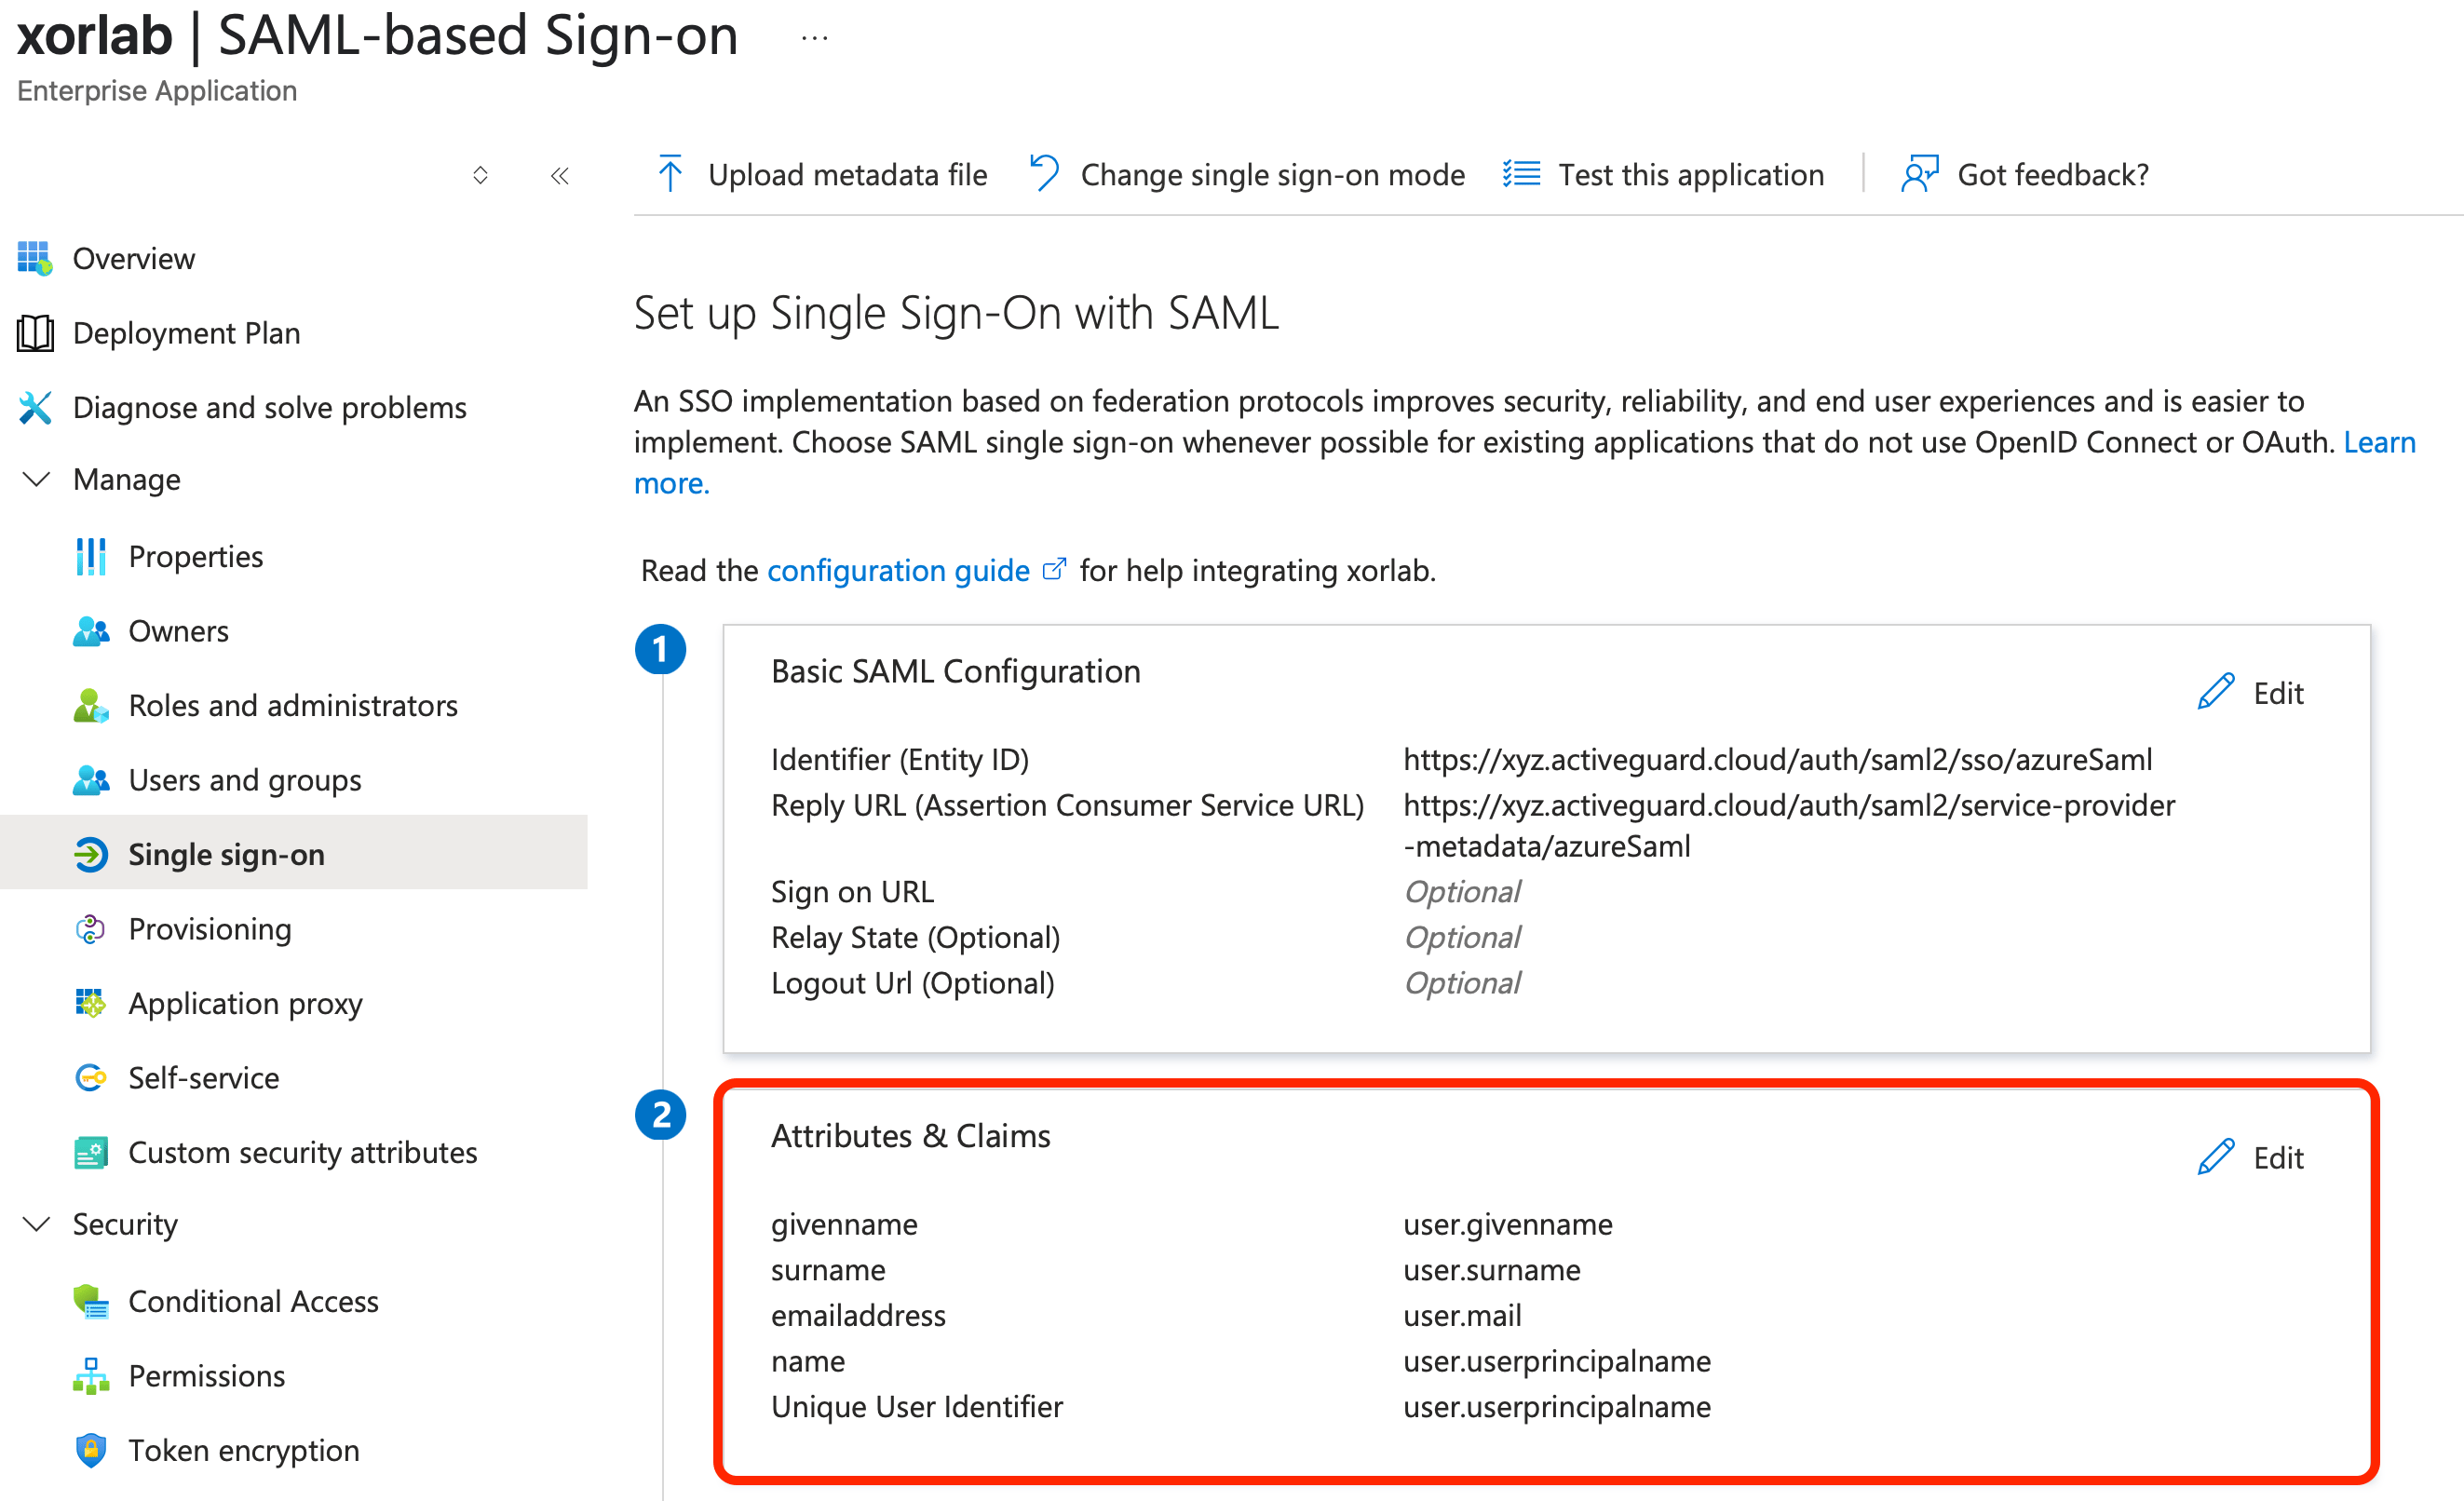 *Attributes & Claims section*
2. On the **Attributes & Claims** page, click **Add new claim**:
*Attributes & Claims section*
2. On the **Attributes & Claims** page, click **Add new claim**:
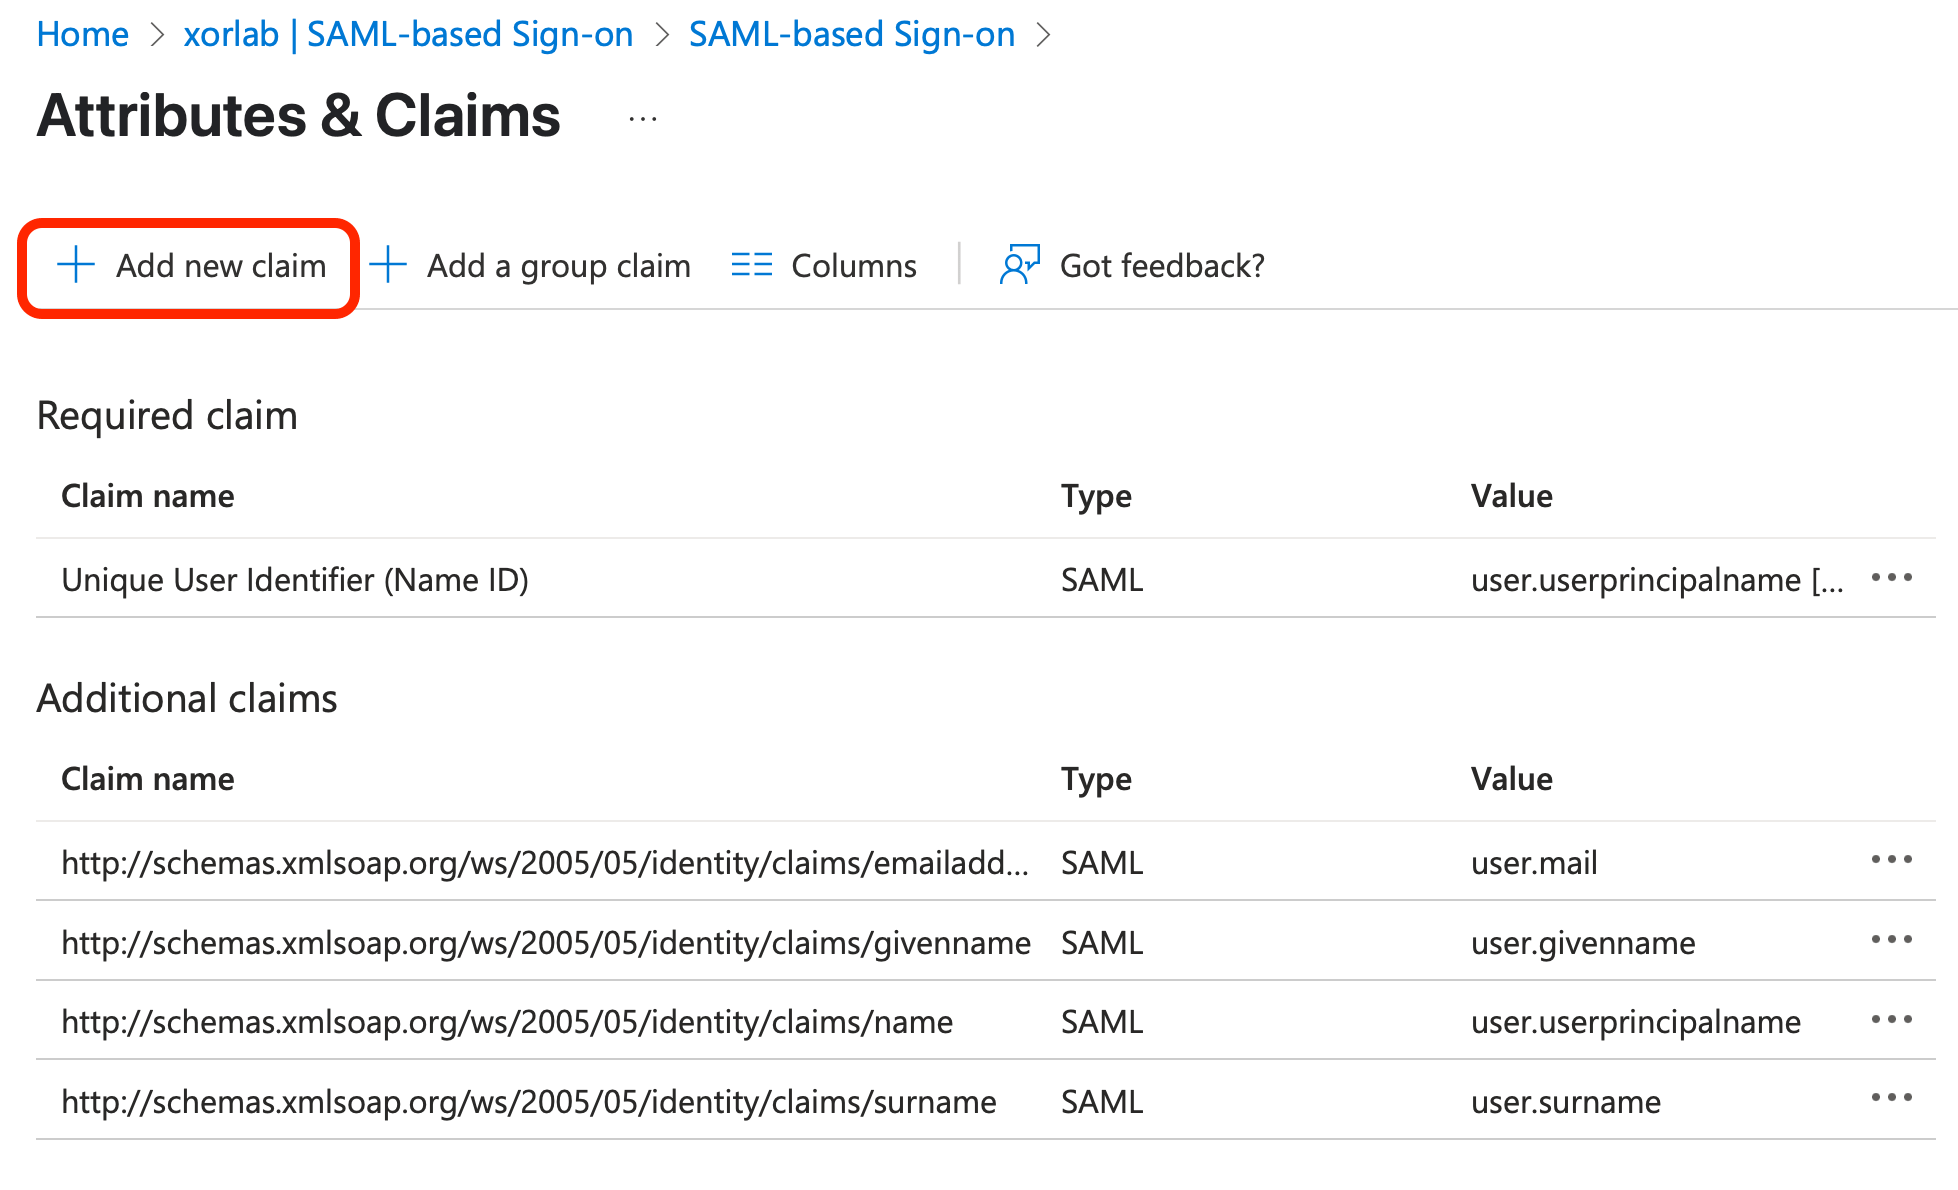 *Add new claim*
3. In the input fields of the **Manage claims** page that appears, enter `proxyAddresses` as the **Name** and `user.proxyaddresses` as the **Source attribute**. Click **Save**:
*Add new claim*
3. In the input fields of the **Manage claims** page that appears, enter `proxyAddresses` as the **Name** and `user.proxyaddresses` as the **Source attribute**. Click **Save**:
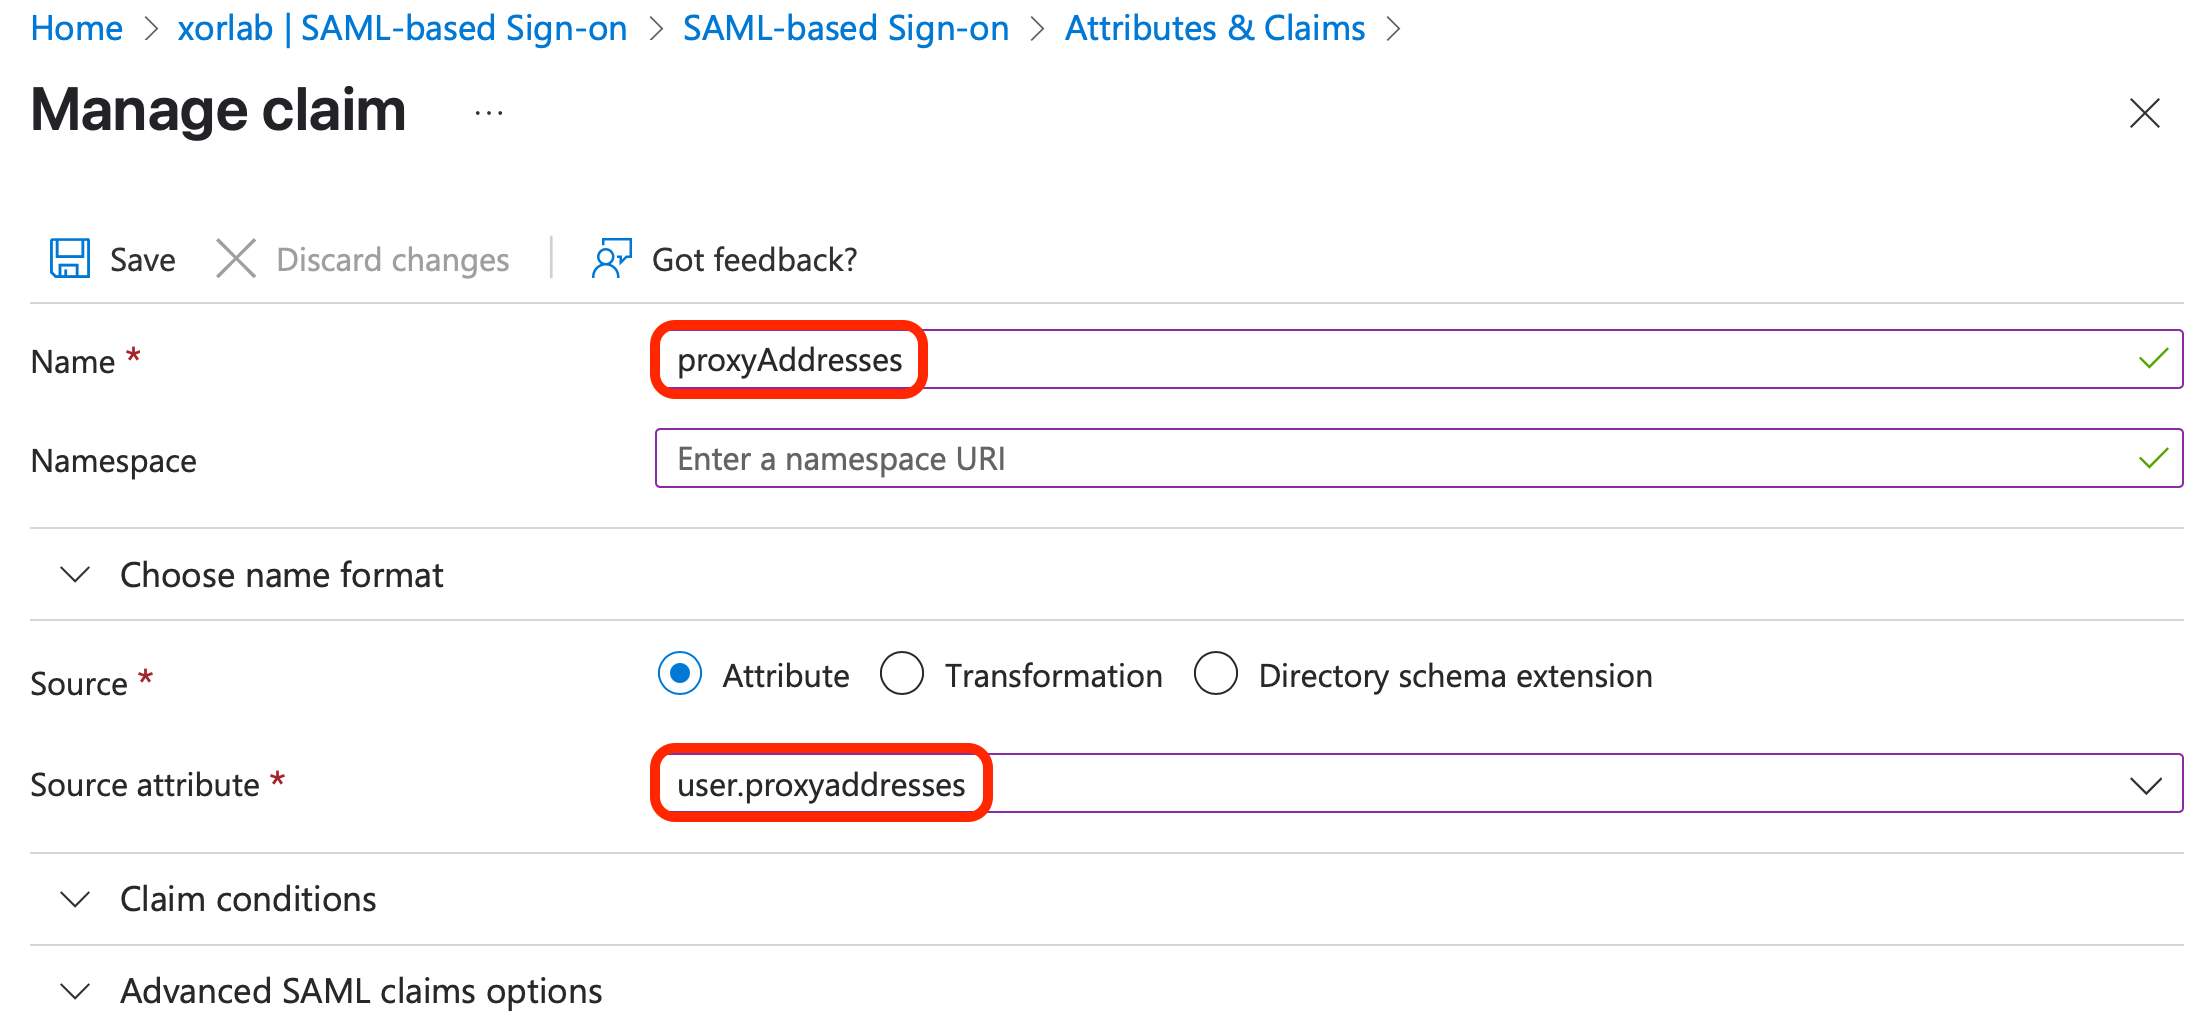 *Managing claims*
## App users, groups, and roles
Next, you’ll create roles in the **xorlab App Registration**, then add users or groups to the **xorlab Enterprise Application** and assign them roles.
**Managing groups in AAD**
For more information on groups in AAD, please see Microsoft’s documentation regarding [static](https://learn.microsoft.com/en-us/azure/active-directory/fundamentals/how-to-manage-groups) and [dynamic](https://learn.microsoft.com/en-us/azure/active-directory/enterprise-users/groups-create-rule) groups.
1. Go to the [Microsoft Entra ID](https://entra.microsoft.com/#view/Microsoft_AAD_IAM/TenantOverview.ReactView) screen, click to expand the **Applications** item on the left pane, click **App registrations**, then click **All applications** in the main view, and click your app in the displayed list:
*Managing claims*
## App users, groups, and roles
Next, you’ll create roles in the **xorlab App Registration**, then add users or groups to the **xorlab Enterprise Application** and assign them roles.
**Managing groups in AAD**
For more information on groups in AAD, please see Microsoft’s documentation regarding [static](https://learn.microsoft.com/en-us/azure/active-directory/fundamentals/how-to-manage-groups) and [dynamic](https://learn.microsoft.com/en-us/azure/active-directory/enterprise-users/groups-create-rule) groups.
1. Go to the [Microsoft Entra ID](https://entra.microsoft.com/#view/Microsoft_AAD_IAM/TenantOverview.ReactView) screen, click to expand the **Applications** item on the left pane, click **App registrations**, then click **All applications** in the main view, and click your app in the displayed list:
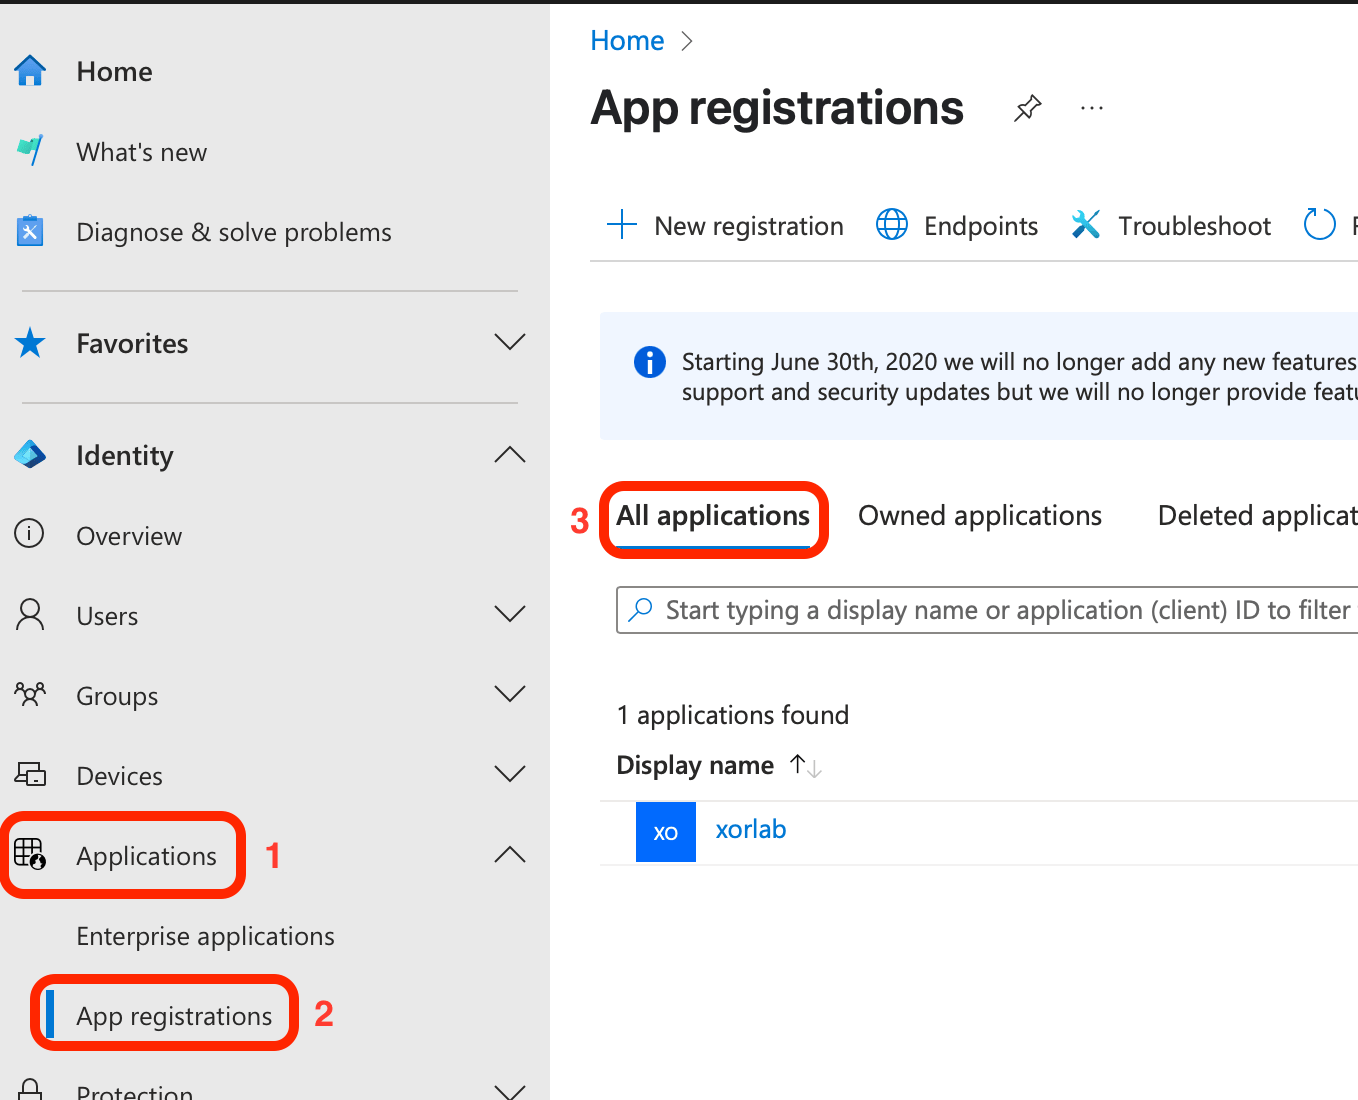 *App registrations*
2. On your app registration screen, click **App roles** in the left pane and then **Create app role** in the main view:
*App registrations*
2. On your app registration screen, click **App roles** in the left pane and then **Create app role** in the main view:
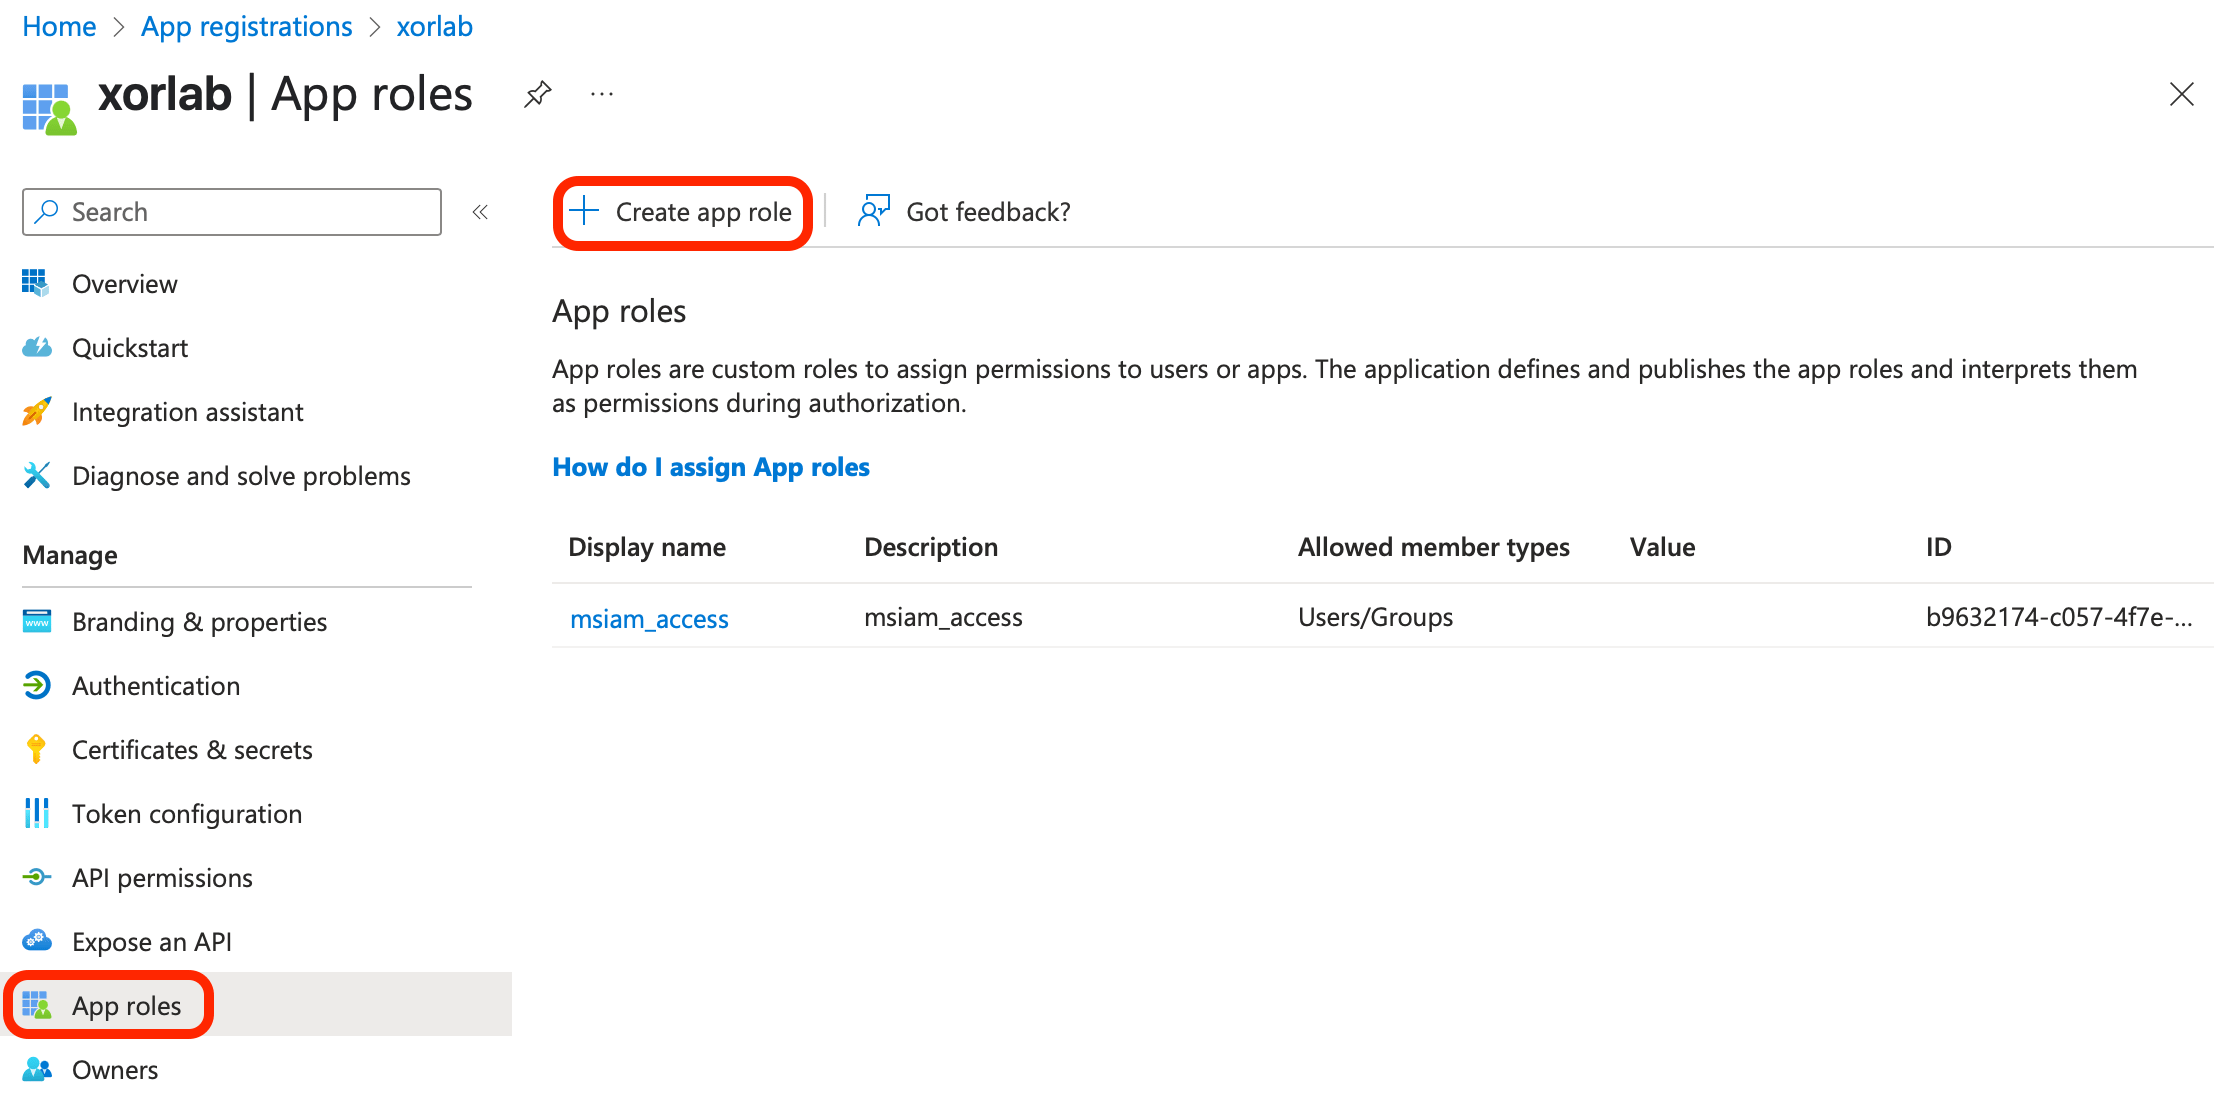 *Create app role*
3. In the **Create app role** pane on the right, fill the input fields with necessary data:
*Create app role*
3. In the **Create app role** pane on the right, fill the input fields with necessary data:
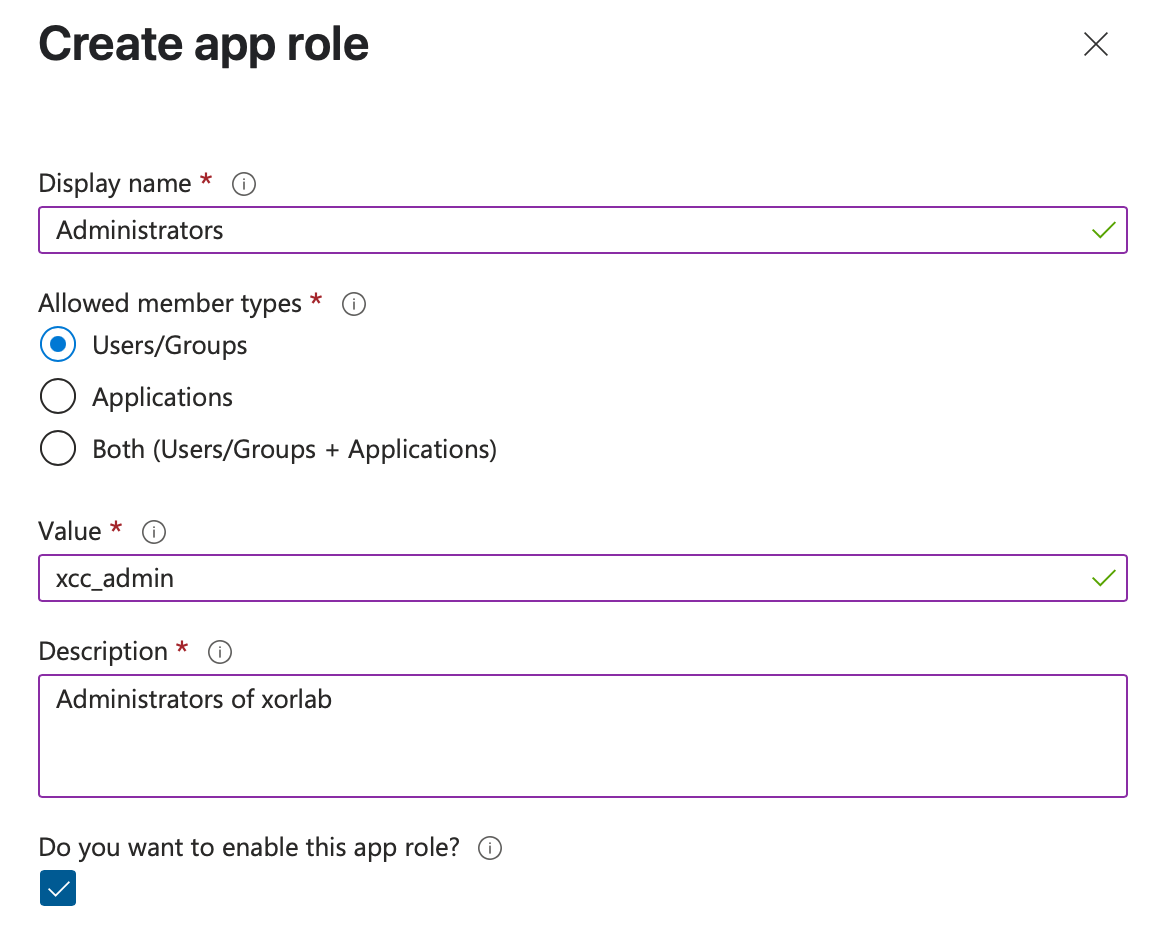 *App role configuration panel*
Enter the name for the role in the **Display name** field and select **Users/Groups** as allowed member types.
In the **Value** field, you can type in your custom aliases or directly one of the [roles](/9.0/users-roles-and-permissions#roles) used by xorlab:
* `xcc_admin`
* `xcc_analyst`
* `xcc_insights`
* `xcc_monitor`
* `xcc_quarantine_user`
Role aliases can be named however you like, e.g., `xsp.admin`. You will assign them to the target xorlab roles listed above in the XCC configuration file as described in the next section.
4. After providing a description for the role, click **Apply**.
5. Go to the [preview screen](https://portal.azure.com/#blade/Microsoft_AAD_IAM/StartboardApplicationsMenuBlade/AppAppsPreview/menuId/) of all enterprise applications, click the xorlab app and, on the overview page for your app, click **Assign users and groups** in the first tile:
*App role configuration panel*
Enter the name for the role in the **Display name** field and select **Users/Groups** as allowed member types.
In the **Value** field, you can type in your custom aliases or directly one of the [roles](/9.0/users-roles-and-permissions#roles) used by xorlab:
* `xcc_admin`
* `xcc_analyst`
* `xcc_insights`
* `xcc_monitor`
* `xcc_quarantine_user`
Role aliases can be named however you like, e.g., `xsp.admin`. You will assign them to the target xorlab roles listed above in the XCC configuration file as described in the next section.
4. After providing a description for the role, click **Apply**.
5. Go to the [preview screen](https://portal.azure.com/#blade/Microsoft_AAD_IAM/StartboardApplicationsMenuBlade/AppAppsPreview/menuId/) of all enterprise applications, click the xorlab app and, on the overview page for your app, click **Assign users and groups** in the first tile:
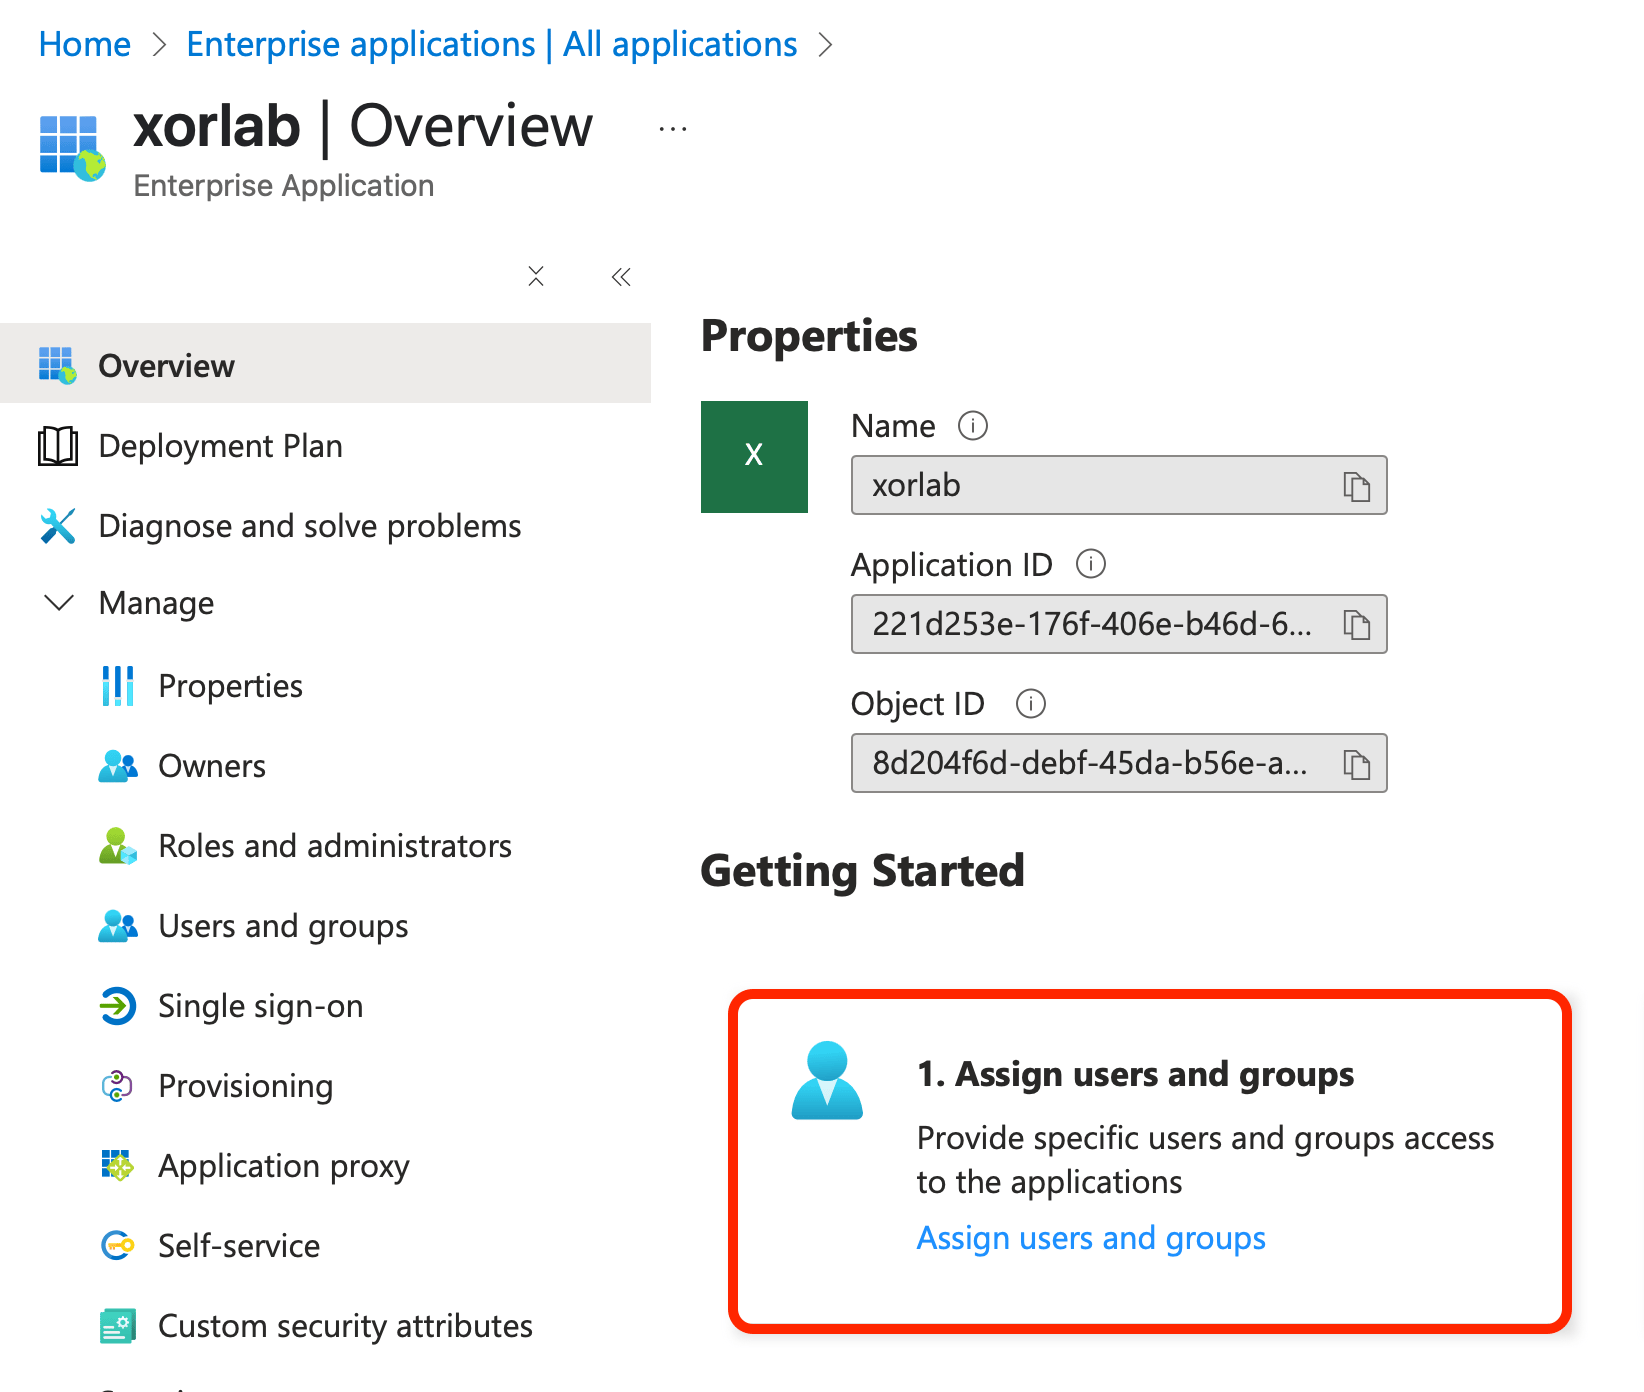 *Assign users and groups*
6. On the **Users and groups** screen for your app, click **Add user/group**:
*Assign users and groups*
6. On the **Users and groups** screen for your app, click **Add user/group**:
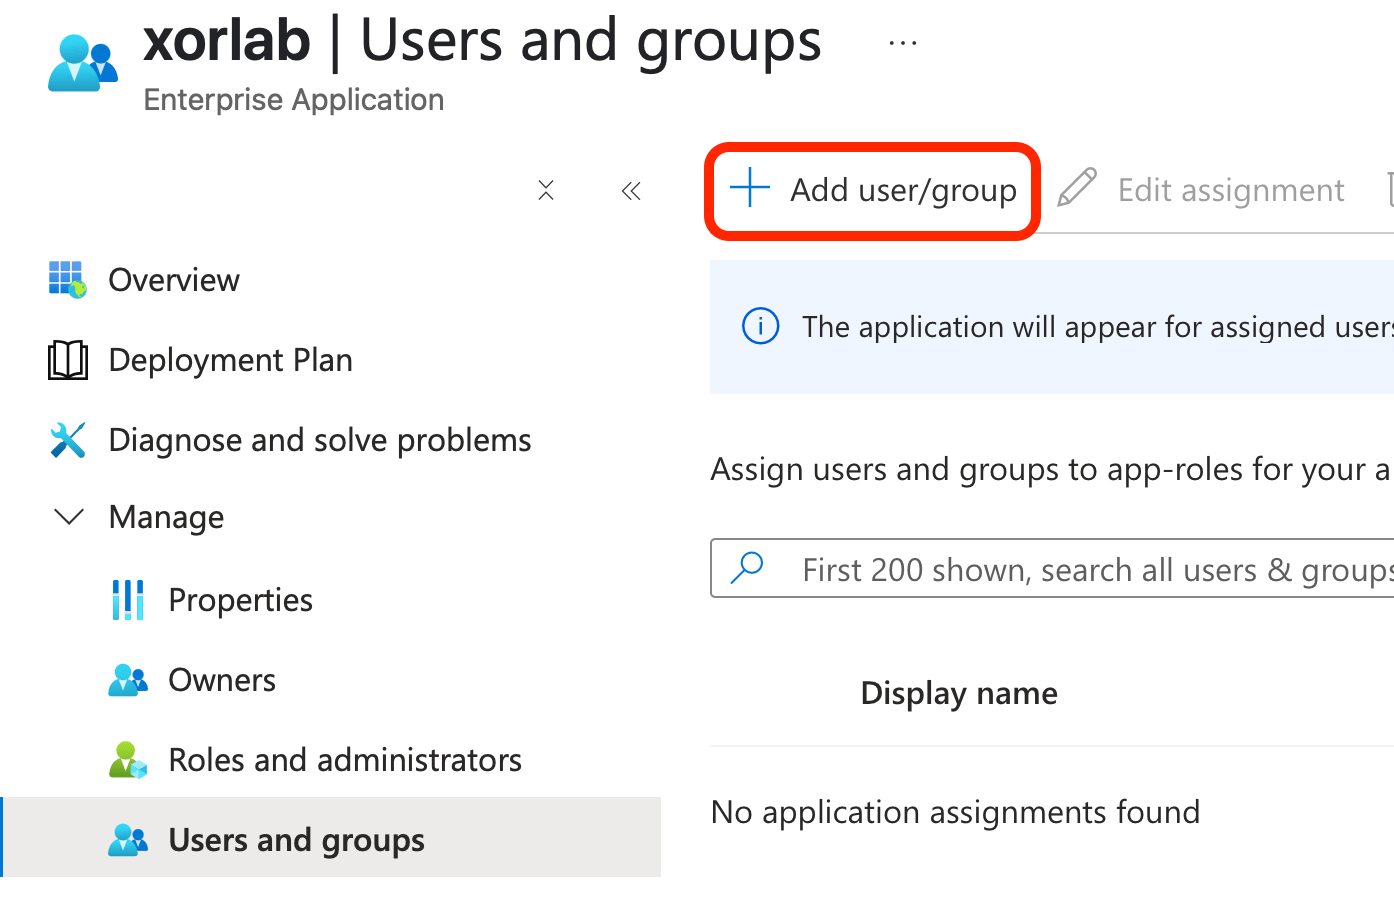 *Add user/group*
7. Add the users or groups who need access to xorlab and assign them one of the roles you created earlier.
**Groups and your Azure license**
Group assigning is available only in the Azure AD P1+ license.
## Configuring xorlab to use the AD SAML app
Now that you have the AD SAML app configured, you need to pass the appropriate data to xorlab.
1. You should have previously copied and saved the **App Federation Metadata Url** on the **SAML-based Sign-on** page (see the step #3 in *[Creating a SAML App in AD](#creating-a-saml-app-in-ad)*).
2. Open the file `auth/auth/auth.yml` in the **[Expert Editor](/9.0/expert-editor)**.
3. Enter the **App Federation Metadata Url** you copied as a value for the `metadataUrl` key.
4. In case you configured role aliases, add a `roleMapping` key and assign your role aliases to the [roles](/9.0/users-roles-and-permissions#roles) used by xorlab.
The following examples show how you might assign role aliases when you are using custom aliases such as `xsp.admin`, `xsp.analyst`, or `xsp.user`:
```yaml theme={null}
roleMapping:
xcc_admin:
- xsp.admin
xcc_monitor:
- xsp.admin
xcc_insights:
- xsp.admin
- xsp.analyst
xcc_quarantine_user:
- xsp.admin
- xsp.analyst
- xsp.user
```
As you can see, users with the `xsp.analyst` role assigned in AAD can actually have two roles in xorlab Control Center: `xcc_insights` and `xcc_quarantine_user`, thus having access to both quarantined messages and insights.
Your `auth.yml` should look like either one below.
```yaml theme={null}
tokenSigningKey: ******************************
tokenTtl: 60
enabledAuthBackends:
- azureSaml
saml2AuthBackends:
azureSaml:
idp:
# Enter the App Federation Metadata Url from M365
metadataUrl: https://login.microsoftonline.com/*****************************
attributeMapping:
displayName: attr('http://schemas.microsoft.com/identity/claims/displayname')
emails: attr('http://schemas.xmlsoap.org/ws/2005/05/identity/claims/name')
roles: attr('http://schemas.microsoft.com/ws/2008/06/identity/claims/role')
roleMapping:
xcc_admin:
- xsp.admin
xcc_monitor:
- xsp.admin
xcc_insights:
- xsp.admin
- xsp.analyst
xcc_quarantine_user:
- xsp.admin
- xsp.analyst
- xsp.user
```
```yaml theme={null}
tokenSigningKey: ******************************
tokenTtl: 60
enabledAuthBackends:
- azureSaml
saml2AuthBackends:
azureSaml:
idp:
# Enter the App Federation Metadata Url from M365
metadataUrl: https://login.microsoftonline.com/*****************************
attributeMapping:
displayName: attr('http://schemas.microsoft.com/identity/claims/displayname')
emails: attr('http://schemas.xmlsoap.org/ws/2005/05/identity/claims/name')
roles: attr('http://schemas.microsoft.com/ws/2008/06/identity/claims/role')
# Specify PASS_THROUGH, otherwise xorlab will only consider roles that match the role mapping
roleMappingMode: PASS_THROUGH
```
**Name of the SAML backend**
In this example, we use `azureSaml` as the name of the SAML auth backend. If you decide to use a different name, please make sure to change the URL of the backend accordingly in step #4 of [creating a SAML app in AD](#creating-a-saml-app-in-ad).
### SSQ integration
If you configured the SAML application to obtain aliases email addresses from AD as [described earlier](#optional-configuration-for-aliases-email-addresses), you will need to change the `emails` line in `attributeMapping` to:
```yaml theme={null}
emails: azureAdEmails(attr('proxyAddresses'))
```
so that the `attributeMapping` section looks like this:
```yaml theme={null}
attributeMapping:
displayName: attr('http://schemas.microsoft.com/identity/claims/displayname')
emails: azureAdEmails(attr('proxyAddresses'))
roles: attr('http://schemas.microsoft.com/ws/2008/06/identity/claims/role')
```
**Custom trust store**
In case your xorlab configuration uses a custom trust store, you will also have to add the [DigiCert Global Root CA certificate](https://cacerts.digicert.com/DigiCertGlobalRootCA.crt.pem) when integrating SAML with Azure Active Directory. Please follow the steps described in *[Certificate configuration](/9.0/authentication#certificate-configuration)*.
*Add user/group*
7. Add the users or groups who need access to xorlab and assign them one of the roles you created earlier.
**Groups and your Azure license**
Group assigning is available only in the Azure AD P1+ license.
## Configuring xorlab to use the AD SAML app
Now that you have the AD SAML app configured, you need to pass the appropriate data to xorlab.
1. You should have previously copied and saved the **App Federation Metadata Url** on the **SAML-based Sign-on** page (see the step #3 in *[Creating a SAML App in AD](#creating-a-saml-app-in-ad)*).
2. Open the file `auth/auth/auth.yml` in the **[Expert Editor](/9.0/expert-editor)**.
3. Enter the **App Federation Metadata Url** you copied as a value for the `metadataUrl` key.
4. In case you configured role aliases, add a `roleMapping` key and assign your role aliases to the [roles](/9.0/users-roles-and-permissions#roles) used by xorlab.
The following examples show how you might assign role aliases when you are using custom aliases such as `xsp.admin`, `xsp.analyst`, or `xsp.user`:
```yaml theme={null}
roleMapping:
xcc_admin:
- xsp.admin
xcc_monitor:
- xsp.admin
xcc_insights:
- xsp.admin
- xsp.analyst
xcc_quarantine_user:
- xsp.admin
- xsp.analyst
- xsp.user
```
As you can see, users with the `xsp.analyst` role assigned in AAD can actually have two roles in xorlab Control Center: `xcc_insights` and `xcc_quarantine_user`, thus having access to both quarantined messages and insights.
Your `auth.yml` should look like either one below.
```yaml theme={null}
tokenSigningKey: ******************************
tokenTtl: 60
enabledAuthBackends:
- azureSaml
saml2AuthBackends:
azureSaml:
idp:
# Enter the App Federation Metadata Url from M365
metadataUrl: https://login.microsoftonline.com/*****************************
attributeMapping:
displayName: attr('http://schemas.microsoft.com/identity/claims/displayname')
emails: attr('http://schemas.xmlsoap.org/ws/2005/05/identity/claims/name')
roles: attr('http://schemas.microsoft.com/ws/2008/06/identity/claims/role')
roleMapping:
xcc_admin:
- xsp.admin
xcc_monitor:
- xsp.admin
xcc_insights:
- xsp.admin
- xsp.analyst
xcc_quarantine_user:
- xsp.admin
- xsp.analyst
- xsp.user
```
```yaml theme={null}
tokenSigningKey: ******************************
tokenTtl: 60
enabledAuthBackends:
- azureSaml
saml2AuthBackends:
azureSaml:
idp:
# Enter the App Federation Metadata Url from M365
metadataUrl: https://login.microsoftonline.com/*****************************
attributeMapping:
displayName: attr('http://schemas.microsoft.com/identity/claims/displayname')
emails: attr('http://schemas.xmlsoap.org/ws/2005/05/identity/claims/name')
roles: attr('http://schemas.microsoft.com/ws/2008/06/identity/claims/role')
# Specify PASS_THROUGH, otherwise xorlab will only consider roles that match the role mapping
roleMappingMode: PASS_THROUGH
```
**Name of the SAML backend**
In this example, we use `azureSaml` as the name of the SAML auth backend. If you decide to use a different name, please make sure to change the URL of the backend accordingly in step #4 of [creating a SAML app in AD](#creating-a-saml-app-in-ad).
### SSQ integration
If you configured the SAML application to obtain aliases email addresses from AD as [described earlier](#optional-configuration-for-aliases-email-addresses), you will need to change the `emails` line in `attributeMapping` to:
```yaml theme={null}
emails: azureAdEmails(attr('proxyAddresses'))
```
so that the `attributeMapping` section looks like this:
```yaml theme={null}
attributeMapping:
displayName: attr('http://schemas.microsoft.com/identity/claims/displayname')
emails: azureAdEmails(attr('proxyAddresses'))
roles: attr('http://schemas.microsoft.com/ws/2008/06/identity/claims/role')
```
**Custom trust store**
In case your xorlab configuration uses a custom trust store, you will also have to add the [DigiCert Global Root CA certificate](https://cacerts.digicert.com/DigiCertGlobalRootCA.crt.pem) when integrating SAML with Azure Active Directory. Please follow the steps described in *[Certificate configuration](/9.0/authentication#certificate-configuration)*.