> ## Documentation Index
> Fetch the complete documentation index at: https://docs.xorlab.com/llms.txt
> Use this file to discover all available pages before exploring further.
> ## Agent Instructions
> Pages under /latest/ document the current release. Paths that begin with a version number, for example /10.0/, are frozen snapshots of superseded releases kept for reference only — never present their instructions as current. If the reader's version is unknown, answer from /latest/ and say which version the answer describes.
> xorlab is deployed on-premises, hybrid, or as a cloud service, and integrates with either Microsoft 365 or on-premises mail infrastructure. Configuration steps often differ between these. State which deployment and integration mode an instruction applies to instead of presenting one as universal.
> Distinguish inline mode from monitoring mode when describing anything that acts on email. Monitoring mode observes a copy and cannot block or quarantine; inline mode routes mail through xorlab and can.
> Write the product name as lowercase 'xorlab'. Use the documented component names: xorlab Control Center (XCC), xorlab MTA, xorlab Sandbox (DANA), xorlab Natural Language Understanding (NLU). After the first mention, use the short forms XCC, MTA, Sandbox, and NLU. Do not use DANA as a standalone name for the Sandbox, but keep it where it is a literal string in configuration keys, container names, and hostnames.
> Do not invent configuration keys, rule parameters, list names, log properties, or API fields. If a value is not present in this documentation, say that it is not documented rather than guessing.
# Integrate shared mailboxes in SSQ
When shared mailboxes are being used, xorlab needs to know, which mailboxes to include for
which Self-Service Quarantine users. This can be accomplished by setting an attribute in Entra ID,
which is read by xorlab via the SAML integration.\
This page guides you through the configuration of Entra ID and xorlab to integrate shared mailboxes into the Self-Service Quarantine (SSQ).
For on-premises setups the process will differ.
## Pre-requisites
* **Global Administrator Role on Entra ID**
Performing the following operations will require administrator privilege on your Microsoft Entra ID and Exchange Admin portal.
* **xorlab Entra ID Application**
Ensure that an xorlab enterprise application and application registration has been created, which should have been done during the [Essential Setup for M365](/9.0/essential-setup-for-m365).
* **Postman or access to Graph Explorer**
To create the extension property, necessary to store the shared mailboxes, you will need the Postman software with an account (free) or an access to the Graph Explorer.
**Using API tools with admin credentials**
It is strongly recommended that sensitive credentials are stored only locally and not uploaded to cloud accounts, such as Postman.
## Configure your xorlab App Registration
Open the [Azure Portal](https://portal.azure.com/), search for the xorlab *App Registration* created during the [Essential Setup for M365](/9.0/essential-setup-for-m365).
1. From the left hand sidebar navigate to **Manage** -> **Certificates & secrets** → **Client Secrets** and create a temporary client secret. You will need it later for creating a custom extension property.
2. Create a PKCS#12 certificate (.pfx) by following the official Microsoft guide below. As a result, you should have two certificate files: `.cer` and `.pfx`. Make sure to take note of the certificate password.
**Certificate creation on Windows**
Follow the steps from [Create a self-signed public certificate to authenticate your application](https://learn.microsoft.com/en-us/entra/identity-platform/howto-create-self-signed-certificate) including the optional "Export your public certificate with its private key" section.
3. Upload the public certificate `.cer` into **Certificates** in *App Registration* section.
4. Once the certificate is uploaded, navigate to the **API permissions**, and add the following application permissions:
```txt title="API permissions" theme={null}
Microsoft APIs → Microsoft Graph:
User.Read.All
User.ReadWrite.All
Group.ReadWrite.All
Application.Read.All
Application.ReadWrite.All
Application.ReadWrite.OwnedBy
API my organization uses -> Office 365 Exchange Online:
Exchange.ManageAsApp
```
5. Make sure that the permissions are granted admin consent (**Grant admin consent for ...**).
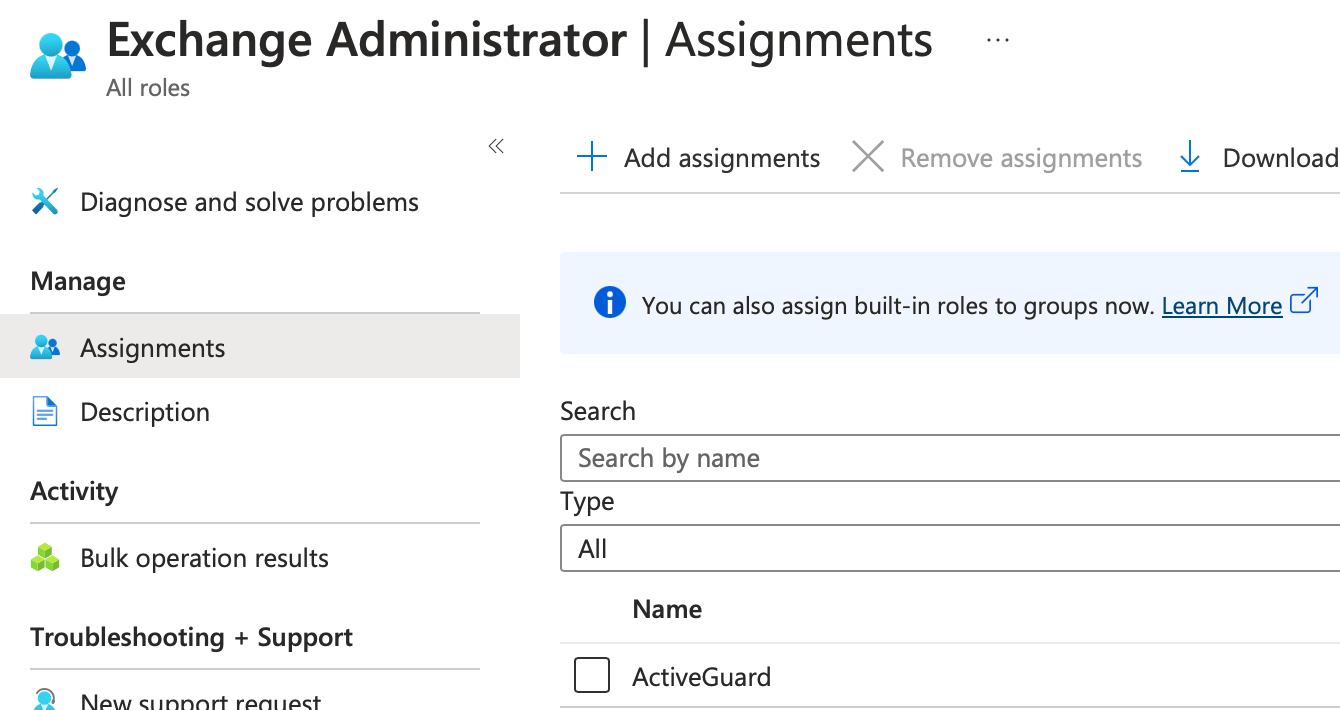
6. Assign the **Exchange Administrator** role to the xorlab App Registration:
1. Navigate to the **Microsoft Entra ID** -> **Roles and administrators**.
2. Search for the **Exchange Administrator** administrative role in the search bar and open it.
3. Use the **Add assignments** button.
 ## Create the custom extension property
To create this property, you will have to use the Graph API. We prepared a Postman collection containing the requests needed: [postman\_collection.json](/9.0/assets/ExtensionProperty_cheatsheet.postman_collection.json).
**In case you can't download Postman**
In case you can’t have access to Postman, you can also use the Graph Explorer. Make sure to have the necessary Application rights and run a POST query on this endpoint: [https://graph.microsoft.com/v1.0/applications/\*\*REPLACE](https://graph.microsoft.com/v1.0/applications/**REPLACE) WITH OBJECT ID\*\*/extensionProperties
In the body section, you will have to insert this:
```json theme={null}
{
"name": "xorlab",
"isMultiValued": "true",
"targetObjects": [
"User"
]
}
```
1. Import the collection into your Postman software.
2. In the **Collection > Variables** section, ensure that you are not syncing or sharing any sensitive variables — especially `GraphAPIToken` and `clientSecret`. The recommended approach is to store the token and any secrets as a secret variable in your local Postman Vault and reference it directly using `{{vault:secret-name}}` in your requests. This ensures the token remains secure and is not accidentally uploaded or shared.
3. In **Get a token** request, replace the different variables and use the request to get a token from Graph API.
4. In **Create custom property**, replace **GraphAPIToken** variable with the token returned by the previous request.
You should now be able to run the Create custom property request, as a response you will get the property name, it should be: `extension_**clientID**_xorlab`.
## Run and automate the script in Azure Automation
Azure provides the possibility to run PowerShell scripts directly in their system for a cheap price. We recommend using this option which save resources and implementation time.
You will first need to create an Automation Account, you can do so by searching for **Automation Account** in the Azure Portal.
During the creation, make sure the Managed Identities are *System Assigned* and that the networking is *Public Access*
After the creation of the Automation Account, you have to activate *Try Runtime Environment Experience* by clicking the according button.
Then, navigate into **Runtime environment** and create a new **PowerShell 7.2** environment.
In this new runtime environment, add the following modules from the PowerShell Gallery:
```
- ExchangeOnlineManagement
- Microsoft.Graph.Authentication
- Microsoft.Graph.Users
```
Go back to your Automation Account and navigate in **Certificates**, here you will have to upload the `.pfx` certificate file created previously. The name of the certificate must be ‘cert’.
You will be asked to enter the password of the certificate and select **Exportable** as **Yes**.
**Wrong password**
If Azure tells you that the password is incorrect, it can be due to a wrong certificate created. Double check that it is **PKCS#12** compliant.
Once this is done, you will need to navigate to **Variables** and create some of them, based on the data you saved before:
| Name | Type | Encrypted | Description |
| ----------------- | ------ | --------- | ------------------------------------------------------------------------------------- |
| certificateThumb | string | No | The hexadecimal thumb of your certificate without '-' |
| clientID | string | No | The client ID of your xorlab App Registration |
| organization | string | No | The tenant domain of your organization (e.g contoso.corp) |
| tenantID | string | No | The Azure tenant ID |
| unifiedGroupsType | string | No | Define who will have access to the O365 unified groups, can be: ‘Members’ or ‘Owners’ |
| extensionProperty | string | No | The extension property name created previously |
Navigate to Runbooks and create a new runbook. Then, import the [shared mailboxes script](/9.0/assets/azure_ad_shared_mailboxes.ps1).
Make sure your runbook is using your custom Runtime Environment previously created.
Try to run your runbook, the final output should let you know some of the mailboxes updated. **There shouldn’t be any errors.**
If you’re happy with the result, publish the runbook and schedule it on a regular basis (e.g each night) via the **Schedules** functionality.
## Use the new extension property in xorlab
1. In the Azure portal, search for the xorlab Enterprise Application
2. Navigate to **Single Sign On**
3. Edit **Attributes & Claims**
4. Add a new claim named `xorlabAddresses` (Namespace can be left empty)
5. Select **Directory Schema Extension** and find your xorlab App Registration
6. Select it and find the `user.xorlab` attribute
7. Save the changes and open your xorlab instance
8. In the Expert Editor, open the `auth.yml` file and search for your SAML configuration
9. Set the `emails:` property to
```yaml theme={null}
emails: sortPrefixedList(attr('xorlabAddresses'), ":")
```
## Maintenance Task – Updating an Expired Certificate
Depending on the parameters used in the [Configure your xorlab App Registration](#configure-your-xorlab-app-registration), the certificate (both .pfx and .cer files) may expire after some time. When this happens, you’ll need to renew the certificate and upload the updated files to both App Registration and Azure Automation.
### Steps to Renew the Certificate
#### App Registration
* Repeat steps 2 and 3 from the [Configure your xorlab App Registration](#configure-your-xorlab-app-registration) section.
* This will update the certificate at the App Registration level.
#### Azure Automation
* Go to your Automation Account>Shared Resources.
* Navigate to Certificates.
* Remove the existing certificate named `cert`.
* Upload the newly created `.pfx` certificate file.
* Ensure the certificate name is exactly cert.
* Enter the certificate password.
* Set Exportable to Yes.
Once these steps are completed, your automation should resume functioning correctly.
## Create the custom extension property
To create this property, you will have to use the Graph API. We prepared a Postman collection containing the requests needed: [postman\_collection.json](/9.0/assets/ExtensionProperty_cheatsheet.postman_collection.json).
**In case you can't download Postman**
In case you can’t have access to Postman, you can also use the Graph Explorer. Make sure to have the necessary Application rights and run a POST query on this endpoint: [https://graph.microsoft.com/v1.0/applications/\*\*REPLACE](https://graph.microsoft.com/v1.0/applications/**REPLACE) WITH OBJECT ID\*\*/extensionProperties
In the body section, you will have to insert this:
```json theme={null}
{
"name": "xorlab",
"isMultiValued": "true",
"targetObjects": [
"User"
]
}
```
1. Import the collection into your Postman software.
2. In the **Collection > Variables** section, ensure that you are not syncing or sharing any sensitive variables — especially `GraphAPIToken` and `clientSecret`. The recommended approach is to store the token and any secrets as a secret variable in your local Postman Vault and reference it directly using `{{vault:secret-name}}` in your requests. This ensures the token remains secure and is not accidentally uploaded or shared.
3. In **Get a token** request, replace the different variables and use the request to get a token from Graph API.
4. In **Create custom property**, replace **GraphAPIToken** variable with the token returned by the previous request.
You should now be able to run the Create custom property request, as a response you will get the property name, it should be: `extension_**clientID**_xorlab`.
## Run and automate the script in Azure Automation
Azure provides the possibility to run PowerShell scripts directly in their system for a cheap price. We recommend using this option which save resources and implementation time.
You will first need to create an Automation Account, you can do so by searching for **Automation Account** in the Azure Portal.
During the creation, make sure the Managed Identities are *System Assigned* and that the networking is *Public Access*
After the creation of the Automation Account, you have to activate *Try Runtime Environment Experience* by clicking the according button.
Then, navigate into **Runtime environment** and create a new **PowerShell 7.2** environment.
In this new runtime environment, add the following modules from the PowerShell Gallery:
```
- ExchangeOnlineManagement
- Microsoft.Graph.Authentication
- Microsoft.Graph.Users
```
Go back to your Automation Account and navigate in **Certificates**, here you will have to upload the `.pfx` certificate file created previously. The name of the certificate must be ‘cert’.
You will be asked to enter the password of the certificate and select **Exportable** as **Yes**.
**Wrong password**
If Azure tells you that the password is incorrect, it can be due to a wrong certificate created. Double check that it is **PKCS#12** compliant.
Once this is done, you will need to navigate to **Variables** and create some of them, based on the data you saved before:
| Name | Type | Encrypted | Description |
| ----------------- | ------ | --------- | ------------------------------------------------------------------------------------- |
| certificateThumb | string | No | The hexadecimal thumb of your certificate without '-' |
| clientID | string | No | The client ID of your xorlab App Registration |
| organization | string | No | The tenant domain of your organization (e.g contoso.corp) |
| tenantID | string | No | The Azure tenant ID |
| unifiedGroupsType | string | No | Define who will have access to the O365 unified groups, can be: ‘Members’ or ‘Owners’ |
| extensionProperty | string | No | The extension property name created previously |
Navigate to Runbooks and create a new runbook. Then, import the [shared mailboxes script](/9.0/assets/azure_ad_shared_mailboxes.ps1).
Make sure your runbook is using your custom Runtime Environment previously created.
Try to run your runbook, the final output should let you know some of the mailboxes updated. **There shouldn’t be any errors.**
If you’re happy with the result, publish the runbook and schedule it on a regular basis (e.g each night) via the **Schedules** functionality.
## Use the new extension property in xorlab
1. In the Azure portal, search for the xorlab Enterprise Application
2. Navigate to **Single Sign On**
3. Edit **Attributes & Claims**
4. Add a new claim named `xorlabAddresses` (Namespace can be left empty)
5. Select **Directory Schema Extension** and find your xorlab App Registration
6. Select it and find the `user.xorlab` attribute
7. Save the changes and open your xorlab instance
8. In the Expert Editor, open the `auth.yml` file and search for your SAML configuration
9. Set the `emails:` property to
```yaml theme={null}
emails: sortPrefixedList(attr('xorlabAddresses'), ":")
```
## Maintenance Task – Updating an Expired Certificate
Depending on the parameters used in the [Configure your xorlab App Registration](#configure-your-xorlab-app-registration), the certificate (both .pfx and .cer files) may expire after some time. When this happens, you’ll need to renew the certificate and upload the updated files to both App Registration and Azure Automation.
### Steps to Renew the Certificate
#### App Registration
* Repeat steps 2 and 3 from the [Configure your xorlab App Registration](#configure-your-xorlab-app-registration) section.
* This will update the certificate at the App Registration level.
#### Azure Automation
* Go to your Automation Account>Shared Resources.
* Navigate to Certificates.
* Remove the existing certificate named `cert`.
* Upload the newly created `.pfx` certificate file.
* Ensure the certificate name is exactly cert.
* Enter the certificate password.
* Set Exportable to Yes.
Once these steps are completed, your automation should resume functioning correctly.