> ## Documentation Index
> Fetch the complete documentation index at: https://docs.xorlab.com/llms.txt
> Use this file to discover all available pages before exploring further.
> ## Agent Instructions
> Pages under /latest/ document the current release. Paths that begin with a version number, for example /10.0/, are frozen snapshots of superseded releases kept for reference only — never present their instructions as current. If the reader's version is unknown, answer from /latest/ and say which version the answer describes.
> xorlab is deployed on-premises, hybrid, or as a cloud service, and integrates with either Microsoft 365 or on-premises mail infrastructure. Configuration steps often differ between these. State which deployment and integration mode an instruction applies to instead of presenting one as universal.
> Distinguish inline mode from monitoring mode when describing anything that acts on email. Monitoring mode observes a copy and cannot block or quarantine; inline mode routes mail through xorlab and can.
> Write the product name as lowercase 'xorlab'. Use the documented component names: xorlab Control Center (XCC), xorlab MTA, xorlab Sandbox (DANA), xorlab Natural Language Understanding (NLU). After the first mention, use the short forms XCC, MTA, Sandbox, and NLU. Do not use DANA as a standalone name for the Sandbox, but keep it where it is a literal string in configuration keys, container names, and hostnames.
> Do not invent configuration keys, rule parameters, list names, log properties, or API fields. If a value is not present in this documentation, say that it is not documented rather than guessing.
# VM Setup Guide
This guide supports system administrators who want to install xorlab in a (virtualized) data center. Please make sure to complete this guide before starting with the *[Step-by-Step Configuration Guide](/9.0/configuration-guide)*.
## VM Setup Preparation
xorlab consists of two on-premises components: Control Center (XCC) and MTA, and various backend services operated by xorlab, such as Sandbox, xCloud, and others. MTAs are email processing nodes that can be operated redundantly, depending on the expected load and availability requirements. The Control Center consolidates the analysis results from the MTAs and hosts the user interface. Sandbox performs on-demand dynamic sandbox analysis of email attachments.
### Hardware requirements
The Control Center and MTAs are provided as images in the OVF format. Our [Sizing Guide](/9.0/sizing-guide) will help you determine the right configuration for the resulting VMs. Download credentials can be requested \[via email]\(mailto:[support@xorlab.com](mailto:support@xorlab.com)?subject=xorlab download request).
### Network requirements
Make sure that your network is configured as described in *[xorlab Network Guide](/9.0/network-guide)* before starting with the installation.
### DNS registration
1. Register DNS A records for the Control Center and MTA VMs with your internal DNS server(s). For the Control Center, you can also use a CNAME record instead of an A record. For the MTA VMs, A records are required; see also [RFC 2181](https://datatracker.ietf.org/doc/html/rfc2181#section-10.3). The table below shows an example setup for example.com:
| Component | Record | Type |
| :------------- | :----------------- | :--------- |
| Control Center | `xcc.example.com` | A or CNAME |
| MTA1 | `mta1.example.com` | A |
| MTA2 | `mta2.example.com` | A |
2. Add an MX record for every MTA in your setup. Use the same priority for all MTAs to achieve automatic load-balancing. In our example, we use `mx.example.com` and the DNS query result is:
```shell theme={null}
dig MX mx.example.com
[...]
;; ANSWER SECTION:
mx.example.com. 3600 IN MX 10 mta1.example.com.
mx.example.com. 3600 IN MX 10 mta2.example.com.
```
### Preparing the VMs
1. Download the Control Center and MTA images (OVF format). The link and credentials will be provided by us.
2. Decompress the zip files and instantiate the Control Center and MTA virtual machines using your Hypervisor.
## VM Setup process
### OS & XSP config on the host
XCC and MTA VMs come with a [setup script](#setup-script) (`xorlab-set-up-xcc`, `xorlab-set-up-mta`) that can be safely run multiple times. It automatically configures the operating system and xorlab settings, skipping steps that have already been completed.
In the tables below, you can find all configuration settings needed to set up the XCC and MTA VMs with their respective config files; if they are covered by the setup script, and whether the change is mandatory or optional. Each `Setting / topic` links to a detailed description of the configuration changes. If the step is covered by the setup script, it is not necessary to manually execute these steps again.
| Setting / topic | Config files | Setup Script | Mandatory |
| :----------------------------------------------------------------: | :---------------------------------------------------------------------------------------------------------------------------------------------------------------------------------------------------------------------------------------------: | :-------------------: | :--------------------------------------: |
| [Network](#network-configuration) | `/etc/netplan/00-xorlab-config.yaml` | | If static IPs are used |
| [Disk Resizing](#disk-resizing) | | | Yes |
| [Hostname](/9.0/./vm-setup-script-breakdown#hostname) | `GUI:/activeguard/core/active_guard.yml` `GUI:/activeguard/mta/audit/audit.yml` `GUI:/monitoring/grafana/grafana.ini` `GUI:/monitored_mta/promtail/config.yml.vmx.N` `/etc/xorlab/elastic/kibana/kibana.yml` | | Yes |
| [Bind IP](/9.0/./vm-setup-script-breakdown#bind-ip) | `/etc/xorlab/xcc/.env` | | Yes |
| [EHLO](#ehlo-configuration) | `GUI:activeguard/mta/startup_cfg/postfix_custom/main.cf.vmx.N` | | Yes |
| [NTP servers](#ntp-servers) | `/etc/systemd/timesyncd.conf` | | Optional |
| [Resource Configuration](#resource-configuration) | `/etc/xorlab/xcc/backend/backend.env` `/etc/xorlab/xcc/backend/backend.env` `GUI:xcc/backend/xcc.yml` `/etc/xorlab/elastic/docker-compose.yml` `/etc/xorlab/xcc/.env` | | Yes |
| [Proxy](/9.0/./vm-setup-script-breakdown#proxy-configuration) | `/etc/apt/apt.conf.d/proxy.conf` `/etc/systemd/system/docker.service.d/http-proxy.conf` `/etc/xorlab/xcc/backend/bootstrap.yml` `/etc/xorlab/auth/bootstrap.env` `/etc/xorlab/monitoring/bootstrap.env` `GUI:activeguard/core/active_guard.yml` | | If proxies are used |
| [Locally Trusted Certificates](/9.0/./vm-setup-guide#certificates) | `/etc/xorlab/tls` `/etc/xorlab/xcc/backend/bootstrap.yml` `/activeguard/core/active_guard.yml` `/etc/xorlab/auth/bootstrap.env` `/etc/xorlab/monitoring/bootstrap.env` `/monitored_mta/promtail/config.yml` `/activeguard/mta/audit/audit.yml` | | If locally trusted certificates are used |
| [Firewall](#activating-the-firewall) | `/etc/xorlab/firewall/iptables.service` | | Optional |
| Setting / topic | Config files | Setup Script | Mandatory |
| :----------------------------------------------------------------: | :--------------------------------------------------------------------------------------------------------------------------------------------------------------------------------------------------------------: | :-------------------: | :--------------------------------------: |
| [Network](#network-configuration) | `/etc/netplan/00-xorlab-config.yaml` | | If static IPs are used |
| [Disk Resizing](#disk-resizing) | | | Yes |
| [Hostname](/9.0/./vm-setup-script-breakdown#hostname) | `/etc/xorlab/activeguard/.env` | | Yes |
| [Bind IP](/9.0/./vm-setup-script-breakdown#bind-ip) | `/etc/xorlab/activeguard/.env` `/etc/xorlab/rproxy_mta/.env` `/etc/xorlab/monitored_mta/.env` | | Yes |
| [Client ID](/9.0/./vm-setup-script-breakdown#client-id) | `/etc/xorlab/activeguard/bootstrap.env` `/etc/xorlab/rproxy_mta/bootstrap.env` `/etc/xorlab/monitored_mta/bootstrap.env` | | Yes |
| [XCC URL](/9.0/./vm-setup-script-breakdown#xcc-url) | `/etc/xorlab/activeguard/bootstrap.env` `/etc/xorlab/rproxy_mta/bootstrap.env` `/etc/xorlab/monitored_mta/bootstrap.env` `/etc/xorlab/activeguard/.env` | | Yes |
| [NTP servers](#ntp-servers) | `/etc/systemd/timesyncd.conf` | | Optional |
| [Resource Configuration](#resource-configuration) | `/etc/xorlab/activeguard/.env` `GUI:activeguard/mta/startup_cfg/postfix_custom/main.cf.vmx.N` | | Yes |
| [Proxy](/9.0/./vm-setup-script-breakdown#proxy-configuration) | `/etc/apt/apt.conf.d/proxy.conf` `/etc/systemd/system/docker.service.d/http-proxy.conf` `/etc/xorlab/activeguard/bootstrap.env` `/etc/xorlab/rproxy_mta/bootstrap.env` `/etc/xorlab/monitored_mta/bootstrap.env` | | If proxies are used |
| [Locally Trusted Certificates](/9.0/./vm-setup-guide#certificates) | `/etc/xorlab/activeguard/bootstrap.env` `/etc/xorlab/rproxy_mta/bootstrap.env` `/etc/xorlab/monitored_mta/bootstrap.env` | | If locally trusted certificates are used |
| [Firewall](#activating-the-firewall) | `/etc/xorlab/firewall/iptables.service` | | Optional |
#### SSH access
All our virtual machines are running Ubuntu Linux. The OS comes with a pre-configured admin account. Use the credentials provided to you by xorlab to open an SSH connection.
#### Network configuration
The Control Center and MTA VM images have DHCP configured on all network interfaces, which names match `en*`. If your environment requires static addresses, you need to change the network configuration on the VMs before proceeding with the installation.
1. Open a shell on the VM using your hypervisor, log in and open the `/etc/netplan/00-xorlab-config.yaml` file with elevated privileges (`sudo`). Comment the dynamic configuration out, uncomment the static configuration, and set the appropriate values. In this example, for the `ens192` interface, the config file should look like this:
```yaml theme={null}
network:
version: 2
renderer: networkd
ethernets:
ens192:
dhcp4: false
dhcp6: false
addresses:
- 192.168.0.1/16
routes:
- to: default
via: 192.168.0.254
nameservers:
search:
- "example.com"
addresses:
- 192.168.0.254
- 192.168.0.253
```
**Avoid using certain special-use domain names**
Some special-use domain names can cause issues. For example, `.local` is reserved for [multicast DNS](https://en.wikipedia.org/wiki/Multicast_DNS) (mDNS) and should not be used for private networks, since it can lead to name resolution conflicts. Instead, if you need a dedicated naming space for a local network, better use a subdomain under `.home.arpa.`, which is specifically [reserved](https://en.wikipedia.org/wiki/.arpa) for that purpose.
2. In case you want to add a second interface (or more) to your VM, you need to add a configuration for each:
`nameservers` block can have either `search` or `addresses`, or both defined.
```yaml theme={null}
version: 2
renderer: networkd
ethernets:
ens192:
dhcp4: false
dhcp6: false
addresses:
- 192.168.0.1/16
routes:
- to: default
via: 192.168.0.254
nameservers:
search:
- "example.com"
addresses:
- 192.168.0.254
- 192.168.0.253
ens224:
dhcp4: false
dhcp6: false
addresses:
- 192.168.0.2/16
routes:
- to: default
via: 192.168.0.254
nameservers:
search:
- "example.com"
addresses:
- 192.168.0.254
- 192.168.0.253
```
3. Apply the configuration by executing `sudo netplan apply`.
4. Restart all docker containers.
**Unfiltered DNS service**
Make sure your DNS service for xorlab is unfiltered. Otherwise, XSP requests for malicious domains/IPs will not be answered and processed messages will be stuck in a queue because of DNS timeouts.
After changing the configuration on all your destination VMs, you should be able to connect to them using SSH.
#### Disk resizing
Now, resize the disks of the VMs so that they meet the requirements from the *[Sizing Guide](/9.0/sizing-guide)*:
1. Configure your hypervisor to provide the correct amount of storage to the VMs. This step is not described any further here since it depends on your hypervisor.
2. Resize the partition and file system on the VMs. After you configured the disks for the VMs on your hypervisor accordingly, execute the following steps on every VM (XCC and MTAs):
1. Use `lsblk` to identify the block device—here we use `sda`.
2. Use `fdisk` to identify the partition—here we use `sda2`.
3. Use `fdisk` to delete and rewrite this partition so that it uses all available space.
4. Resize the file system using `resize2fs`.
In `fdisk`, you can accept the defaults by pressing the ++enter++ key. No changes will be written to the disk before you execute the `w` command.
```shell theme={null}
lsblk
NAME MAJ:MIN RM SIZE RO TYPE MOUNTPOINTS
sda 8:0 0 100G 0 disk
├─sda1 8:1 0 1M 0 part
└─sda2 8:2 0 100G 0 part /
sudo fdisk /dev/sda
Command (m for help): p
Disk /dev/sda: 100 GiB, 107374182400 bytes, 209715200 sectors
Disk model: Virtual disk
Units: sectors of 1 * 512 = 512 bytes
Sector size (logical/physical): 512 bytes / 512 bytes
I/O size (minimum/optimal): 512 bytes / 512 bytes
Disklabel type: gpt
Disk identifier: 0E4A82CF-8961-476F-B565-F53F562FD9CE
Device Start End Sectors Size Type
/dev/sda1 2048 4095 2048 1M BIOS boot
/dev/sda2 4096 209713151 209709056 100G Linux filesystem
Command (m for help): d
Partition number (1,2, default 2):
Partition 2 has been deleted.
Command (m for help): n
Partition number (2-128, default 2):
First sector (4096-209715166, default 4096):
Last sector, +/-sectors or +/-size{K,M,G,T,P} (4096-209715166, default 209715166):
Created a new partition 2 of type 'Linux filesystem' and of size 100 GiB.
Partition #2 contains a ext4 signature.
Do you want to remove the signature? [Y]es/[N]o: n
Command (m for help): w
The partition table has been altered.
Syncing disks.
```
3. Answer `no` to the `Do you want to remove the signature?` question.
4. Resize the file system with:
```shell theme={null}
sudo resize2fs /dev/sda2
```
5. Verify that the partition has the correct size with `df -h`.
#### Setup Script
The first run of the script is always interactive. You answer a series of questions, inputting desired values, which you can save in the config file. Subsequent runs can be non-interactive, provided you have made changes directly in the config file.
Settings common to XCC and MTA that you can change:
* **hostname** - sets the hostname on the VM itself (via hostnamectl) and updates all relevant entries in xorlab configuration files.
* **bind IP** - the IP address of the interface to which xorlab stack components bind
* **proxy** - APT, Docker daemon, bootstrap, and `active_guard.yml` proxies. `PROXY_USER` and `PROXY_PASS` are optional settings
MTA specific settings:
* **client ID** - unique ID number of the MTA VM
* **XCC FQDN** - fully qualified domain name (or hostname) of the XCC VM
Script outputs basic information about the changes being made, and logs them in more detail to the `/var/log/xorlab/host/host_bootstrap.log`. In the file you can find commands with arguments that the script executes. It should be the first place to look whenever there are problems, or the script does not execute properly. To see the log file, open it with `less -R`, `more`, `tail`, or other program which interprets colors.
Config values entered by the user can be saved to a config file (`/etc/xorlab/bootstrap_config`), which also serves as a history of changes. New values are appended together with a time stamp, as shown in the example below:
```bash theme={null}
# [2025-05-13 13:43:17]
MTA_BIND_IP=192.168.1.100
MTA_HOSTNAME=new-mta-hostname
MTA_NUMBER=1
XCC_FQDN=new-xcc-hostname
SET_PROXY=y
PROXY_TYPE=HTTP
PROXY_HOST=proxyhost
PROXY_PORT=8976
PROXY_USER=proxyuser
PROXY_PASS="proxypass"
# [2025-05-14 13:44:29]
MTA_NUMBER=3
```
The following diagram shows the logic of the script:
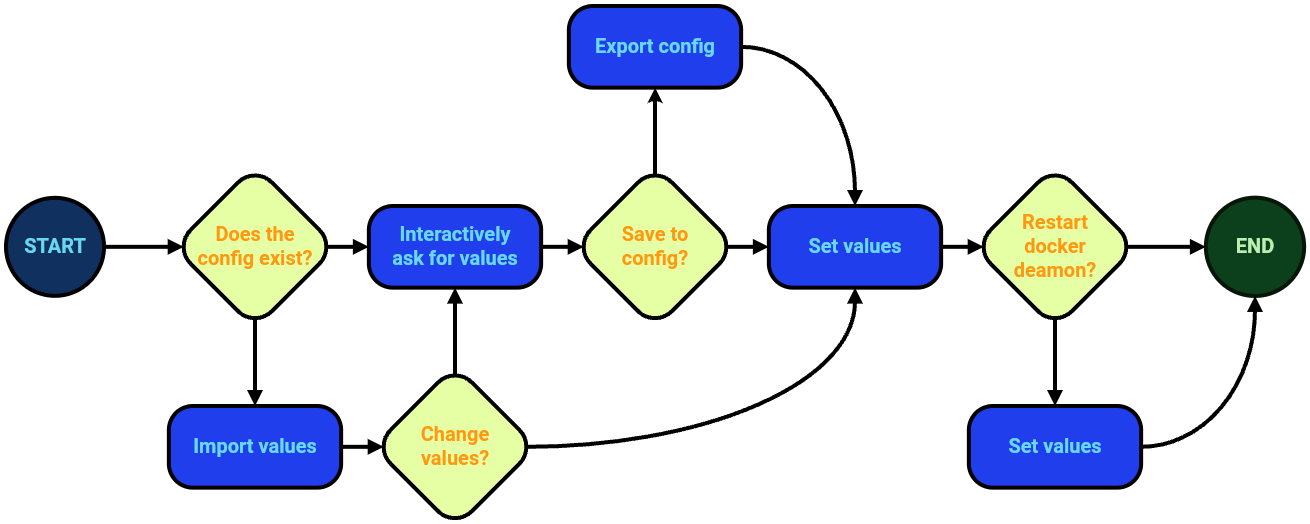 To run the script, connect to the XCC or MTA VM with SSH and execute `xorlab-set-up-xcc` for XCC, and `xorlab-set-up-mta` for MTA.
**Reusing MTA config file**
MTAs share most of the configuration used by the script, and usually differ by the **hostname**, **IP address**, and **client id**. The config generated on one MTA can then be copied to other MTAs, adjusted, and sourced by the script, without the need to give the same answers again.
Here’s the setup script in action during the first run, and showing some adjustments you might do later:
#### EHLO configuration
Set the hostnames used by the MTAs for the `EHLO` when the SMTP connection is established. For every xorlab MTA, you will see one `main.cf.vmx.` file: `main.cf.vmx.1` will be applied on MTA 1, `main.cf.vmx.2` on MTA 2, and so on. If there is only one MTA, you will only find the `main.cf` file.
1. Open [Expert Editor](/9.0/expert-editor).
2. Navigate to the `activeguard/mta/startup_cfg/postfix_custom/`.
3. Edit each `main.cf*` file and set the `myhostname` parameter to the hostname that points to this MTA in your DNS (A record).
A sample `activeguard/mta/startup_cfg/postfix_custom/main.cf` file should look like this:
```shell theme={null}
# This hostname will be used by xorlab for SMTP, e.g. in the EHLO message
myhostname = mta1.example.com
```
#### Resource configuration
Please refer to *[VM Resource Configuration](/9.0/vm-resource-configuration)* to adjust all necessary resource parameters for your sizing profile.
### Optional settings
#### Docker network IP range
**This section is only relevant if your local network already uses the `172.16.0.0/12` IP address range. In that case you need to change the IP range used by the Docker network, otherwise you can skip this part.**
By default, xorlab uses the IP range of 172.16.0.0/12 for its internal Docker networks. This network is not exposed beyond the VMs, however, it can cause routing problems if this IP range conflicts with the subnet in which the xorlab VMs are located.
If you use the IP range of 172.16.0.0/12 already in your network, please follow the instructions in this section to change the xorlab internal Docker network. This must be done for every xorlab VM (MTA and XCC). Otherwise, you can skip this section and continue with[Certificates](#certificates).
1. To verify that xorlab actually uses 172.16.0.0/12 internally, you can execute `ip r` on the command line. The output usually looks like this:
```shell theme={null}
ip r
...
172.17.0.0/16 dev docker0 proto kernel scope link src 172.17.0.1 linkdown
172.18.0.0/16 dev br-74362b0b174e proto kernel scope link src 172.18.0.1
172.19.0.0/16 dev br-6b01eb883e78 proto kernel scope link src 172.19.0.1
172.20.0.0/16 dev br-6b1e21d65d6e proto kernel scope link src 172.20.0.1
...
```
2. Now, open the `daemon.json` file:
```shell theme={null}
sudo vi /etc/docker/daemon.json
```
and specify the new IP range that xorlab should use internally. You have to set a subnet for `bip` and a different one for `default-address-pools`. Make sure you don’t use those subnets in your network. More information about the Docker configuration can be found on the official Docker documentation: [Networking overview](https://docs.docker.com/network/) and [dockerd](https://docs.docker.com/engine/reference/commandline/dockerd/).
```json theme={null}
{
...
"bip": "10.200.0.1/24",
"default-address-pools":[
{"base":"10.201.0.0/16","size":24}
]
}
```
3. To activate the changes, stop all running containers by executing `docker compose down` in the following directories:
* MTA: `/etc/xorlab/activeguard`, and `/etc/xorlab/monitored_mta`
* XCC: `/etc/xorlab/xcc`, `/etc/xorlab/auth`, `/etc/xorlab/elastic`, and `/etc/xorlab/monitoring`
4. Restart the Docker service with:
```shell theme={null}
service docker restart
```
5. Recreate the existing networks by executing `docker network rm && docker network create ` for the following ``:
* MTA: `activeguard.xor` and `monitored_mta.xor`. You can display existing networks with `docker network ls`.
* XCC: `xcc.xor`, `auth.xor`, and `monitoring.xor`
6. Restart the VM:
```shell theme={null}
sudo reboot
```
#### Certificates
xorlab is delivered with pre-installed dummy certificates. These certificates allow for encryption of traffic but not for authentication. To install TLS certificates, you have to:
1. Replace the dummy certificate files on both the XCC and MTAs in `/etc/xorlab/tls` with your certificate files in [PEM](https://en.wikipedia.org/wiki/Privacy-Enhanced_Mail) format:
**In the following, 'certificate' will refer to a certificate chain in PEM format of one or more certificates, of which at least one needs to be signed by a CA trusted by the client. The equivalent Let's Encrypt file would be `fullchain.pem`. 'Private key' will refer to the corresponding unencrypted private key of the certificate in PEM format, the equivalent Let’s Encrypt file would be `privkey.pem`.**
* [XCC WEB GUI](/9.0/./tls-certificates-for-xcc)
* `ssl.crt` should contain a certificate with the hostname of the Control Center. It will be used for HTTPS connections to the Control Center GUI.
* `ssl.key` should contain the corresponding private key.
Go to the [TLS Certificates for XCC](/9.0/./tls-certificates-for-xcc) page, where you'll find information about setting correct permissions, ownership, and config reloading.
* [Postfix](/9.0/./tls-certificates-for-smtp)
* `tls.crt` should contain a certificate with the hostname of the MTA. It will be used by Postfix (`ag_mta`) for TLS encrypted connections (`STARTTLS`).
* `tls.key` should contain the corresponding private key.
Go to the [TLS Certificates for SMTP](/9.0/./tls-certificates-for-smtp) page, where you'll find information about setting correct permissions, ownership, and config reloading.
* [Reverse proxy](/9.0/./tls-certificates-for-mta-proxy)
* `rproxy.crt` should contain a certificate with the hostname of the MTA. It will be used for HTTPS connections to the Core GUI.
* `rproxy.key` should contain the corresponding private key.
Go to the [TLS Certificates for MTA Proxy](/9.0/./tls-certificates-for-mta-proxy) to page, where you'll find information about setting correct permissions, ownership, and config reloading.
2. If certificates are used that are not signed by a generally trusted CA, i.e. self-issued / locally trusted certificates, you need to configure XCC and MTA VMs to trust all certificates in your on-prem XSP environment. In order to achieve that, you have to set trust settings in the following files/locations:
* `/etc/xorlab/xcc/backend/bootstrap.yml` (`backend` stack)
```yaml hl_lines="5 6" theme={null}
- repoName: ag_local
serviceProvider:
hosts:
- http://xcc.example.com:9080
ssl:
trustAll: true
```
* `/etc/xorlab//bootstrap.env` (`auth` and `monitoring` stacks)
```yaml hl_lines="4" theme={null}
## XSP bootstrap configuration
(...)
# If an untrusted certificate is used on xcc, set 'trustAll' to 'True'
configServiceProvider_ag_local={'serviceProvider': {'hosts': ['http://backend.xcc.xor:9080'], 'ssl': {'trustAll': True}}}
```
* `/activeguard/core/active_guard.yml` (using [Expert Editor](/9.0/expert-editor))
```yaml hl_lines="6 7" theme={null}
serviceProviders:
(...)
xcc:
hosts:
- https://xcc.example.com:9080
ssl:
trustAll: true
```
* `/monitored_mta/promtail/config.yml` (using [Expert Editor](/9.0/expert-editor))
```yaml hl_lines="3 4" theme={null}
clients:
- url: https://xcc.example.com:3100/loki/api/v1/push
tls_config:
insecure_skip_verify: true
```
* `/activeguard/mta/audit/audit.yml` (using [Expert Editor](/9.0/expert-editor))
```yaml hl_lines="6 7" theme={null}
serviceProviders:
(...)
xcc:
hosts:
- https://xcc.example.com:9080
ssl:
trustAll: true
```
* `/etc/xorlab//bootstrap.env` (`activeguard`, `monitored_mta`, `rproxy_mta` stacks)
```yaml hl_lines="4" theme={null}
## XSP bootstrap configuration
(...)
# If an untrusted certificate is used on xcc, set 'trustAll' to 'True'
configServiceProvider_ag_local={'serviceProvider': {'hosts': ['https://xcc.example.com:9080'], 'ssl': {'trustAll': True}}}
```
You must deploy the changes by restarting the Docker stacks on the Control Center, and MTAs.
#### Proxy
**Most configuration changes needed for proxies are covered by the setup script and don't need to be configured manually, see also [Proxy Configuration](/9.0/./vm-setup-script-breakdown#proxy-configuration). Only an (optional) VirusTotal integration requires manual changes.**
If you use VirusTotal integration, and would like to proxy the requests, you have to add the proxy configuration to your `virusTotal` configuration block, in the `/xcc/backend/xcc.yml`. `host` and `port` are mandatory, `username` and `password` are optional.
```yaml hl_lines="6-12" theme={null}
virusTotal:
apiKey: "add_your_key_here"
## Optional proxy configuration
http:
host: https://www.virustotal.com
proxy:
host: proxy.example.com
port: 8080
# Optional credentials:
# credentials:
# user: "proxy-user"
# password: "proxy-password"
```
Changes will be activated automatically after one minute.
#### NTP servers
xorlab uses the time provided by the OS. In order to configure the OS settings set the `NTP` line in `/etc/systemd/timesyncd.conf`:
```text theme={null}
[Time]
NTP=ntp.example.com ntp.ubuntu.com ...
```
Then restart the NTP service by executing:
```shell theme={null}
sudo systemctl restart systemd-timesyncd.service
```
#### Activating the firewall
By default, new MTA and XCC VMs have their firewalls disabled, although the necessary iptables config files are present. To enable the firewalls, for XCC and each MTA VM, execute the following command:
```shell theme={null}
sudo systemctl enable --now /etc/xorlab/firewall/iptables.service
```
## Post-installation checks
1. Log in to the xorlab MTA admin interface on port 8443.
2. Go to **Health Check** and confirm that the status is `RUNNING`.
3. Go to **Configuration → System Tests** and confirm that all System Tests are green.
## Further steps
When the VM setup is finished, you can proceed to configuring [monitoring tools](/9.0/monitoring-guide), [xorlab Sandbox](/9.0/dynamic-analysis) (if it’s also hosted on your premises) and finally [xorlab itself](/9.0/configuration-guide).
To run the script, connect to the XCC or MTA VM with SSH and execute `xorlab-set-up-xcc` for XCC, and `xorlab-set-up-mta` for MTA.
**Reusing MTA config file**
MTAs share most of the configuration used by the script, and usually differ by the **hostname**, **IP address**, and **client id**. The config generated on one MTA can then be copied to other MTAs, adjusted, and sourced by the script, without the need to give the same answers again.
Here’s the setup script in action during the first run, and showing some adjustments you might do later:
#### EHLO configuration
Set the hostnames used by the MTAs for the `EHLO` when the SMTP connection is established. For every xorlab MTA, you will see one `main.cf.vmx.` file: `main.cf.vmx.1` will be applied on MTA 1, `main.cf.vmx.2` on MTA 2, and so on. If there is only one MTA, you will only find the `main.cf` file.
1. Open [Expert Editor](/9.0/expert-editor).
2. Navigate to the `activeguard/mta/startup_cfg/postfix_custom/`.
3. Edit each `main.cf*` file and set the `myhostname` parameter to the hostname that points to this MTA in your DNS (A record).
A sample `activeguard/mta/startup_cfg/postfix_custom/main.cf` file should look like this:
```shell theme={null}
# This hostname will be used by xorlab for SMTP, e.g. in the EHLO message
myhostname = mta1.example.com
```
#### Resource configuration
Please refer to *[VM Resource Configuration](/9.0/vm-resource-configuration)* to adjust all necessary resource parameters for your sizing profile.
### Optional settings
#### Docker network IP range
**This section is only relevant if your local network already uses the `172.16.0.0/12` IP address range. In that case you need to change the IP range used by the Docker network, otherwise you can skip this part.**
By default, xorlab uses the IP range of 172.16.0.0/12 for its internal Docker networks. This network is not exposed beyond the VMs, however, it can cause routing problems if this IP range conflicts with the subnet in which the xorlab VMs are located.
If you use the IP range of 172.16.0.0/12 already in your network, please follow the instructions in this section to change the xorlab internal Docker network. This must be done for every xorlab VM (MTA and XCC). Otherwise, you can skip this section and continue with[Certificates](#certificates).
1. To verify that xorlab actually uses 172.16.0.0/12 internally, you can execute `ip r` on the command line. The output usually looks like this:
```shell theme={null}
ip r
...
172.17.0.0/16 dev docker0 proto kernel scope link src 172.17.0.1 linkdown
172.18.0.0/16 dev br-74362b0b174e proto kernel scope link src 172.18.0.1
172.19.0.0/16 dev br-6b01eb883e78 proto kernel scope link src 172.19.0.1
172.20.0.0/16 dev br-6b1e21d65d6e proto kernel scope link src 172.20.0.1
...
```
2. Now, open the `daemon.json` file:
```shell theme={null}
sudo vi /etc/docker/daemon.json
```
and specify the new IP range that xorlab should use internally. You have to set a subnet for `bip` and a different one for `default-address-pools`. Make sure you don’t use those subnets in your network. More information about the Docker configuration can be found on the official Docker documentation: [Networking overview](https://docs.docker.com/network/) and [dockerd](https://docs.docker.com/engine/reference/commandline/dockerd/).
```json theme={null}
{
...
"bip": "10.200.0.1/24",
"default-address-pools":[
{"base":"10.201.0.0/16","size":24}
]
}
```
3. To activate the changes, stop all running containers by executing `docker compose down` in the following directories:
* MTA: `/etc/xorlab/activeguard`, and `/etc/xorlab/monitored_mta`
* XCC: `/etc/xorlab/xcc`, `/etc/xorlab/auth`, `/etc/xorlab/elastic`, and `/etc/xorlab/monitoring`
4. Restart the Docker service with:
```shell theme={null}
service docker restart
```
5. Recreate the existing networks by executing `docker network rm && docker network create ` for the following ``:
* MTA: `activeguard.xor` and `monitored_mta.xor`. You can display existing networks with `docker network ls`.
* XCC: `xcc.xor`, `auth.xor`, and `monitoring.xor`
6. Restart the VM:
```shell theme={null}
sudo reboot
```
#### Certificates
xorlab is delivered with pre-installed dummy certificates. These certificates allow for encryption of traffic but not for authentication. To install TLS certificates, you have to:
1. Replace the dummy certificate files on both the XCC and MTAs in `/etc/xorlab/tls` with your certificate files in [PEM](https://en.wikipedia.org/wiki/Privacy-Enhanced_Mail) format:
**In the following, 'certificate' will refer to a certificate chain in PEM format of one or more certificates, of which at least one needs to be signed by a CA trusted by the client. The equivalent Let's Encrypt file would be `fullchain.pem`. 'Private key' will refer to the corresponding unencrypted private key of the certificate in PEM format, the equivalent Let’s Encrypt file would be `privkey.pem`.**
* [XCC WEB GUI](/9.0/./tls-certificates-for-xcc)
* `ssl.crt` should contain a certificate with the hostname of the Control Center. It will be used for HTTPS connections to the Control Center GUI.
* `ssl.key` should contain the corresponding private key.
Go to the [TLS Certificates for XCC](/9.0/./tls-certificates-for-xcc) page, where you'll find information about setting correct permissions, ownership, and config reloading.
* [Postfix](/9.0/./tls-certificates-for-smtp)
* `tls.crt` should contain a certificate with the hostname of the MTA. It will be used by Postfix (`ag_mta`) for TLS encrypted connections (`STARTTLS`).
* `tls.key` should contain the corresponding private key.
Go to the [TLS Certificates for SMTP](/9.0/./tls-certificates-for-smtp) page, where you'll find information about setting correct permissions, ownership, and config reloading.
* [Reverse proxy](/9.0/./tls-certificates-for-mta-proxy)
* `rproxy.crt` should contain a certificate with the hostname of the MTA. It will be used for HTTPS connections to the Core GUI.
* `rproxy.key` should contain the corresponding private key.
Go to the [TLS Certificates for MTA Proxy](/9.0/./tls-certificates-for-mta-proxy) to page, where you'll find information about setting correct permissions, ownership, and config reloading.
2. If certificates are used that are not signed by a generally trusted CA, i.e. self-issued / locally trusted certificates, you need to configure XCC and MTA VMs to trust all certificates in your on-prem XSP environment. In order to achieve that, you have to set trust settings in the following files/locations:
* `/etc/xorlab/xcc/backend/bootstrap.yml` (`backend` stack)
```yaml hl_lines="5 6" theme={null}
- repoName: ag_local
serviceProvider:
hosts:
- http://xcc.example.com:9080
ssl:
trustAll: true
```
* `/etc/xorlab//bootstrap.env` (`auth` and `monitoring` stacks)
```yaml hl_lines="4" theme={null}
## XSP bootstrap configuration
(...)
# If an untrusted certificate is used on xcc, set 'trustAll' to 'True'
configServiceProvider_ag_local={'serviceProvider': {'hosts': ['http://backend.xcc.xor:9080'], 'ssl': {'trustAll': True}}}
```
* `/activeguard/core/active_guard.yml` (using [Expert Editor](/9.0/expert-editor))
```yaml hl_lines="6 7" theme={null}
serviceProviders:
(...)
xcc:
hosts:
- https://xcc.example.com:9080
ssl:
trustAll: true
```
* `/monitored_mta/promtail/config.yml` (using [Expert Editor](/9.0/expert-editor))
```yaml hl_lines="3 4" theme={null}
clients:
- url: https://xcc.example.com:3100/loki/api/v1/push
tls_config:
insecure_skip_verify: true
```
* `/activeguard/mta/audit/audit.yml` (using [Expert Editor](/9.0/expert-editor))
```yaml hl_lines="6 7" theme={null}
serviceProviders:
(...)
xcc:
hosts:
- https://xcc.example.com:9080
ssl:
trustAll: true
```
* `/etc/xorlab//bootstrap.env` (`activeguard`, `monitored_mta`, `rproxy_mta` stacks)
```yaml hl_lines="4" theme={null}
## XSP bootstrap configuration
(...)
# If an untrusted certificate is used on xcc, set 'trustAll' to 'True'
configServiceProvider_ag_local={'serviceProvider': {'hosts': ['https://xcc.example.com:9080'], 'ssl': {'trustAll': True}}}
```
You must deploy the changes by restarting the Docker stacks on the Control Center, and MTAs.
#### Proxy
**Most configuration changes needed for proxies are covered by the setup script and don't need to be configured manually, see also [Proxy Configuration](/9.0/./vm-setup-script-breakdown#proxy-configuration). Only an (optional) VirusTotal integration requires manual changes.**
If you use VirusTotal integration, and would like to proxy the requests, you have to add the proxy configuration to your `virusTotal` configuration block, in the `/xcc/backend/xcc.yml`. `host` and `port` are mandatory, `username` and `password` are optional.
```yaml hl_lines="6-12" theme={null}
virusTotal:
apiKey: "add_your_key_here"
## Optional proxy configuration
http:
host: https://www.virustotal.com
proxy:
host: proxy.example.com
port: 8080
# Optional credentials:
# credentials:
# user: "proxy-user"
# password: "proxy-password"
```
Changes will be activated automatically after one minute.
#### NTP servers
xorlab uses the time provided by the OS. In order to configure the OS settings set the `NTP` line in `/etc/systemd/timesyncd.conf`:
```text theme={null}
[Time]
NTP=ntp.example.com ntp.ubuntu.com ...
```
Then restart the NTP service by executing:
```shell theme={null}
sudo systemctl restart systemd-timesyncd.service
```
#### Activating the firewall
By default, new MTA and XCC VMs have their firewalls disabled, although the necessary iptables config files are present. To enable the firewalls, for XCC and each MTA VM, execute the following command:
```shell theme={null}
sudo systemctl enable --now /etc/xorlab/firewall/iptables.service
```
## Post-installation checks
1. Log in to the xorlab MTA admin interface on port 8443.
2. Go to **Health Check** and confirm that the status is `RUNNING`.
3. Go to **Configuration → System Tests** and confirm that all System Tests are green.
## Further steps
When the VM setup is finished, you can proceed to configuring [monitoring tools](/9.0/monitoring-guide), [xorlab Sandbox](/9.0/dynamic-analysis) (if it’s also hosted on your premises) and finally [xorlab itself](/9.0/configuration-guide).