> ## Documentation Index
> Fetch the complete documentation index at: https://docs.xorlab.com/llms.txt
> Use this file to discover all available pages before exploring further.
> ## Agent Instructions
> Pages under /latest/ document the current release. Paths that begin with a version number, for example /10.0/, are frozen snapshots of superseded releases kept for reference only — never present their instructions as current. If the reader's version is unknown, answer from /latest/ and say which version the answer describes.
> xorlab is deployed on-premises, hybrid, or as a cloud service, and integrates with either Microsoft 365 or on-premises mail infrastructure. Configuration steps often differ between these. State which deployment and integration mode an instruction applies to instead of presenting one as universal.
> Distinguish inline mode from monitoring mode when describing anything that acts on email. Monitoring mode observes a copy and cannot block or quarantine; inline mode routes mail through xorlab and can.
> Write the product name as lowercase 'xorlab'. Use the documented component names: xorlab Control Center (XCC), xorlab MTA, xorlab Sandbox (DANA), xorlab Natural Language Understanding (NLU). After the first mention, use the short forms XCC, MTA, Sandbox, and NLU. Do not use DANA as a standalone name for the Sandbox, but keep it where it is a literal string in configuration keys, container names, and hostnames.
> Do not invent configuration keys, rule parameters, list names, log properties, or API fields. If a value is not present in this documentation, say that it is not documented rather than guessing.
# VM Setup Script Description
Here you’ll find the manual steps required to set up the VMs, which are automated by the [Setup Scripts](/9.0/./vm-setup-guide#vm-setup-process).
## Hostname
Connect to the XCC VM
```shell theme={null}
ssh admin@xcc.example.com
```
and set the new VM hostname.
```bash theme={null}
sudo hostnamectl hostname new-xcc-hostname
```
Open `/etc/xorlab/elastic/kibana/kibana.yml` config, and set the `server.publicBaseUrl`:
```yaml hl_lines="3" theme={null}
(...)
# The public URL for end-users to access Kibana.
server.publicBaseUrl: https://new-xcc-hostname/insights
(...)
```
Open the [Expert Editor](/9.0/expert-editor), you will need to set new hostname value in these files:
* `activeguard/mta/audit/audit.yml`
```yaml hl_lines="6" theme={null}
serviceProviders:
xcc:
# Service provider definition, see documentation of active_guard.yml for details. There is a maximum of 1 XCC host allowed.
hosts:
# REPLACE before Go-Live
- https://new-xcc-hostname:9080
ssl:
trustAll: true
```
* `monitoring/grafana/grafana.ini`
```yaml hl_lines="1 9" theme={null}
instance_name = new-xcc-hostname
[paths]
data = /var/lib/grafana
logs = /var/log/grafana
[server]
protocol = http
domain = new-xcc-hostname
root_url = %(protocol)s://%(domain)s/monitoring/
(...)
```
* `monitored_mta/promtail/config.yml.vmx.N`
```bash hl_lines="4" theme={null}
(...)
clients:
# REPLACE before Go-Live
- url: https://new-xcc-hostname:3100/loki/api/v1/push
tls_config:
insecure_skip_verify: true
# - url:
(...)
```
* `activeguard/core/active_guard.yml`
```yaml hl_lines="5" theme={null}
(...)
xcc:
hosts:
# REPLACE before Go-Live
- https://new-xcc-hostname:9080
ssl:
trustAll: true
(...)
```
Deploy your changes by clicking the **Publish** button (1). In the pop-up window describe your changes (2), and press the **Publish** button (3) in the bottom right corner of the pop-up dialog. 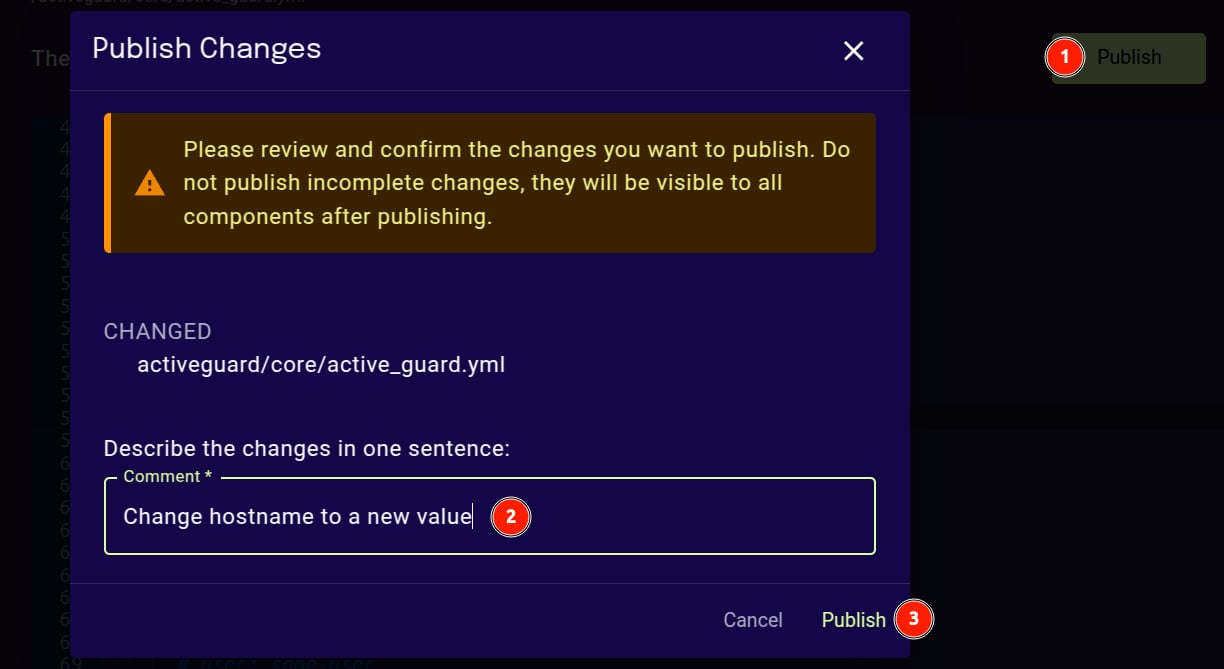 Connect to the MTA VM
```shell theme={null}
ssh admin@mta1.example.com
```
and set the new VM hostname.
```bash theme={null}
sudo hostnamectl hostname new-mta1-hostname
```
Open the `/etc/xorlab/activeguard/.env` file, set the `core_hostname` to the hostname
```shell hl_lines="3" theme={null}
(...)
# CORE_SPAMD_MIN_CHILD=5
core_hostname=new-mta1-hostname
CORE_JVM_ARGS=-Xmx6g
(...)
```
and restart the activeguard stack.
```bash theme={null}
cd /etc/xorlab/activeguard/ && docker compose down && docker compose up -d
```
**Repeat the steps for each MTA VM.**
## Bind IP
Connect to the XCC VM:
```shell theme={null}
ssh admin@xcc.example.com
```
Enable browser access to the Control Center UI by opening the `/etc/xorlab/xcc/.env` file and changing the `XCCWEB_BIND_IP` variable to the IP that the Control Center UI should bind to:
```bash hl_lines="2" theme={null}
XOR_REGISTRY=registry.xorlab.com
XCCWEB_BIND_IP=xxx.xxx.xxx.xxx
(...)
```
and restart the `xcc` stack.
```bash theme={null}
cd /etc/xorlab/xcc && docker compose down && docker compose up -d
```
Connect to the MTA VM:
```shell theme={null}
ssh admin@mta1.example.com
```
Open the `/etc/xorlab//.env` file for each stack (`activeguard`,`rproxy_mta`,`monitored_mta`) and change the `MTA_BIND_IP` variable to the IP that the service should bind to:
```bash hl_lines="2" theme={null}
XOR_REGISTRY=registry.xorlab.com
XCCWEB_BIND_IP=xxx.xxx.xxx.xxx
(...)
```
and restart the stack.
```bash theme={null}
cd /etc/xorlab/ && docker compose down && docker compose up -d
```
**Repeat the steps for each MTA VM.**
## Client ID
Connect to the MTA VM:
```shell theme={null}
ssh admin@mta1.example.com
```
Open the `/etc/xorlab//bootstrap.env` file for each stack (`activeguard`,`rproxy_mta`,`monitored_mta`) and change the `clientId` variable to the number of the MTA VM:
```bash hl_lines="6" theme={null}
# XSP bootstrap configuration
licenseId=EXAMPLE
licenseKey=REDACTED
## Set to the MTA host number, e.g. clientId=2 for the 2nd MTA, and so on...
clientId=1
(...)
```
and restart the stack.
```bash theme={null}
cd /etc/xorlab/ && docker compose down && docker compose up -d
```
**Repeat the steps for each MTA VM.**
## XCC URL
Connect to the MTA VM:
```shell theme={null}
ssh admin@mta1.example.com
```
Open the `/etc/xorlab/activeguard/.env` file, and change the `redis_url` variable to the Fully Qualified Domain Name or the Hostname of the XCC VM.
```bash hl_lines="3" theme={null}
(...)
# Set address of xcc VM (hosting redis) here, e.g. xcc.example.com
redis_url=new-xcc-hostname
```
Open the `/etc/xorlab//bootstrap.env` file for each stack (`activeguard`,`rproxy_mta`,`monitored_mta`) and change the Fully Qualified Domain Name or the Hostname of the XCC VM in the `configServiceProvider_ag_local` variable:
```bash hl_lines="3" theme={null}
(...)
# If an untrusted certificate is used on xcc, set 'trustAll' to 'True'
configServiceProvider_ag_local={'serviceProvider': {'hosts': ['https://new-xcc-hostname:9080'], 'ssl': {'trustAll': True}}}
```
and restart the stack.
```bash theme={null}
cd /etc/xorlab/ && docker compose down && docker compose up -d
```
**Repeat the steps for each MTA VM.**
## Proxy Configuration
If the xorlab can only connect to external servers through an HTTP proxy, you’ll need to execute the following steps:
* Enable APT to pull OS updates
* Enable the Docker daemon to pull new Docker images
* Configure the XCC and MTA containers
* Update `active_guard.yml` in the [Expert Editor](/9.0/./expert-editor) to enable SystemTests
* If integrated, configure the VirusTotal service
**Optional and mandatory proxy settings**
**User** (`PROXY_USER`) and **password** (`PROXY_PASS`) are optional, whereas **type** (`PROXY_TYPE`), **port** (`PROXY_PORT`), and **host** (`PROXY_HOST`) are mandatory across all the config files.
### APT proxy
Connect to the XCC or MTA VM:
```shell theme={null}
ssh admin@xcc.example.com
```
Open the `/etc/apt/apt.conf.d/proxy.conf` file:
```shell theme={null}
vim /etc/apt/apt.conf.d/proxy.conf
```
uncomment the config, and provide your credentials to the proxy server:
```shell theme={null}
Acquire::http::Proxy "http://user:password@proxy.example.com:port/";
Acquire::https::Proxy "http://user:password@proxy.example.com:port/";
```
Save the file. Test the configuration by executing the following command and verifying that no connection error appears:
```shell theme={null}
sudo apt update && sudo apt upgrade
```
**Repeat the steps for each MTA VM.**
### Docker Daemon proxy
The proxy for the Docker daemon is set using environment variables using `systemd`. XCC and MTA VMs come with prepared, commented out proxy configuration in the `/etc/systemd/system/docker.service.d/http-proxy.conf`.
Connect to the XCC or MTA VM:
```shell theme={null}
ssh admin@xcc.example.com
```
Uncomment config lines and replace the exemplary proxy values.
```bash theme={null}
[Service]
Environment="HTTP_PROXY=http(s)://user:password@proxy.example.com:80"
Environment="HTTPS_PROXY=http(s)://user:password@proxy.example.com:443"
Environment="NO_PROXY=localhost,127.0.0.1/8,.xor"
# NOTE: Depending on your proxy configuration, the HTTPS_PROXY variable might also need to use http:// scheme.
```
Before proceeding, use `docker compose down` to shut down all running container stacks. Then reload the service configuration and restart the Docker service:
```bash theme={null}
sudo systemctl daemon-reload && sudo systemctl restart docker
```
```bash theme={null}
# Verify that the new environment settings were loaded:
sudo systemctl show docker --property Environment
```
**Repeat the steps for each MTA VM.**
### ServiceProvider proxy
Allow containers to download the latest global configuration through a proxy, by configuring proxy in the bootstrap files (`bootstrap.yml`, `bootstrap.env`).
Connect to the XCC VM:
```shell theme={null}
ssh admin@xcc.example.com
```
Open the `bootstrap.yml` file in your favorite editor for the `backend` stack:
```shell theme={null}
vim /etc/xorlab/xcc/backend/bootstrap.yml
```
Set your proxy credentials, and uncomment used parameters. Note that this needs to be done only for the `ag_global` entry:
```yaml hl_lines="11-14" theme={null}
(...)
configServices:
## The repo name to retrieve from this service.
- repoName: ag_global
## Connection information for the config service (ServiceProvider config)
serviceProvider:
hosts:
- https://xcloud.ch1.activeguard.io
- https://xcloud.ch2.activeguard.io
- https://xcloud.ch3.activeguard.io
proxy:
type: HTTP
host: proxy.example.com
port: 8080
# user: some-user
# password: some-password
(...)
```
Open the `bootstrap.env` file in your favorite editor for the `auth` and `monitoring` stacks:
```shell theme={null}
vim /etc/xorlab//bootstrap.env
```
Uncomment `configServiceURL_ag_global` (line `12`), uncomment `configServiceProvider_ag_global` (line `11`) and add the value in the JSON format to use the corresponding proxy and xCloud:
```yaml linenums="1" hl_lines="11 12" theme={null}
## XSP bootstrap configuration
licenseId=EXAMPLE
licenseKey=REDACTED
# Where to find the ConfigurationService (URL(s) where to find the ConfigService)
# e.g. "https://xcc.example.com:9080"
# e.g. "https://xcc.example.com:9080,https://fallback.example.com:9080"
# If a proxy for external connections is used, remove configServiceURL_ag_global and use configServiceProvider_ag_global
# If the proxy uses TLS inspection and provides an untrusted certificate, set 'trustAll' to 'True'
configServiceProvider_ag_global={"serviceProvider":{"hosts": ['https://xcloud.ch1.activeguard.io', 'https://xcloud.ch2.activeguard.io', 'https://xcloud.ch3.activeguard.io'], "proxy": {'type': 'HTTP', 'host': 'proxy.example.com', 'port': 8080, 'user': 'proxy_user', 'password': 'proxy_password'}, 'ssl': {'trustAll': False}}}
# configServiceURL_ag_global=https://xcloud.ch1.activeguard.io,https://xcloud.ch2.activeguard.io,https://xcloud.ch3.activeguard.io
# If an untrusted certificate is used on xcc, set 'trustAll' to 'True'
configServiceProvider_ag_local={'serviceProvider': {'hosts': ['http://backend.xcc.xor:9080'], 'ssl': {'trustAll': True}}}
```
Restart container stacks:
```bash theme={null}
cd /etc/xorlab/ && docker compose down && docker compose up -d
```
Connect to the MTA VM:
```shell theme={null}
ssh admin@mta1.example.com
```
Open the `bootstrap.env` file in your favorite editor for the `activeguard`, `monitored_mta`, and `rproxy_mta` stacks:
```shell theme={null}
vim /etc/xorlab//bootstrap.env
```
Uncomment `configServiceURL_ag_global` (line `12`), uncomment `configServiceProvider_ag_global` (line `11`) and add the value in the JSON format to use the corresponding proxy and xCloud:
```yaml linenums="1" hl_lines="13 14" theme={null}
## XSP bootstrap configuration
licenseId=EXAMPLE
licenseKey=REDACTED
## Set to the MTA host number, e.g. clientId=2 for the 2nd MTA, and so on...
clientId=1
# Where to find the ConfigurationService (URL(s) where to find the ConfigService)
# e.g. "https://xcc.example.com:9080"
# e.g. "https://xcc.example.com:9080,https://fallback.example.com:9080"
# If a proxy for external connections is used, remove configServiceURL_ag_global and use configServiceProvider_ag_global
# If the proxy uses TLS inspection and provides an untrusted certificate, set 'trustAll' to 'True'
configServiceProvider_ag_global={"serviceProvider":{"hosts": ['https://xcloud.ch1.activeguard.io', 'https://xcloud.ch2.activeguard.io', 'https://xcloud.ch3.activeguard.io'], "proxy": {'type': 'HTTP', 'host': 'proxy.example.com', 'port': 8080, 'user': 'proxy_user', 'password': 'proxy_password'}, 'ssl': {'trustAll': False}}}
# configServiceURL_ag_global=https://xcloud.ch1.activeguard.io,https://xcloud.ch2.activeguard.io,https://xcloud.ch3.activeguard.io
# If an untrusted certificate is used on xcc, set 'trustAll' to 'True'
configServiceProvider_ag_local={'serviceProvider': {'hosts': ['https://new-xcc-hostname:9080'], 'ssl': {'trustAll': True}}}
```
Restart container stacks:
```bash theme={null}
cd /etc/xorlab/ && docker compose down && docker compose up -d
```
**Repeat the steps for each MTA VM.**
### xorlab Services and SystemTests
To enable connection to the xorlab backend services (DANA, xCloud, NLU), open the [Expert Editor](/9.0/expert-editor) and navigate to `/activeguard/core/active_guard.yml`. Here you can uncomment and set proxy values for each backend service.
```yaml hl_lines="10-13 25-28 34-37 43-46 55-58 66-69" theme={null}
(...)
## xorlab services
serviceProviders:
xcloud:
hosts:
- https://xcloud.ch1.activeguard.io
- https://xcloud.ch2.activeguard.io
- https://xcloud.ch3.activeguard.io
retryRequestCount: 1
proxy:
type: HTTP
host: proxy.example.com
port: 8080
# user: proxy-user
# password: proxy-password
xcc:
hosts:
- https://new-xcc-hostname:9080
ssl:
trustAll: true
dana1.ch:
hosts:
- https://dana.ch1.activeguard.io
proxy:
type: HTTP
host: proxy.example.com
port: 8080
# user: proxy-user
# password: proxy-password
dana2.ch:
hosts:
- https://dana.ch2.activeguard.io
proxy:
type: HTTP
host: proxy.example.com
port: 8080
# user: proxy-user
# password: proxy-password
dana3.ch:
hosts:
- https://dana.ch3.activeguard.io
proxy:
type: HTTP
host: proxy.example.com
port: 8080
# user: proxy-user
# password: proxy-password
tika:
hosts:
- https://tika.ch1.activeguard.io
- https://tika.ch2.activeguard.io
- https://tika.ch3.activeguard.io
retryRequestCount: 1
proxy:
type: HTTP
host: proxy.example.com
port: 8080
# user: proxy-user
# password: proxy-password
ml:
hosts:
- https://ml1.ch.activeguard.io
- https://ml2.ch.activeguard.io
retryRequestCount: 1
proxy:
type: HTTP
host: proxy.example.com
port: 8080
# user: proxy-user
# password: proxy-password
(...)
```
There are two system tests that can use proxy: `ReachXorlabSystemTest` and `URLRedirectFollowerSystemTest`. In order to configure them, you need to insert the `httpProxy` block into `/activeguard/core/active_guard.yml`.
```yaml theme={null}
httpProxy:
type: HTTP
host: proxy.example.com
port: 8080
# user: proxy-user
# password: proxy-password
```
Publish the changes; the configuration will be applied after one minute. You can also manually restart the `activeguard` stack.
Connect to the MTA VM
```shell theme={null}
ssh admin@mta1.example.com
```
and set the new VM hostname.
```bash theme={null}
sudo hostnamectl hostname new-mta1-hostname
```
Open the `/etc/xorlab/activeguard/.env` file, set the `core_hostname` to the hostname
```shell hl_lines="3" theme={null}
(...)
# CORE_SPAMD_MIN_CHILD=5
core_hostname=new-mta1-hostname
CORE_JVM_ARGS=-Xmx6g
(...)
```
and restart the activeguard stack.
```bash theme={null}
cd /etc/xorlab/activeguard/ && docker compose down && docker compose up -d
```
**Repeat the steps for each MTA VM.**
## Bind IP
Connect to the XCC VM:
```shell theme={null}
ssh admin@xcc.example.com
```
Enable browser access to the Control Center UI by opening the `/etc/xorlab/xcc/.env` file and changing the `XCCWEB_BIND_IP` variable to the IP that the Control Center UI should bind to:
```bash hl_lines="2" theme={null}
XOR_REGISTRY=registry.xorlab.com
XCCWEB_BIND_IP=xxx.xxx.xxx.xxx
(...)
```
and restart the `xcc` stack.
```bash theme={null}
cd /etc/xorlab/xcc && docker compose down && docker compose up -d
```
Connect to the MTA VM:
```shell theme={null}
ssh admin@mta1.example.com
```
Open the `/etc/xorlab//.env` file for each stack (`activeguard`,`rproxy_mta`,`monitored_mta`) and change the `MTA_BIND_IP` variable to the IP that the service should bind to:
```bash hl_lines="2" theme={null}
XOR_REGISTRY=registry.xorlab.com
XCCWEB_BIND_IP=xxx.xxx.xxx.xxx
(...)
```
and restart the stack.
```bash theme={null}
cd /etc/xorlab/ && docker compose down && docker compose up -d
```
**Repeat the steps for each MTA VM.**
## Client ID
Connect to the MTA VM:
```shell theme={null}
ssh admin@mta1.example.com
```
Open the `/etc/xorlab//bootstrap.env` file for each stack (`activeguard`,`rproxy_mta`,`monitored_mta`) and change the `clientId` variable to the number of the MTA VM:
```bash hl_lines="6" theme={null}
# XSP bootstrap configuration
licenseId=EXAMPLE
licenseKey=REDACTED
## Set to the MTA host number, e.g. clientId=2 for the 2nd MTA, and so on...
clientId=1
(...)
```
and restart the stack.
```bash theme={null}
cd /etc/xorlab/ && docker compose down && docker compose up -d
```
**Repeat the steps for each MTA VM.**
## XCC URL
Connect to the MTA VM:
```shell theme={null}
ssh admin@mta1.example.com
```
Open the `/etc/xorlab/activeguard/.env` file, and change the `redis_url` variable to the Fully Qualified Domain Name or the Hostname of the XCC VM.
```bash hl_lines="3" theme={null}
(...)
# Set address of xcc VM (hosting redis) here, e.g. xcc.example.com
redis_url=new-xcc-hostname
```
Open the `/etc/xorlab//bootstrap.env` file for each stack (`activeguard`,`rproxy_mta`,`monitored_mta`) and change the Fully Qualified Domain Name or the Hostname of the XCC VM in the `configServiceProvider_ag_local` variable:
```bash hl_lines="3" theme={null}
(...)
# If an untrusted certificate is used on xcc, set 'trustAll' to 'True'
configServiceProvider_ag_local={'serviceProvider': {'hosts': ['https://new-xcc-hostname:9080'], 'ssl': {'trustAll': True}}}
```
and restart the stack.
```bash theme={null}
cd /etc/xorlab/ && docker compose down && docker compose up -d
```
**Repeat the steps for each MTA VM.**
## Proxy Configuration
If the xorlab can only connect to external servers through an HTTP proxy, you’ll need to execute the following steps:
* Enable APT to pull OS updates
* Enable the Docker daemon to pull new Docker images
* Configure the XCC and MTA containers
* Update `active_guard.yml` in the [Expert Editor](/9.0/./expert-editor) to enable SystemTests
* If integrated, configure the VirusTotal service
**Optional and mandatory proxy settings**
**User** (`PROXY_USER`) and **password** (`PROXY_PASS`) are optional, whereas **type** (`PROXY_TYPE`), **port** (`PROXY_PORT`), and **host** (`PROXY_HOST`) are mandatory across all the config files.
### APT proxy
Connect to the XCC or MTA VM:
```shell theme={null}
ssh admin@xcc.example.com
```
Open the `/etc/apt/apt.conf.d/proxy.conf` file:
```shell theme={null}
vim /etc/apt/apt.conf.d/proxy.conf
```
uncomment the config, and provide your credentials to the proxy server:
```shell theme={null}
Acquire::http::Proxy "http://user:password@proxy.example.com:port/";
Acquire::https::Proxy "http://user:password@proxy.example.com:port/";
```
Save the file. Test the configuration by executing the following command and verifying that no connection error appears:
```shell theme={null}
sudo apt update && sudo apt upgrade
```
**Repeat the steps for each MTA VM.**
### Docker Daemon proxy
The proxy for the Docker daemon is set using environment variables using `systemd`. XCC and MTA VMs come with prepared, commented out proxy configuration in the `/etc/systemd/system/docker.service.d/http-proxy.conf`.
Connect to the XCC or MTA VM:
```shell theme={null}
ssh admin@xcc.example.com
```
Uncomment config lines and replace the exemplary proxy values.
```bash theme={null}
[Service]
Environment="HTTP_PROXY=http(s)://user:password@proxy.example.com:80"
Environment="HTTPS_PROXY=http(s)://user:password@proxy.example.com:443"
Environment="NO_PROXY=localhost,127.0.0.1/8,.xor"
# NOTE: Depending on your proxy configuration, the HTTPS_PROXY variable might also need to use http:// scheme.
```
Before proceeding, use `docker compose down` to shut down all running container stacks. Then reload the service configuration and restart the Docker service:
```bash theme={null}
sudo systemctl daemon-reload && sudo systemctl restart docker
```
```bash theme={null}
# Verify that the new environment settings were loaded:
sudo systemctl show docker --property Environment
```
**Repeat the steps for each MTA VM.**
### ServiceProvider proxy
Allow containers to download the latest global configuration through a proxy, by configuring proxy in the bootstrap files (`bootstrap.yml`, `bootstrap.env`).
Connect to the XCC VM:
```shell theme={null}
ssh admin@xcc.example.com
```
Open the `bootstrap.yml` file in your favorite editor for the `backend` stack:
```shell theme={null}
vim /etc/xorlab/xcc/backend/bootstrap.yml
```
Set your proxy credentials, and uncomment used parameters. Note that this needs to be done only for the `ag_global` entry:
```yaml hl_lines="11-14" theme={null}
(...)
configServices:
## The repo name to retrieve from this service.
- repoName: ag_global
## Connection information for the config service (ServiceProvider config)
serviceProvider:
hosts:
- https://xcloud.ch1.activeguard.io
- https://xcloud.ch2.activeguard.io
- https://xcloud.ch3.activeguard.io
proxy:
type: HTTP
host: proxy.example.com
port: 8080
# user: some-user
# password: some-password
(...)
```
Open the `bootstrap.env` file in your favorite editor for the `auth` and `monitoring` stacks:
```shell theme={null}
vim /etc/xorlab//bootstrap.env
```
Uncomment `configServiceURL_ag_global` (line `12`), uncomment `configServiceProvider_ag_global` (line `11`) and add the value in the JSON format to use the corresponding proxy and xCloud:
```yaml linenums="1" hl_lines="11 12" theme={null}
## XSP bootstrap configuration
licenseId=EXAMPLE
licenseKey=REDACTED
# Where to find the ConfigurationService (URL(s) where to find the ConfigService)
# e.g. "https://xcc.example.com:9080"
# e.g. "https://xcc.example.com:9080,https://fallback.example.com:9080"
# If a proxy for external connections is used, remove configServiceURL_ag_global and use configServiceProvider_ag_global
# If the proxy uses TLS inspection and provides an untrusted certificate, set 'trustAll' to 'True'
configServiceProvider_ag_global={"serviceProvider":{"hosts": ['https://xcloud.ch1.activeguard.io', 'https://xcloud.ch2.activeguard.io', 'https://xcloud.ch3.activeguard.io'], "proxy": {'type': 'HTTP', 'host': 'proxy.example.com', 'port': 8080, 'user': 'proxy_user', 'password': 'proxy_password'}, 'ssl': {'trustAll': False}}}
# configServiceURL_ag_global=https://xcloud.ch1.activeguard.io,https://xcloud.ch2.activeguard.io,https://xcloud.ch3.activeguard.io
# If an untrusted certificate is used on xcc, set 'trustAll' to 'True'
configServiceProvider_ag_local={'serviceProvider': {'hosts': ['http://backend.xcc.xor:9080'], 'ssl': {'trustAll': True}}}
```
Restart container stacks:
```bash theme={null}
cd /etc/xorlab/ && docker compose down && docker compose up -d
```
Connect to the MTA VM:
```shell theme={null}
ssh admin@mta1.example.com
```
Open the `bootstrap.env` file in your favorite editor for the `activeguard`, `monitored_mta`, and `rproxy_mta` stacks:
```shell theme={null}
vim /etc/xorlab//bootstrap.env
```
Uncomment `configServiceURL_ag_global` (line `12`), uncomment `configServiceProvider_ag_global` (line `11`) and add the value in the JSON format to use the corresponding proxy and xCloud:
```yaml linenums="1" hl_lines="13 14" theme={null}
## XSP bootstrap configuration
licenseId=EXAMPLE
licenseKey=REDACTED
## Set to the MTA host number, e.g. clientId=2 for the 2nd MTA, and so on...
clientId=1
# Where to find the ConfigurationService (URL(s) where to find the ConfigService)
# e.g. "https://xcc.example.com:9080"
# e.g. "https://xcc.example.com:9080,https://fallback.example.com:9080"
# If a proxy for external connections is used, remove configServiceURL_ag_global and use configServiceProvider_ag_global
# If the proxy uses TLS inspection and provides an untrusted certificate, set 'trustAll' to 'True'
configServiceProvider_ag_global={"serviceProvider":{"hosts": ['https://xcloud.ch1.activeguard.io', 'https://xcloud.ch2.activeguard.io', 'https://xcloud.ch3.activeguard.io'], "proxy": {'type': 'HTTP', 'host': 'proxy.example.com', 'port': 8080, 'user': 'proxy_user', 'password': 'proxy_password'}, 'ssl': {'trustAll': False}}}
# configServiceURL_ag_global=https://xcloud.ch1.activeguard.io,https://xcloud.ch2.activeguard.io,https://xcloud.ch3.activeguard.io
# If an untrusted certificate is used on xcc, set 'trustAll' to 'True'
configServiceProvider_ag_local={'serviceProvider': {'hosts': ['https://new-xcc-hostname:9080'], 'ssl': {'trustAll': True}}}
```
Restart container stacks:
```bash theme={null}
cd /etc/xorlab/ && docker compose down && docker compose up -d
```
**Repeat the steps for each MTA VM.**
### xorlab Services and SystemTests
To enable connection to the xorlab backend services (DANA, xCloud, NLU), open the [Expert Editor](/9.0/expert-editor) and navigate to `/activeguard/core/active_guard.yml`. Here you can uncomment and set proxy values for each backend service.
```yaml hl_lines="10-13 25-28 34-37 43-46 55-58 66-69" theme={null}
(...)
## xorlab services
serviceProviders:
xcloud:
hosts:
- https://xcloud.ch1.activeguard.io
- https://xcloud.ch2.activeguard.io
- https://xcloud.ch3.activeguard.io
retryRequestCount: 1
proxy:
type: HTTP
host: proxy.example.com
port: 8080
# user: proxy-user
# password: proxy-password
xcc:
hosts:
- https://new-xcc-hostname:9080
ssl:
trustAll: true
dana1.ch:
hosts:
- https://dana.ch1.activeguard.io
proxy:
type: HTTP
host: proxy.example.com
port: 8080
# user: proxy-user
# password: proxy-password
dana2.ch:
hosts:
- https://dana.ch2.activeguard.io
proxy:
type: HTTP
host: proxy.example.com
port: 8080
# user: proxy-user
# password: proxy-password
dana3.ch:
hosts:
- https://dana.ch3.activeguard.io
proxy:
type: HTTP
host: proxy.example.com
port: 8080
# user: proxy-user
# password: proxy-password
tika:
hosts:
- https://tika.ch1.activeguard.io
- https://tika.ch2.activeguard.io
- https://tika.ch3.activeguard.io
retryRequestCount: 1
proxy:
type: HTTP
host: proxy.example.com
port: 8080
# user: proxy-user
# password: proxy-password
ml:
hosts:
- https://ml1.ch.activeguard.io
- https://ml2.ch.activeguard.io
retryRequestCount: 1
proxy:
type: HTTP
host: proxy.example.com
port: 8080
# user: proxy-user
# password: proxy-password
(...)
```
There are two system tests that can use proxy: `ReachXorlabSystemTest` and `URLRedirectFollowerSystemTest`. In order to configure them, you need to insert the `httpProxy` block into `/activeguard/core/active_guard.yml`.
```yaml theme={null}
httpProxy:
type: HTTP
host: proxy.example.com
port: 8080
# user: proxy-user
# password: proxy-password
```
Publish the changes; the configuration will be applied after one minute. You can also manually restart the `activeguard` stack.