> ## Documentation Index
> Fetch the complete documentation index at: https://docs.xorlab.com/llms.txt
> Use this file to discover all available pages before exploring further.
> ## Agent Instructions
> Pages under /latest/ document the current release. Paths that begin with a version number, for example /10.0/, are frozen snapshots of superseded releases kept for reference only — never present their instructions as current. If the reader's version is unknown, answer from /latest/ and say which version the answer describes.
> xorlab is deployed on-premises, hybrid, or as a cloud service, and integrates with either Microsoft 365 or on-premises mail infrastructure. Configuration steps often differ between these. State which deployment and integration mode an instruction applies to instead of presenting one as universal.
> Distinguish inline mode from monitoring mode when describing anything that acts on email. Monitoring mode observes a copy and cannot block or quarantine; inline mode routes mail through xorlab and can.
> Write the product name as lowercase 'xorlab'. Use the documented component names: xorlab Control Center (XCC), xorlab MTA, xorlab Sandbox (DANA), xorlab Natural Language Understanding (NLU). After the first mention, use the short forms XCC, MTA, Sandbox, and NLU. Do not use DANA as a standalone name for the Sandbox, but keep it where it is a literal string in configuration keys, container names, and hostnames.
> Do not invent configuration keys, rule parameters, list names, log properties, or API fields. If a value is not present in this documentation, say that it is not documented rather than guessing.
# Enable Contextual Banners
> Add contextual warning banners to emails. Requires a subscription; contact support to enable.
The script packages and individual scripts linked on this page are protected downloads and
require a password.
## Why Contextual Banners Matter
Contextual Banners provide users with targeted security insights based on xorlab's analysis, appearing at the top of the email body. They highlight risks such as low sender trust, potential partner impersonation, or suspicious attachments. Unlike generic warnings, these banners are selectively applied to reduce alert fatigue, ensuring that users remain attentive to truly relevant threats.
Examples of different types of banners, categorized by severity:
* **Alert (Red) banners:** Critical warnings for high-risk messages.  * **Warning (Orange) banners:** Moderate risks that require user attention.
  * **Information (Blue) banners:** General insights without immediate action required.
  ## How It Works
Contextual Banners highlight security risks based on matched detection rules:
1. xorlab adds an `x-xor-banner` header to flagged emails.
2. The header includes a banner identifier.
3. Exchange mail flow rules detect the identifier.
4. If a match is found, the banner is added to the email body.
5. Emails with a `x-xor-banner` header appear in xorlab with the `#banner` tag.
## Configuration in xorlab
**Optional Feature**
The Contextual Banners feature is optional and the configuration options are disabled by default. To enable this feature, please contact [support@xorlab.com](mailto:support@xorlab.com) to add it to your subscription.
1. Log in to the xorlab Security Platform.
2. Click the **Admin** icon in the right menu.
3. In the **Admin Panel**, click **General Settings**.
## How It Works
Contextual Banners highlight security risks based on matched detection rules:
1. xorlab adds an `x-xor-banner` header to flagged emails.
2. The header includes a banner identifier.
3. Exchange mail flow rules detect the identifier.
4. If a match is found, the banner is added to the email body.
5. Emails with a `x-xor-banner` header appear in xorlab with the `#banner` tag.
## Configuration in xorlab
**Optional Feature**
The Contextual Banners feature is optional and the configuration options are disabled by default. To enable this feature, please contact [support@xorlab.com](mailto:support@xorlab.com) to add it to your subscription.
1. Log in to the xorlab Security Platform.
2. Click the **Admin** icon in the right menu.
3. In the **Admin Panel**, click **General Settings**. 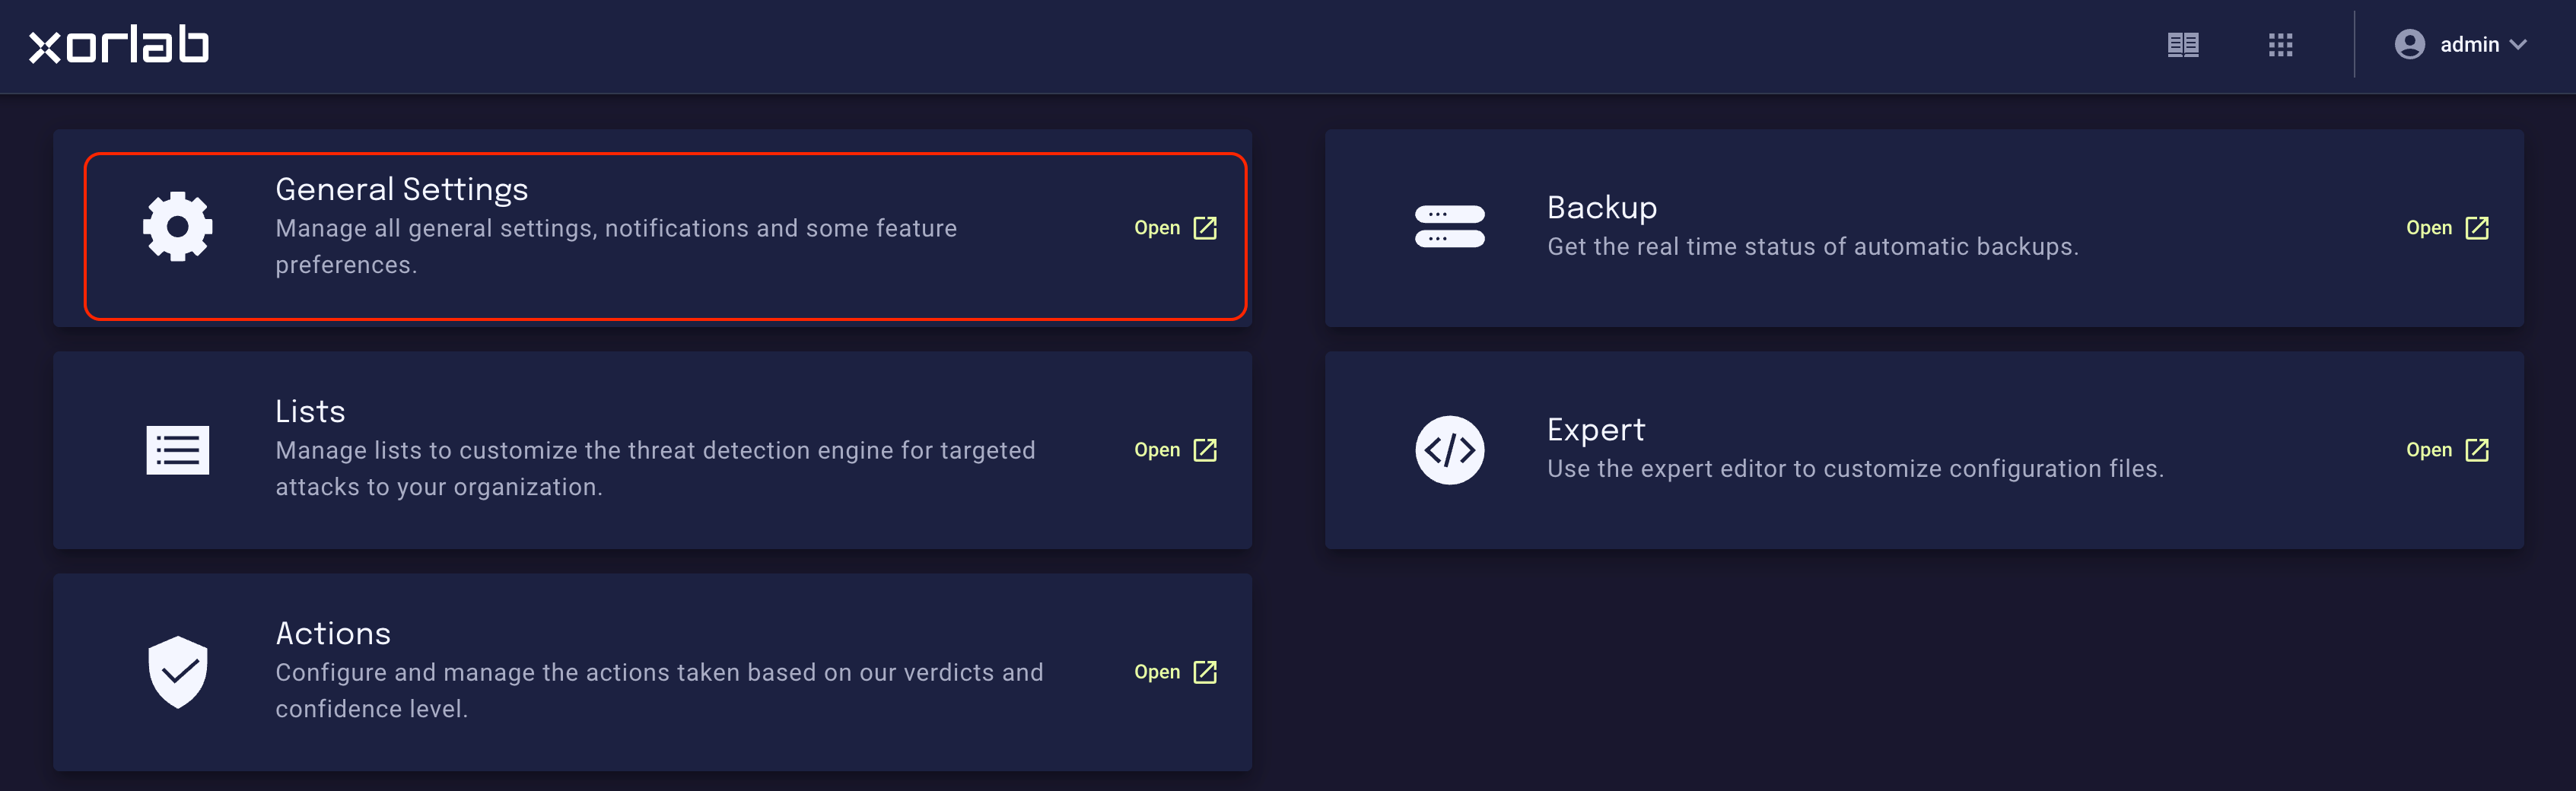 4. Select **Contextual Banners**.
5. Enable the Alert, Warning and Info banners.
4. Select **Contextual Banners**.
5. Enable the Alert, Warning and Info banners. 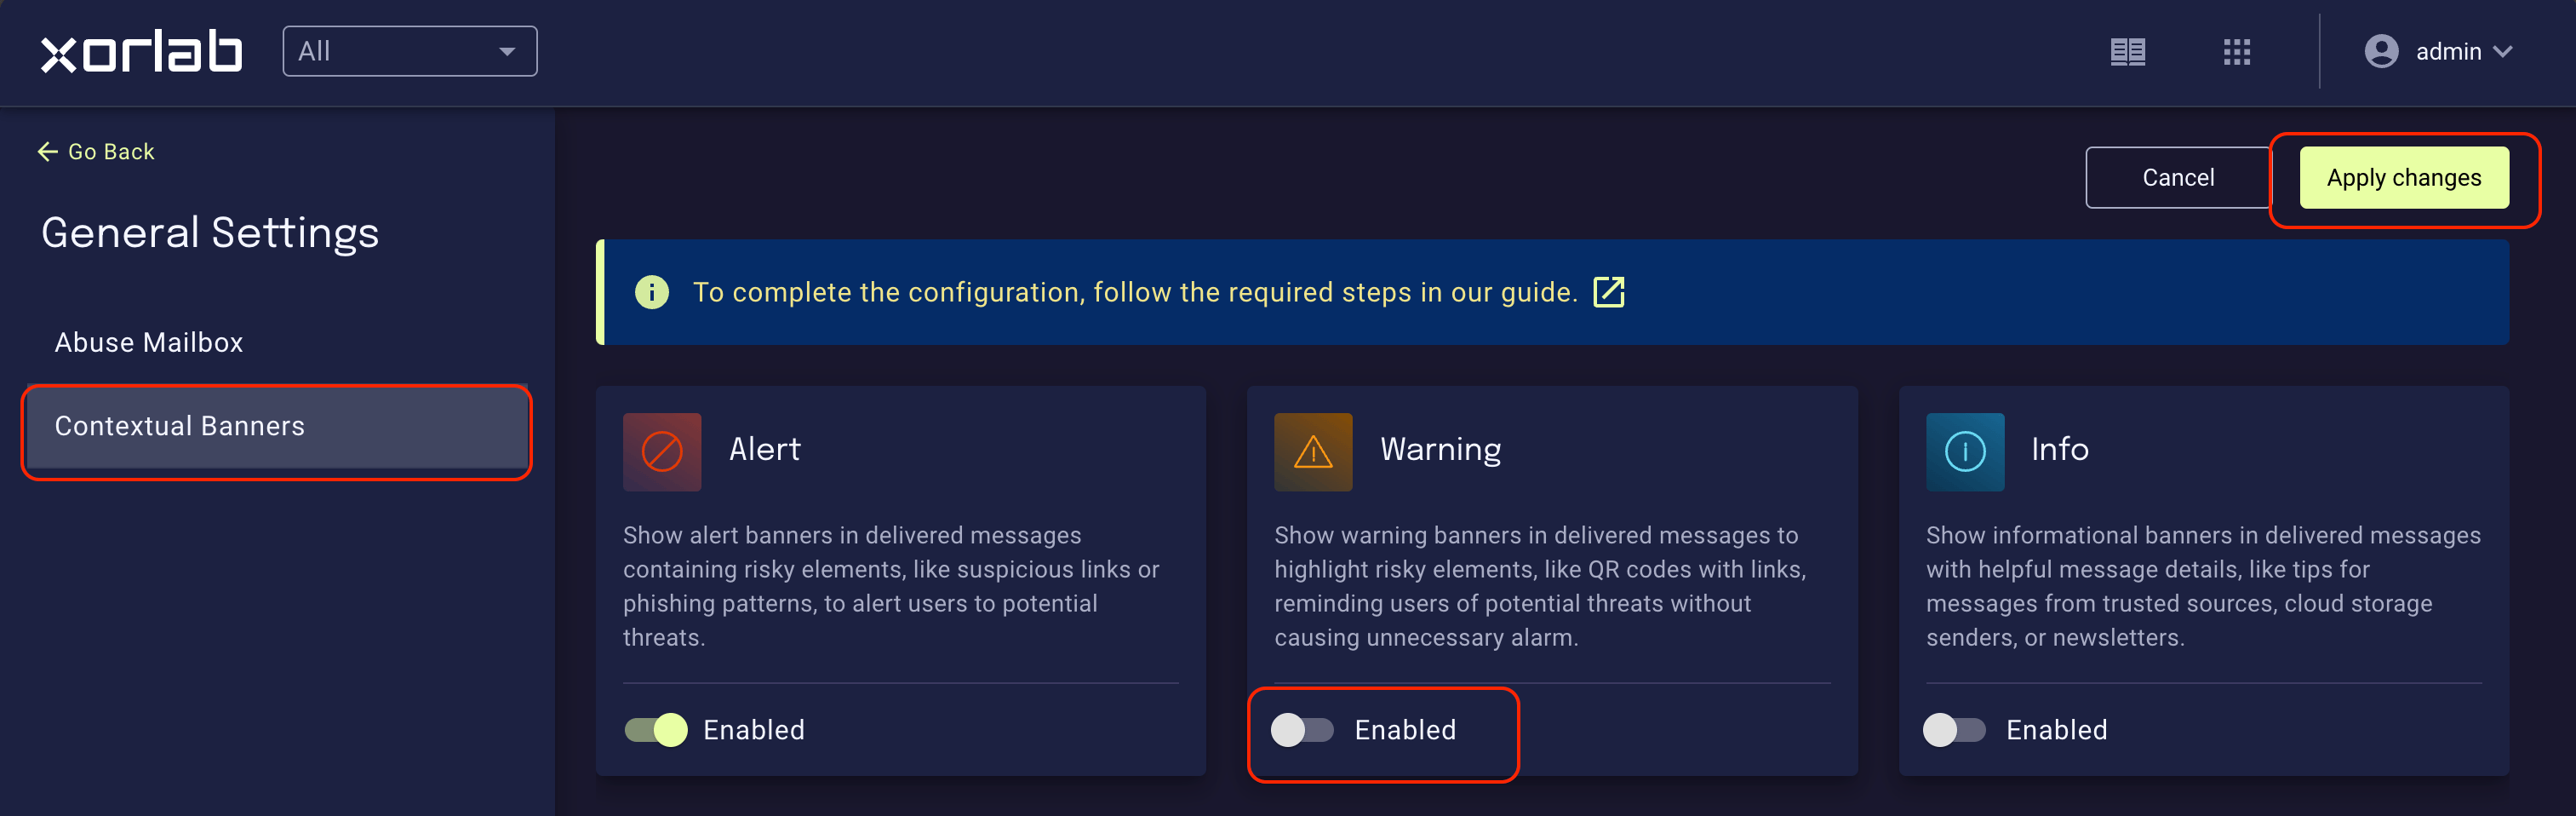 ## Configuration in Exchange Online
Before proceeding, ensure you are connected to Exchange Online via PowerShell. If you need guidance, refer to [Microsoft's official documentation](https://learn.microsoft.com/en-us/powershell/exchange/connect-to-exchange-online-powershell).
1. Download the [xorlab contextual banner EXO script package](https://11-0--ag-docs.netlify.app/assets/xorlab_contextualBanner_Scripts_EXO.zip) to download all scripts to manage the banner mail flow rules.
2. Run the Script xorlabExoAddBanners in the respective language in Dry-Run Mode:
* Open a Cloud Shell in M365.
* Navigate to the folder containing the PowerShell script or upload them using "Manage Files".
* Run the following command:
```powershell theme={null}
xorlabExoAddBanners_DE.ps1 -DryRun
```
```powershell theme={null}
xorlabExoAddBanners_EN.ps1 -DryRun
```
You can also run the respective version for TestRecipients to only enable the rules for few selected recipients.
```powershell theme={null}
xorlabExoAddBanners_TestRecipientEmail_DE.ps1 -DryRun -TestRecipientEmail testuser1@example.ch, testuser2@example.ch
```
If you lack admin privileges or are not allowed to install scripts, first run:
```powershell theme={null}
Set-ExecutionPolicy -Scope Process -ExecutionPolicy RemoteSigned
```
Enter `Y` to confirm any prompts e.g., installing the NuGet module and trusting the PSGallery repository.
3. After running the script, you should see the following message:
```powershell theme={null}
Not connected to Exchange online!
Trying to connect to Exchange now
```
* A Microsoft sign-in window will appear.
* Log in with your Exchange administrator credentials.
* Once connected, you should see the following output in the terminal:
```text theme={null}
Connection status:
State : Connected
Id : 1
Name : ExchangeOnline_1
UserPrincipalName : user@example.com
TenantID : xxxxxxxx-xxxx-xxxx-xxxx-xxxxxxxxxxxx
Getting the list of current transport rules...
Current lowest/last Transport Rule priority = 7. New rules priority value, if created, will grow upwards
Press Enter to continue or Ctrl+c to stop:
```
4. Press **Enter** and review the console output. You should see messages like this:
```text theme={null}
Creating Transport Rule with priority:
8
What if: Creating transport rule Identity:"XorBannerContentExecutable".
Transport rule creation finished
```
5. Once the dry-run successfully simulates all 40+ rules, rerun the script without `-DryRun` to apply the changes.
The actual rule creation process can take several minutes. Once complete, go to the [**Transport rules**](https://admin.exchange.microsoft.com/#/transportrules) page in the Exchange admin panel.
You should see multiple rules with the prefix `XorBanner`:
## Configuration in Exchange Online
Before proceeding, ensure you are connected to Exchange Online via PowerShell. If you need guidance, refer to [Microsoft's official documentation](https://learn.microsoft.com/en-us/powershell/exchange/connect-to-exchange-online-powershell).
1. Download the [xorlab contextual banner EXO script package](https://11-0--ag-docs.netlify.app/assets/xorlab_contextualBanner_Scripts_EXO.zip) to download all scripts to manage the banner mail flow rules.
2. Run the Script xorlabExoAddBanners in the respective language in Dry-Run Mode:
* Open a Cloud Shell in M365.
* Navigate to the folder containing the PowerShell script or upload them using "Manage Files".
* Run the following command:
```powershell theme={null}
xorlabExoAddBanners_DE.ps1 -DryRun
```
```powershell theme={null}
xorlabExoAddBanners_EN.ps1 -DryRun
```
You can also run the respective version for TestRecipients to only enable the rules for few selected recipients.
```powershell theme={null}
xorlabExoAddBanners_TestRecipientEmail_DE.ps1 -DryRun -TestRecipientEmail testuser1@example.ch, testuser2@example.ch
```
If you lack admin privileges or are not allowed to install scripts, first run:
```powershell theme={null}
Set-ExecutionPolicy -Scope Process -ExecutionPolicy RemoteSigned
```
Enter `Y` to confirm any prompts e.g., installing the NuGet module and trusting the PSGallery repository.
3. After running the script, you should see the following message:
```powershell theme={null}
Not connected to Exchange online!
Trying to connect to Exchange now
```
* A Microsoft sign-in window will appear.
* Log in with your Exchange administrator credentials.
* Once connected, you should see the following output in the terminal:
```text theme={null}
Connection status:
State : Connected
Id : 1
Name : ExchangeOnline_1
UserPrincipalName : user@example.com
TenantID : xxxxxxxx-xxxx-xxxx-xxxx-xxxxxxxxxxxx
Getting the list of current transport rules...
Current lowest/last Transport Rule priority = 7. New rules priority value, if created, will grow upwards
Press Enter to continue or Ctrl+c to stop:
```
4. Press **Enter** and review the console output. You should see messages like this:
```text theme={null}
Creating Transport Rule with priority:
8
What if: Creating transport rule Identity:"XorBannerContentExecutable".
Transport rule creation finished
```
5. Once the dry-run successfully simulates all 40+ rules, rerun the script without `-DryRun` to apply the changes.
The actual rule creation process can take several minutes. Once complete, go to the [**Transport rules**](https://admin.exchange.microsoft.com/#/transportrules) page in the Exchange admin panel.
You should see multiple rules with the prefix `XorBanner`:
 ### Managing Banner Rules with PowerShell
You can manage banner transport rules in Exchange Online using the following PowerShell scripts. These scripts allow you to enable, disable, reset, or remove rules as needed.
### Restore Banner Rules
You can restore all existing banner transport rules in Exchange Online using the [xorlabExoAddBanners\_DE.ps1](https://11-0--ag-docs.netlify.app/assets/xorlab_contextualBanner_Scripts_EXO/xorlabExoAddBanners_DE.ps1) script and the `-OverwriteRules` switch:
```powershell theme={null}
./xorlabExoAddBanners_LANGUAGE.ps1 -OverwriteRules -DryRun
./xorlabExoAddBanners_LANGUAGE.ps1 -OverwriteRules
```
### Remove Banner Rules
You can remove all existing banner transport rules in Exchange Online using the [xorlabExoRemoveBanners.ps1](https://11-0--ag-docs.netlify.app/assets/xorlab_contextualBanner_Scripts_EXO/xorlabExoRemoveBanners.ps1) script.
```powershell theme={null}
./xorlabExoRemoveBanners.ps1 -DryRun
```
```powershell theme={null}
./xorlabExoRemoveBanners.ps1
```
### Enabling or Disabling Banner Rules
If you need to temporarily disable banner rules for testing or troubleshooting, you can disable them with the [xorlabExoEnableRules.ps1](https://11-0--ag-docs.netlify.app/assets/xorlab_contextualBanner_Scripts_EXO/xorlabExoEnableRules.ps1) script and the `-DisableRules` switch:
```powershell theme={null}
./xorlabExoEnableRules.ps1 -DisableRules
```
Later, you can re-enable these rules using the [xorlabExoEnableRules.ps1](/latest/assets/xorlab_contextualBanner_Scripts_EXO/xorlabExoEnableRules.ps1) script and the `-EnableRules` switch:
```powershell theme={null}
./xorlabExoEnableRules.ps1 -EnableRules
```
### Allowing xorlab Banners in Microsoft Defender
If you are using Microsoft Defender, we recommend reviewing your Safe Links configuration to ensure that contextual banners render correctly. In some cases, Safe Links policies may rewrite or block banner content.
To prevent this, add `xorlab.com` to the list of trusted URLs in your Safe Links policies (`Policies & rules` > `Threat policies` > `Safe Links`). This ensures that banners are displayed as intended and users receive the full security context
## Configuration in On-Premises Exchange
### Setup
1. Download the [xorlab contextual banner On-Prem script package](https://11-0--ag-docs.netlify.app/assets/xorlab_contextualBanner_Scripts_ONPREM.zip) to download all scripts to manage the banner mail flow rules and place them on your Exchange Server.
2. Open “Exchange Management Shell” as administrator and go to the Download directory.
### Installing Banners
1. Run the script with the -DryRun command. (replace the email address below for that of the recipient)
```powershell theme={null}
.\xorlabOnPremAddBanners_TestRecipientEmail_DE.ps1 -TestRecipientEmail "arthur.dent@exchange.xorlab.net" -DryRun
```
2. Rerun the script without the -DryRun command.
3. Check in the Exchange Admin Center if mail flow rules were successfully added.
### Removing Banners
Execute the script:
```powershell theme={null}
./xorlabOnPremRemoveBanners.ps1
```
## Excluding Specific Senders or Recipients
To prevent banners from appearing on specific emails, use the Contextual Banners Exclusion Lists in xorlab:
* **Contextual banners recipient address exclusion**: Prevents banners from appearing on emails sent to specific internal addresses.
* **Contextual banners sender address exclusion**: Prevents banners from appearing on emails from specific external senders.
To configure these lists:
1. Go to **Settings → Lists** in XCC.
2. Search for "banners".
3. Add the email address.
## Disabling Individual Banners
You can disable one or more banners using either of the following methods:
* **In Exchange:** Disable the mail flow rule associated with the unwanted banner. You can find the rule using the banner identifier listed in the banners list.
* **In xorlab:** Go to General Settings > Contextual Banners and disable all banners of a specific severity (e.g., Alert, Warning, or Info).
## Banner Categories and Identifiers
Each banner has a unique identifier, which starts with the prefix BANNER\_`(Category)`\_`(Name)`
(e.g., BANNER\_verdict\_phishing). Use that identifier to find the associated mail flow rule in
Exchange when you want to disable an individual banner.
The full list of banner names, categories, severity levels and descriptions is documented in
[Detection Defaults → Banner categories and identifiers](/latest/detection-defaults#banner-categories-and-identifiers).
Access to that page is restricted.
### Managing Banner Rules with PowerShell
You can manage banner transport rules in Exchange Online using the following PowerShell scripts. These scripts allow you to enable, disable, reset, or remove rules as needed.
### Restore Banner Rules
You can restore all existing banner transport rules in Exchange Online using the [xorlabExoAddBanners\_DE.ps1](https://11-0--ag-docs.netlify.app/assets/xorlab_contextualBanner_Scripts_EXO/xorlabExoAddBanners_DE.ps1) script and the `-OverwriteRules` switch:
```powershell theme={null}
./xorlabExoAddBanners_LANGUAGE.ps1 -OverwriteRules -DryRun
./xorlabExoAddBanners_LANGUAGE.ps1 -OverwriteRules
```
### Remove Banner Rules
You can remove all existing banner transport rules in Exchange Online using the [xorlabExoRemoveBanners.ps1](https://11-0--ag-docs.netlify.app/assets/xorlab_contextualBanner_Scripts_EXO/xorlabExoRemoveBanners.ps1) script.
```powershell theme={null}
./xorlabExoRemoveBanners.ps1 -DryRun
```
```powershell theme={null}
./xorlabExoRemoveBanners.ps1
```
### Enabling or Disabling Banner Rules
If you need to temporarily disable banner rules for testing or troubleshooting, you can disable them with the [xorlabExoEnableRules.ps1](https://11-0--ag-docs.netlify.app/assets/xorlab_contextualBanner_Scripts_EXO/xorlabExoEnableRules.ps1) script and the `-DisableRules` switch:
```powershell theme={null}
./xorlabExoEnableRules.ps1 -DisableRules
```
Later, you can re-enable these rules using the [xorlabExoEnableRules.ps1](/latest/assets/xorlab_contextualBanner_Scripts_EXO/xorlabExoEnableRules.ps1) script and the `-EnableRules` switch:
```powershell theme={null}
./xorlabExoEnableRules.ps1 -EnableRules
```
### Allowing xorlab Banners in Microsoft Defender
If you are using Microsoft Defender, we recommend reviewing your Safe Links configuration to ensure that contextual banners render correctly. In some cases, Safe Links policies may rewrite or block banner content.
To prevent this, add `xorlab.com` to the list of trusted URLs in your Safe Links policies (`Policies & rules` > `Threat policies` > `Safe Links`). This ensures that banners are displayed as intended and users receive the full security context
## Configuration in On-Premises Exchange
### Setup
1. Download the [xorlab contextual banner On-Prem script package](https://11-0--ag-docs.netlify.app/assets/xorlab_contextualBanner_Scripts_ONPREM.zip) to download all scripts to manage the banner mail flow rules and place them on your Exchange Server.
2. Open “Exchange Management Shell” as administrator and go to the Download directory.
### Installing Banners
1. Run the script with the -DryRun command. (replace the email address below for that of the recipient)
```powershell theme={null}
.\xorlabOnPremAddBanners_TestRecipientEmail_DE.ps1 -TestRecipientEmail "arthur.dent@exchange.xorlab.net" -DryRun
```
2. Rerun the script without the -DryRun command.
3. Check in the Exchange Admin Center if mail flow rules were successfully added.
### Removing Banners
Execute the script:
```powershell theme={null}
./xorlabOnPremRemoveBanners.ps1
```
## Excluding Specific Senders or Recipients
To prevent banners from appearing on specific emails, use the Contextual Banners Exclusion Lists in xorlab:
* **Contextual banners recipient address exclusion**: Prevents banners from appearing on emails sent to specific internal addresses.
* **Contextual banners sender address exclusion**: Prevents banners from appearing on emails from specific external senders.
To configure these lists:
1. Go to **Settings → Lists** in XCC.
2. Search for "banners".
3. Add the email address.
## Disabling Individual Banners
You can disable one or more banners using either of the following methods:
* **In Exchange:** Disable the mail flow rule associated with the unwanted banner. You can find the rule using the banner identifier listed in the banners list.
* **In xorlab:** Go to General Settings > Contextual Banners and disable all banners of a specific severity (e.g., Alert, Warning, or Info).
## Banner Categories and Identifiers
Each banner has a unique identifier, which starts with the prefix BANNER\_`(Category)`\_`(Name)`
(e.g., BANNER\_verdict\_phishing). Use that identifier to find the associated mail flow rule in
Exchange when you want to disable an individual banner.
The full list of banner names, categories, severity levels and descriptions is documented in
[Detection Defaults → Banner categories and identifiers](/latest/detection-defaults#banner-categories-and-identifiers).
Access to that page is restricted.