> ## Documentation Index
> Fetch the complete documentation index at: https://docs.xorlab.com/llms.txt
> Use this file to discover all available pages before exploring further.
> ## Agent Instructions
> Pages under /latest/ document the current release. Paths that begin with a version number, for example /10.0/, are frozen snapshots of superseded releases kept for reference only — never present their instructions as current. If the reader's version is unknown, answer from /latest/ and say which version the answer describes.
> xorlab is deployed on-premises, hybrid, or as a cloud service, and integrates with either Microsoft 365 or on-premises mail infrastructure. Configuration steps often differ between these. State which deployment and integration mode an instruction applies to instead of presenting one as universal.
> Distinguish inline mode from monitoring mode when describing anything that acts on email. Monitoring mode observes a copy and cannot block or quarantine; inline mode routes mail through xorlab and can.
> Write the product name as lowercase 'xorlab'. Use the documented component names: xorlab Control Center (XCC), xorlab MTA, xorlab Sandbox (DANA), xorlab Natural Language Understanding (NLU). After the first mention, use the short forms XCC, MTA, Sandbox, and NLU. Do not use DANA as a standalone name for the Sandbox, but keep it where it is a literal string in configuration keys, container names, and hostnames.
> Do not invent configuration keys, rule parameters, list names, log properties, or API fields. If a value is not present in this documentation, say that it is not documented rather than guessing.
# Detection Overview
> The detection features you can enable on top of xorlab's preconfigured protection, in recommended order.
xorlab's preconfigured protection settings deliver strong security from the start.
| Step | Description |
| :------------------------------------------------------------- | :------------------------------------------------------------------------------------------ |
| [Configure built-in lists](#configure-built-in-lists) | **Mandatory**. Populate built-in lists for optimal protection. |
| [Review Default Actions](/latest/detection-actions) | **Optional**. Review the default actions of xorlab. |
| [Additional features](#activate-additional-detection-features) | **Optional**. Activate additional detection-related features to get the most out of xorlab. |
## Configure built-in lists
To optimize protection, it is required to manually populate some of the built-in lists
1. Go to *Admin* and open *Lists*
2. Select **VIP names** and add the names of your C-level. These names will be used to detect VIP Fraud in incoming emails.
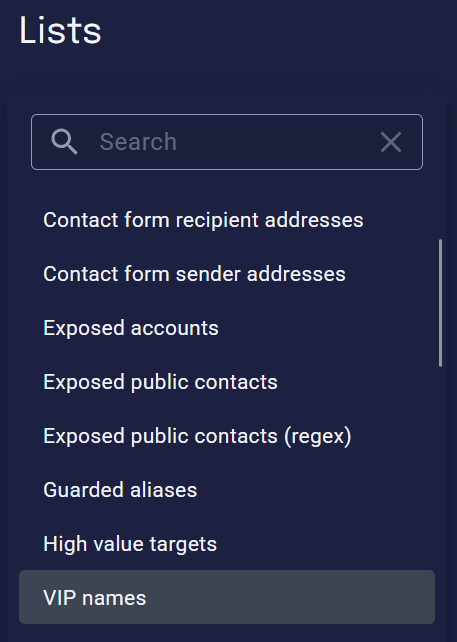 3. Select **High value targets** and add the email addresses of recipients that will be likely targeted by advanced attacks. Usually this is C-level as well. They will receive a more strict and thorough filtering.
4. Optional: Add mailboxes to **Exposed accounts** that should be filtered more aggressively. You can add mailboxes here that are publicly known and receive a lot of spam.
5. Optional: Add mailboxes to **Exposed public contacts** that should be filtered less aggressively to avoid false positives.
## Review default actions
Review what xorlab does with an email per verdict and confidence level, and adjust it where it does not match your policy: [Review Default Actions](/latest/detection-actions).
## Activate additional detection features
The following detection related features can be activated to get the most out of xorlab:
Enable the Self-Service Quarantine (SSQ) for your end-users so that they can release harmless emails themselves.
Enable targeted contextual banners that will be added to suspicious emails.
Note: Banners are a paid feature.
Extend the XCC web interface with threat intelligence from Virustotal. This enhances the analyst experience, but does not affect detection.
The VirusTotal license needs to be provided by the customer.
To further improve spam detection, you can integrate third party DNS blocklists. This is only recommended when using xorlab as standalone filter. We recommend to use either:
* [Spamhaus Integration](/latest/detection-spamhaus-dqs)
* Abusix - contact [support@xorlab.com](mailto:support@xorlab.com)
## Multi-Tenancy
In a multi-tenant deployment, the steps above are done per tenant:
| Step | In a multi-tenant deployment |
| :------------------------------------------------------------- | :--------------------------------------------------------------------------------------------------------------------------------------------------------------------------------------------------------------------- |
| [Configure built-in lists](#configure-built-in-lists) | Same screens as above. Open the **Admin** view and select the tenant in the dropdown on top, then populate the lists for that tenant. Repeat for each tenant. |
| [Review Default Actions](/latest/detection-actions) | Same screens as above. Select the tenant in the dropdown, then review its **Actions**. To give a tenant a different detection strength altogether, reference a different [rule profile](/latest/rule-profiles) for it. |
| [Additional features](#activate-additional-detection-features) | **SSQ** is enabled per tenant, see [Add a Tenant](/latest/multi-tenancy-new-tenant#optional-enable-ssq). **Banners** and **VirusTotal** are instance-wide and cannot be configured per tenant. |
Detection changes you make for a single tenant are stored in that tenant's rule set. See [Manage Tenant Rules](/latest/multi-tenancy-rules) for the underlying folder structure and for setting rule parameters per tenant.
3. Select **High value targets** and add the email addresses of recipients that will be likely targeted by advanced attacks. Usually this is C-level as well. They will receive a more strict and thorough filtering.
4. Optional: Add mailboxes to **Exposed accounts** that should be filtered more aggressively. You can add mailboxes here that are publicly known and receive a lot of spam.
5. Optional: Add mailboxes to **Exposed public contacts** that should be filtered less aggressively to avoid false positives.
## Review default actions
Review what xorlab does with an email per verdict and confidence level, and adjust it where it does not match your policy: [Review Default Actions](/latest/detection-actions).
## Activate additional detection features
The following detection related features can be activated to get the most out of xorlab:
Enable the Self-Service Quarantine (SSQ) for your end-users so that they can release harmless emails themselves.
Enable targeted contextual banners that will be added to suspicious emails.
Note: Banners are a paid feature.
Extend the XCC web interface with threat intelligence from Virustotal. This enhances the analyst experience, but does not affect detection.
The VirusTotal license needs to be provided by the customer.
To further improve spam detection, you can integrate third party DNS blocklists. This is only recommended when using xorlab as standalone filter. We recommend to use either:
* [Spamhaus Integration](/latest/detection-spamhaus-dqs)
* Abusix - contact [support@xorlab.com](mailto:support@xorlab.com)
## Multi-Tenancy
In a multi-tenant deployment, the steps above are done per tenant:
| Step | In a multi-tenant deployment |
| :------------------------------------------------------------- | :--------------------------------------------------------------------------------------------------------------------------------------------------------------------------------------------------------------------- |
| [Configure built-in lists](#configure-built-in-lists) | Same screens as above. Open the **Admin** view and select the tenant in the dropdown on top, then populate the lists for that tenant. Repeat for each tenant. |
| [Review Default Actions](/latest/detection-actions) | Same screens as above. Select the tenant in the dropdown, then review its **Actions**. To give a tenant a different detection strength altogether, reference a different [rule profile](/latest/rule-profiles) for it. |
| [Additional features](#activate-additional-detection-features) | **SSQ** is enabled per tenant, see [Add a Tenant](/latest/multi-tenancy-new-tenant#optional-enable-ssq). **Banners** and **VirusTotal** are instance-wide and cannot be configured per tenant. |
Detection changes you make for a single tenant are stored in that tenant's rule set. See [Manage Tenant Rules](/latest/multi-tenancy-rules) for the underlying folder structure and for setting rule parameters per tenant.