> ## Documentation Index
> Fetch the complete documentation index at: https://docs.xorlab.com/llms.txt
> Use this file to discover all available pages before exploring further.
> ## Agent Instructions
> Pages under /latest/ document the current release. Paths that begin with a version number, for example /10.0/, are frozen snapshots of superseded releases kept for reference only — never present their instructions as current. If the reader's version is unknown, answer from /latest/ and say which version the answer describes.
> xorlab is deployed on-premises, hybrid, or as a cloud service, and integrates with either Microsoft 365 or on-premises mail infrastructure. Configuration steps often differ between these. State which deployment and integration mode an instruction applies to instead of presenting one as universal.
> Distinguish inline mode from monitoring mode when describing anything that acts on email. Monitoring mode observes a copy and cannot block or quarantine; inline mode routes mail through xorlab and can.
> Write the product name as lowercase 'xorlab'. Use the documented component names: xorlab Control Center (XCC), xorlab MTA, xorlab Sandbox (DANA), xorlab Natural Language Understanding (NLU). After the first mention, use the short forms XCC, MTA, Sandbox, and NLU. Do not use DANA as a standalone name for the Sandbox, but keep it where it is a literal string in configuration keys, container names, and hostnames.
> Do not invent configuration keys, rule parameters, list names, log properties, or API fields. If a value is not present in this documentation, say that it is not documented rather than guessing.
# Integrate M365 Abuse Mailbox
> Connect the built-in Microsoft 365 reporting button to xorlab so reported emails appear in xorlab and reporters receive feedback.
**Prerequisites**
* Complete [Before You Begin](/latest/before-begin-integration) and [Set Up Email Routing in xorlab](/latest/m365-smtp)
## Prepare xorlab
1. Open `shared/guarded_tenants.yml` and add all email address patterns that are allowed to report emails.
```yaml guarded_tenants.yml {4-6} theme={null}
tenants:
- name: example
emailReporting:
authorizedEmailReportRecipients:
- .*@xorlab\.com
- .*@xorlab\.net
```
2. Choose if you want to enable or disable automatic feedback. If enabled, every reporter will get an immediate feedback email.
```yaml guarded_tenants.yml {4,5} theme={null}
tenants:
- name: example
ruleProfiles:
# REMOVE this line
- no_auto_feedback.properties
```
```yaml guarded_tenants.yml {4,5} theme={null}
tenants:
- name: example
ruleProfiles:
# ADD this line
- no_auto_feedback.properties
```
3. Optional: Change the sender address used for feedback emails: [Change Sender Address](/latest/email-template-sender-addresses#feedback-emails).
4. Click **Publish**. The new configuration becomes active within about one minute.
## Forward M365 reported emails to xorlab
1. You need a dedicated mailbox in M365 that receives reported emails. If you don't have one, create one like `reporting@example.com`.
2. In the [M365 Defender portal](https://security.microsoft.com/) go to **Settings** → **Email & collaboration** → **User reported settings**. Or directly via [User submissions](https://security.microsoft.com/securitysettings/userSubmission).
3. Activate **Monitor reported messages in Outlook**.
4. Scroll down to **Reported message destinations** and add the mailbox from step #1 to the mailbox field. Choose either **My reporting mailbox only** or **Microsoft and my reporting mailbox** in the dropdown.
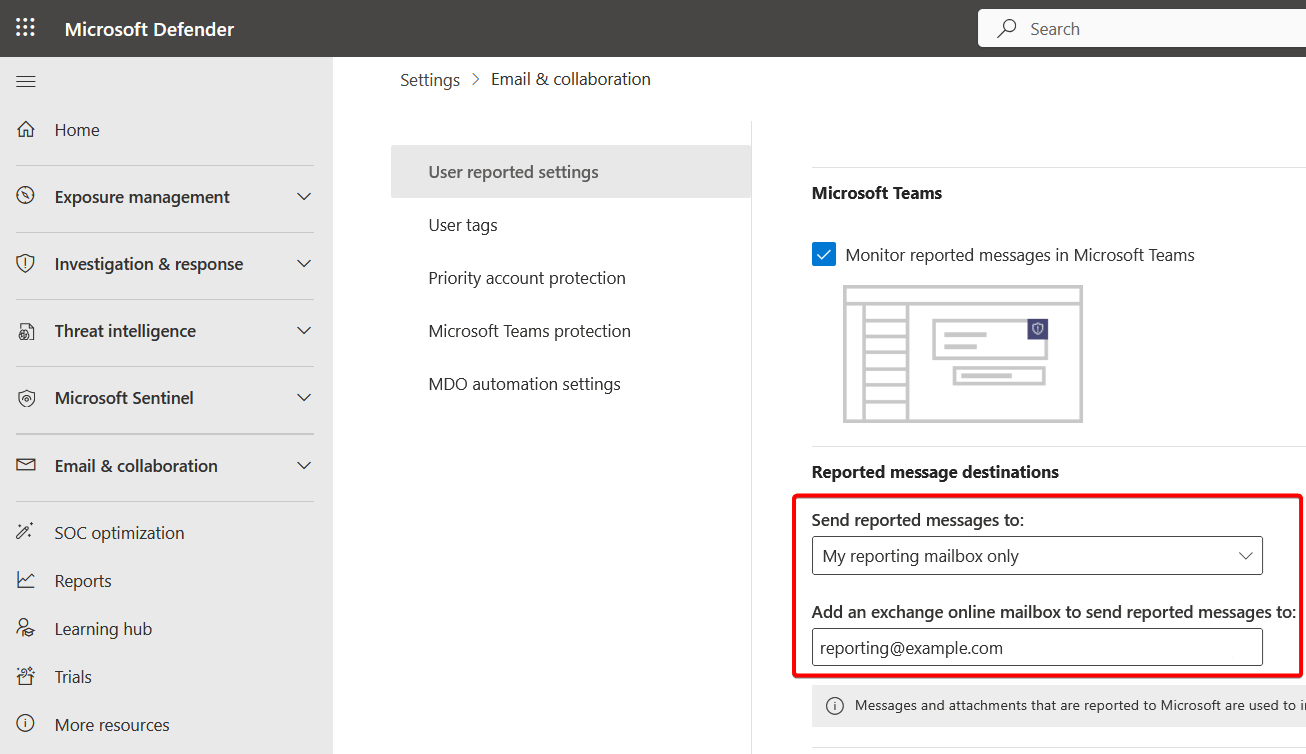 5. Click **Save**.
6. Go to [Exchange Mail Flow](https://admin.exchange.microsoft.com/#/transportrules) and create a new rule with the name `xorlabReportingIntegration`:
* **Apply this rule if** → **The recipient** → **is this person** and select your mailbox from step #1.
* **Do the following** → **Redirect the message to** → enter the xorlab reporting address `suspicious@mx.xyz.activeguard.cloud`, where `xyz` is your customer ID.
5. Click **Save**.
6. Go to [Exchange Mail Flow](https://admin.exchange.microsoft.com/#/transportrules) and create a new rule with the name `xorlabReportingIntegration`:
* **Apply this rule if** → **The recipient** → **is this person** and select your mailbox from step #1.
* **Do the following** → **Redirect the message to** → enter the xorlab reporting address `suspicious@mx.xyz.activeguard.cloud`, where `xyz` is your customer ID.
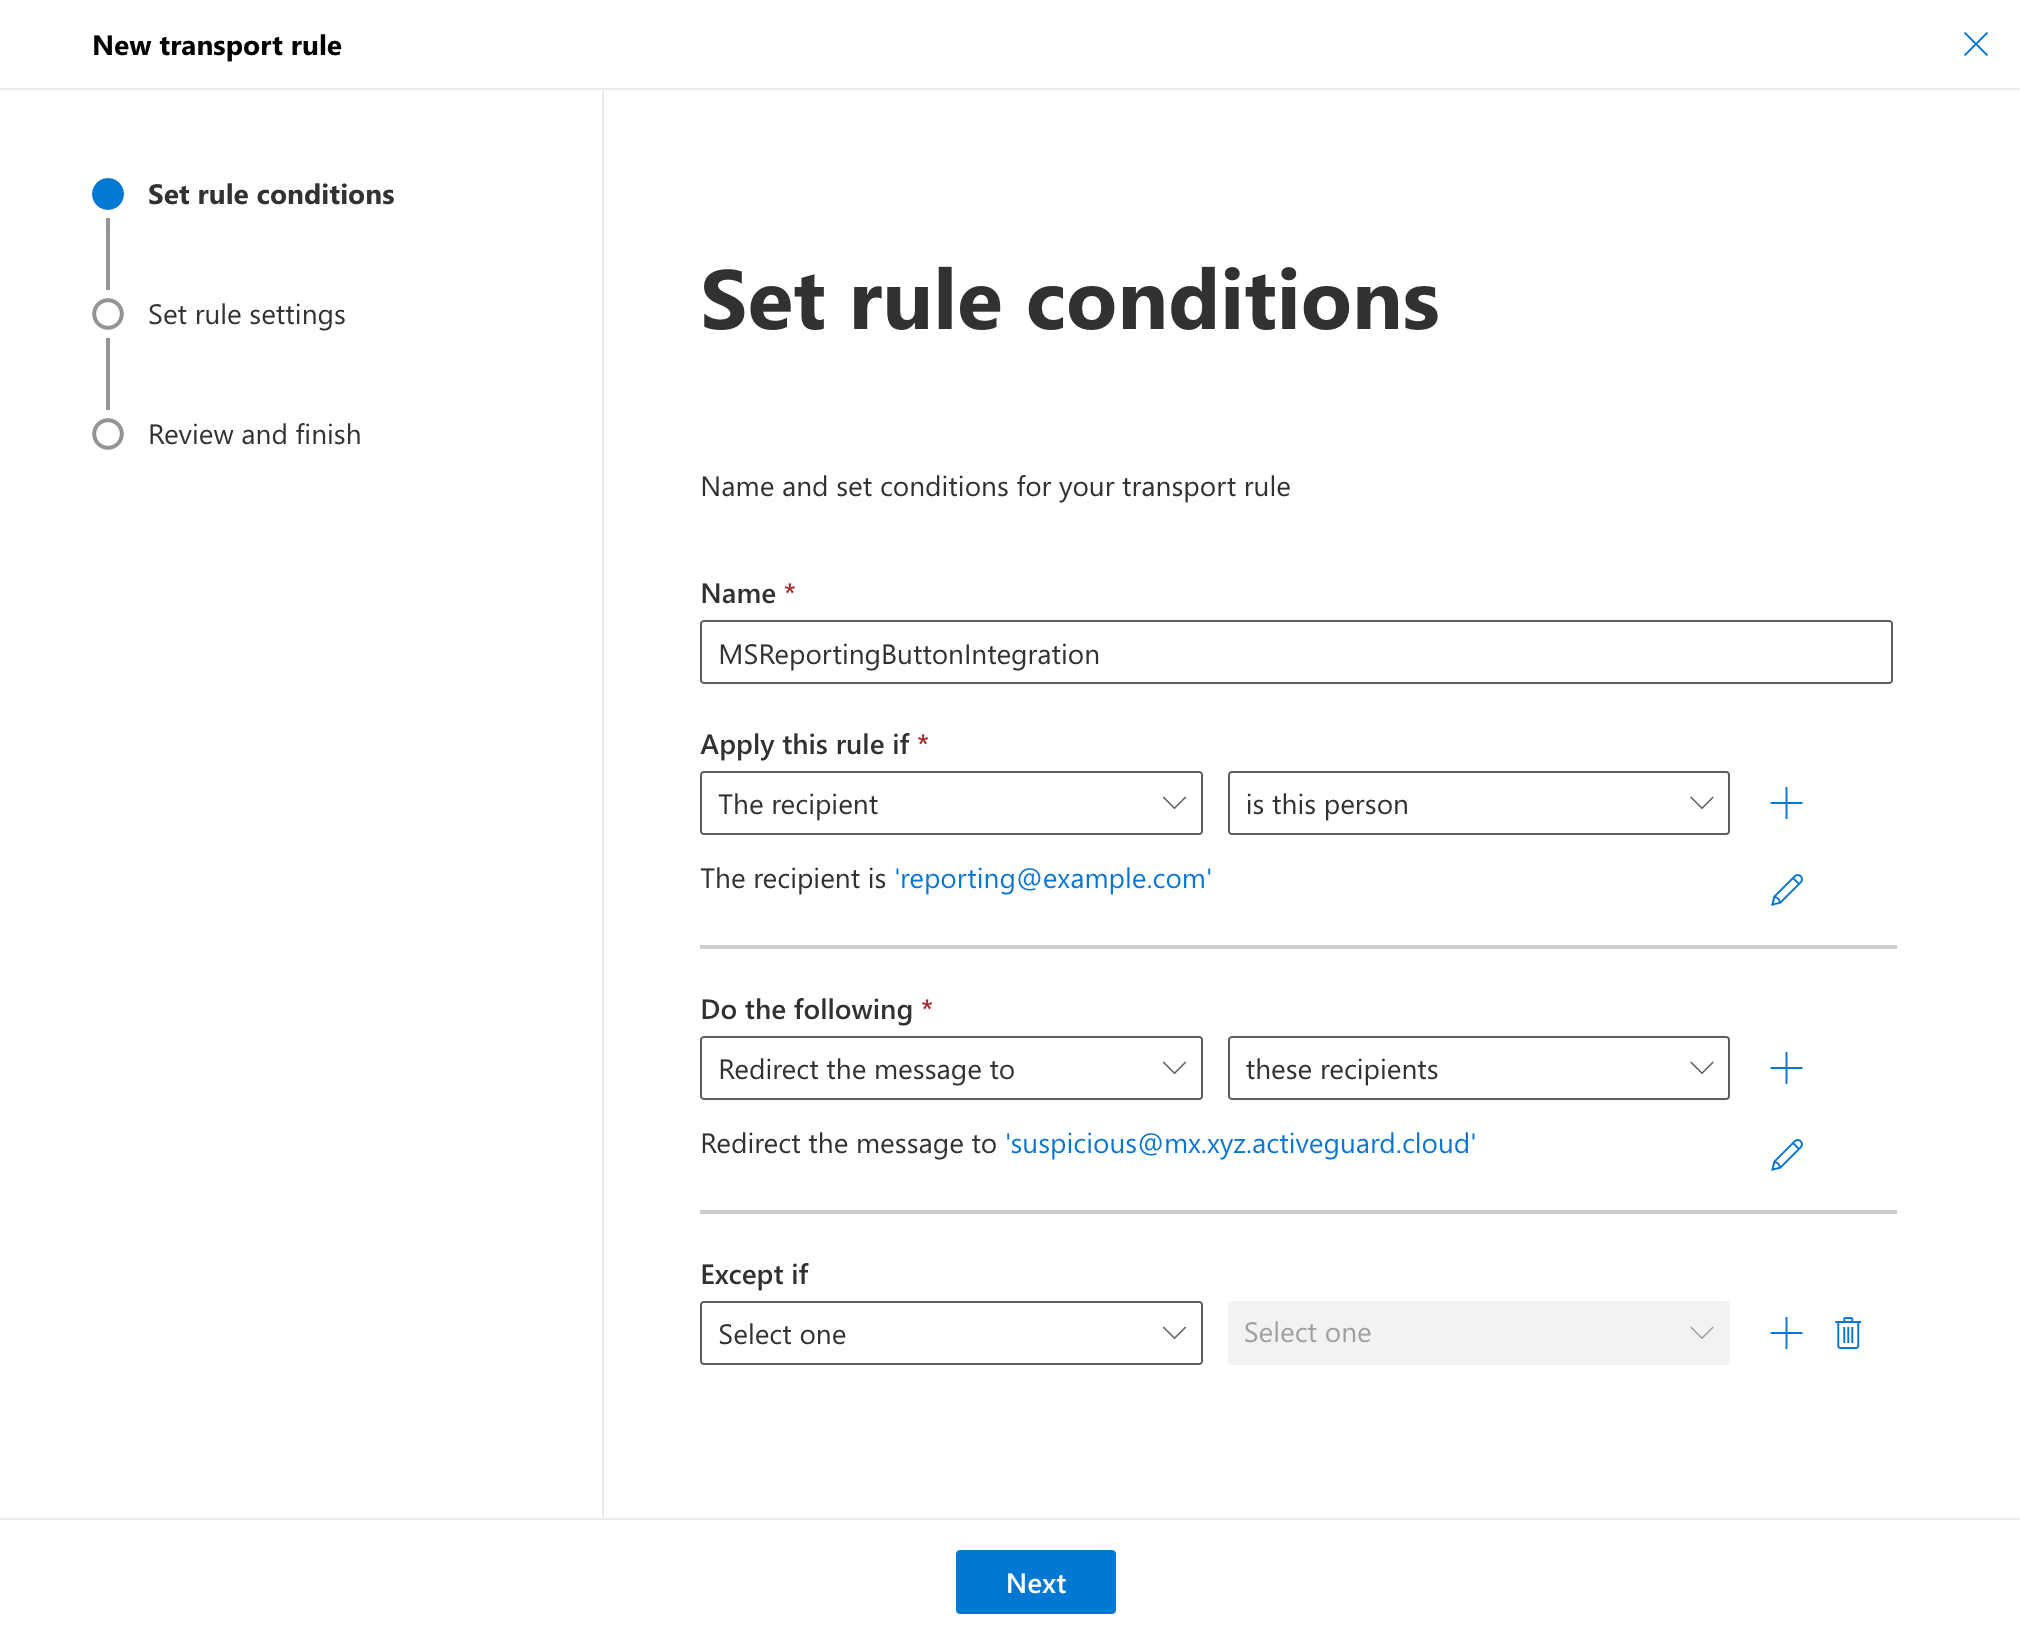 7. Click **Next** until **Finish**, then **Done**.
8. Enable the new rule.
## Test the integration
1. Report an email via the M365 built-in button. It is available in the web interface as well as in Outlook.
2. In xorlab, go to **Abuse Mailbox** → **All Cases** and there you should see the reported email. It can take up to 30 seconds to appear.
3. If you enabled **automatic feedback** in the beginning, you should receive a feedback email within 30 seconds.
## How to change the reporting address
The default address under which xorlab will listen for reported emails is `suspicious@`, with `templateDomain` referring to the parameter that's set in `active_guard.yml`.
If you like to customize the sender address, add the following block (if it does not already exist) to the `active_guard.yml` file:
```yaml active_guard.yml {7} theme={null}
scanSources:
smtp:
port: 10025
handler:
smtpReport:
# Default. corresponds to the parameter templateDomain in active_guard.yml
emailAddress: suspicious@
```
Afterward, click **Publish**. The `scanSources` handler settings become active within about one minute.
## How to automate reported email handling
For further information about automation, have a look at [Abuse Mailbox](/latest/abuse-mailbox#auto-resolve-cases).
## How "Not Junk" reports are handled
When you integrate M365 reporting, xorlab adds one of the following tags to each reported email:
* `#reportedasnotjunk` for messages reported as **Not Junk**
* `#reportedasjunk` for messages reported as **Junk**
* `#reportedasphishing` for messages reported as **Phishing**
Default behavior:
* **Not Junk**: the case is automatically resolved as `benign` by `REPORTED_NOT_JUNK_decision`, no acknowledgment email is sent, and the `#reportedasnotjunk` tag is added.
* **Junk/Phishing**: the corresponding tag is added, acknowledgment is sent (if enabled), and the case is handled by normal reported-email analysis.
`REPORTED_NOT_JUNK_decision` is evaluated before campaigns, so these cases are auto-resolved before campaign rules are applied.
To disable this auto-resolve behavior and return to normal reported-email handling, set the rule state to `PASSIVE` in `/activeguard/core/rule_sets/90_local/params/local.properties`:
```shell local.properties theme={null}
# Disable auto-resolve for M365 "Not Junk" reports
REPORTED_NOT_JUNK_decision_state=PASSIVE
```
Then click **Publish**. The rule-set configuration becomes active within about one minute.
## Multi-Tenancy
Repeat this integration for each M365 tenant. In addition, xorlab needs to know which tenant a reported email belongs to, which is decided by a header on the carrier email:
Add the `x-ag-tenant` header so that reported emails end up in the right tenant.
Note that `local.properties` above applies to all tenants. To change this behavior for a single tenant only, see [Manage Tenant Rules](/latest/multi-tenancy-rules#tenant-specific-parameters).
## Next steps
The M365 integration is complete:
* [What to Configure Next](/latest/integration-next-steps)
7. Click **Next** until **Finish**, then **Done**.
8. Enable the new rule.
## Test the integration
1. Report an email via the M365 built-in button. It is available in the web interface as well as in Outlook.
2. In xorlab, go to **Abuse Mailbox** → **All Cases** and there you should see the reported email. It can take up to 30 seconds to appear.
3. If you enabled **automatic feedback** in the beginning, you should receive a feedback email within 30 seconds.
## How to change the reporting address
The default address under which xorlab will listen for reported emails is `suspicious@`, with `templateDomain` referring to the parameter that's set in `active_guard.yml`.
If you like to customize the sender address, add the following block (if it does not already exist) to the `active_guard.yml` file:
```yaml active_guard.yml {7} theme={null}
scanSources:
smtp:
port: 10025
handler:
smtpReport:
# Default. corresponds to the parameter templateDomain in active_guard.yml
emailAddress: suspicious@
```
Afterward, click **Publish**. The `scanSources` handler settings become active within about one minute.
## How to automate reported email handling
For further information about automation, have a look at [Abuse Mailbox](/latest/abuse-mailbox#auto-resolve-cases).
## How "Not Junk" reports are handled
When you integrate M365 reporting, xorlab adds one of the following tags to each reported email:
* `#reportedasnotjunk` for messages reported as **Not Junk**
* `#reportedasjunk` for messages reported as **Junk**
* `#reportedasphishing` for messages reported as **Phishing**
Default behavior:
* **Not Junk**: the case is automatically resolved as `benign` by `REPORTED_NOT_JUNK_decision`, no acknowledgment email is sent, and the `#reportedasnotjunk` tag is added.
* **Junk/Phishing**: the corresponding tag is added, acknowledgment is sent (if enabled), and the case is handled by normal reported-email analysis.
`REPORTED_NOT_JUNK_decision` is evaluated before campaigns, so these cases are auto-resolved before campaign rules are applied.
To disable this auto-resolve behavior and return to normal reported-email handling, set the rule state to `PASSIVE` in `/activeguard/core/rule_sets/90_local/params/local.properties`:
```shell local.properties theme={null}
# Disable auto-resolve for M365 "Not Junk" reports
REPORTED_NOT_JUNK_decision_state=PASSIVE
```
Then click **Publish**. The rule-set configuration becomes active within about one minute.
## Multi-Tenancy
Repeat this integration for each M365 tenant. In addition, xorlab needs to know which tenant a reported email belongs to, which is decided by a header on the carrier email:
Add the `x-ag-tenant` header so that reported emails end up in the right tenant.
Note that `local.properties` above applies to all tenants. To change this behavior for a single tenant only, see [Manage Tenant Rules](/latest/multi-tenancy-rules#tenant-specific-parameters).
## Next steps
The M365 integration is complete:
* [What to Configure Next](/latest/integration-next-steps)