> ## Documentation Index
> Fetch the complete documentation index at: https://docs.xorlab.com/llms.txt
> Use this file to discover all available pages before exploring further.
> ## Agent Instructions
> Pages under /latest/ document the current release. Paths that begin with a version number, for example /10.0/, are frozen snapshots of superseded releases kept for reference only — never present their instructions as current. If the reader's version is unknown, answer from /latest/ and say which version the answer describes.
> xorlab is deployed on-premises, hybrid, or as a cloud service, and integrates with either Microsoft 365 or on-premises mail infrastructure. Configuration steps often differ between these. State which deployment and integration mode an instruction applies to instead of presenting one as universal.
> Distinguish inline mode from monitoring mode when describing anything that acts on email. Monitoring mode observes a copy and cannot block or quarantine; inline mode routes mail through xorlab and can.
> Write the product name as lowercase 'xorlab'. Use the documented component names: xorlab Control Center (XCC), xorlab MTA, xorlab Sandbox (DANA), xorlab Natural Language Understanding (NLU). After the first mention, use the short forms XCC, MTA, Sandbox, and NLU. Do not use DANA as a standalone name for the Sandbox, but keep it where it is a literal string in configuration keys, container names, and hostnames.
> Do not invent configuration keys, rule parameters, list names, log properties, or API fields. If a value is not present in this documentation, say that it is not documented rather than guessing.
# Enable Entra ID SAML Login
> Wire Entra ID to xorlab as a SAML identity provider, so analysts, admins or end-users sign in with their Microsoft account.
**Prerequisites**
* Complete [Create Entra ID App](/latest/m365-entra-id-app)
* Have access to [Entra ID Portal](https://entra.microsoft.com) with one of these roles: Cloud Application Administrator, Application Administrator, or owner of the service principal.
* Know your customer ID `xyz`, e.g. `xyz.activeguard.cloud`
If you want to enable a different login mechanism like for example LDAP, have a look at [Authentication Overview](/latest/authentication-overview).
## Activate SAML in Entra ID
1. Go to [Entra ID Portal](https://entra.microsoft.com) → **Enterprise apps** → click on the `xorlab` app.
2. Open **Single sign-on**:
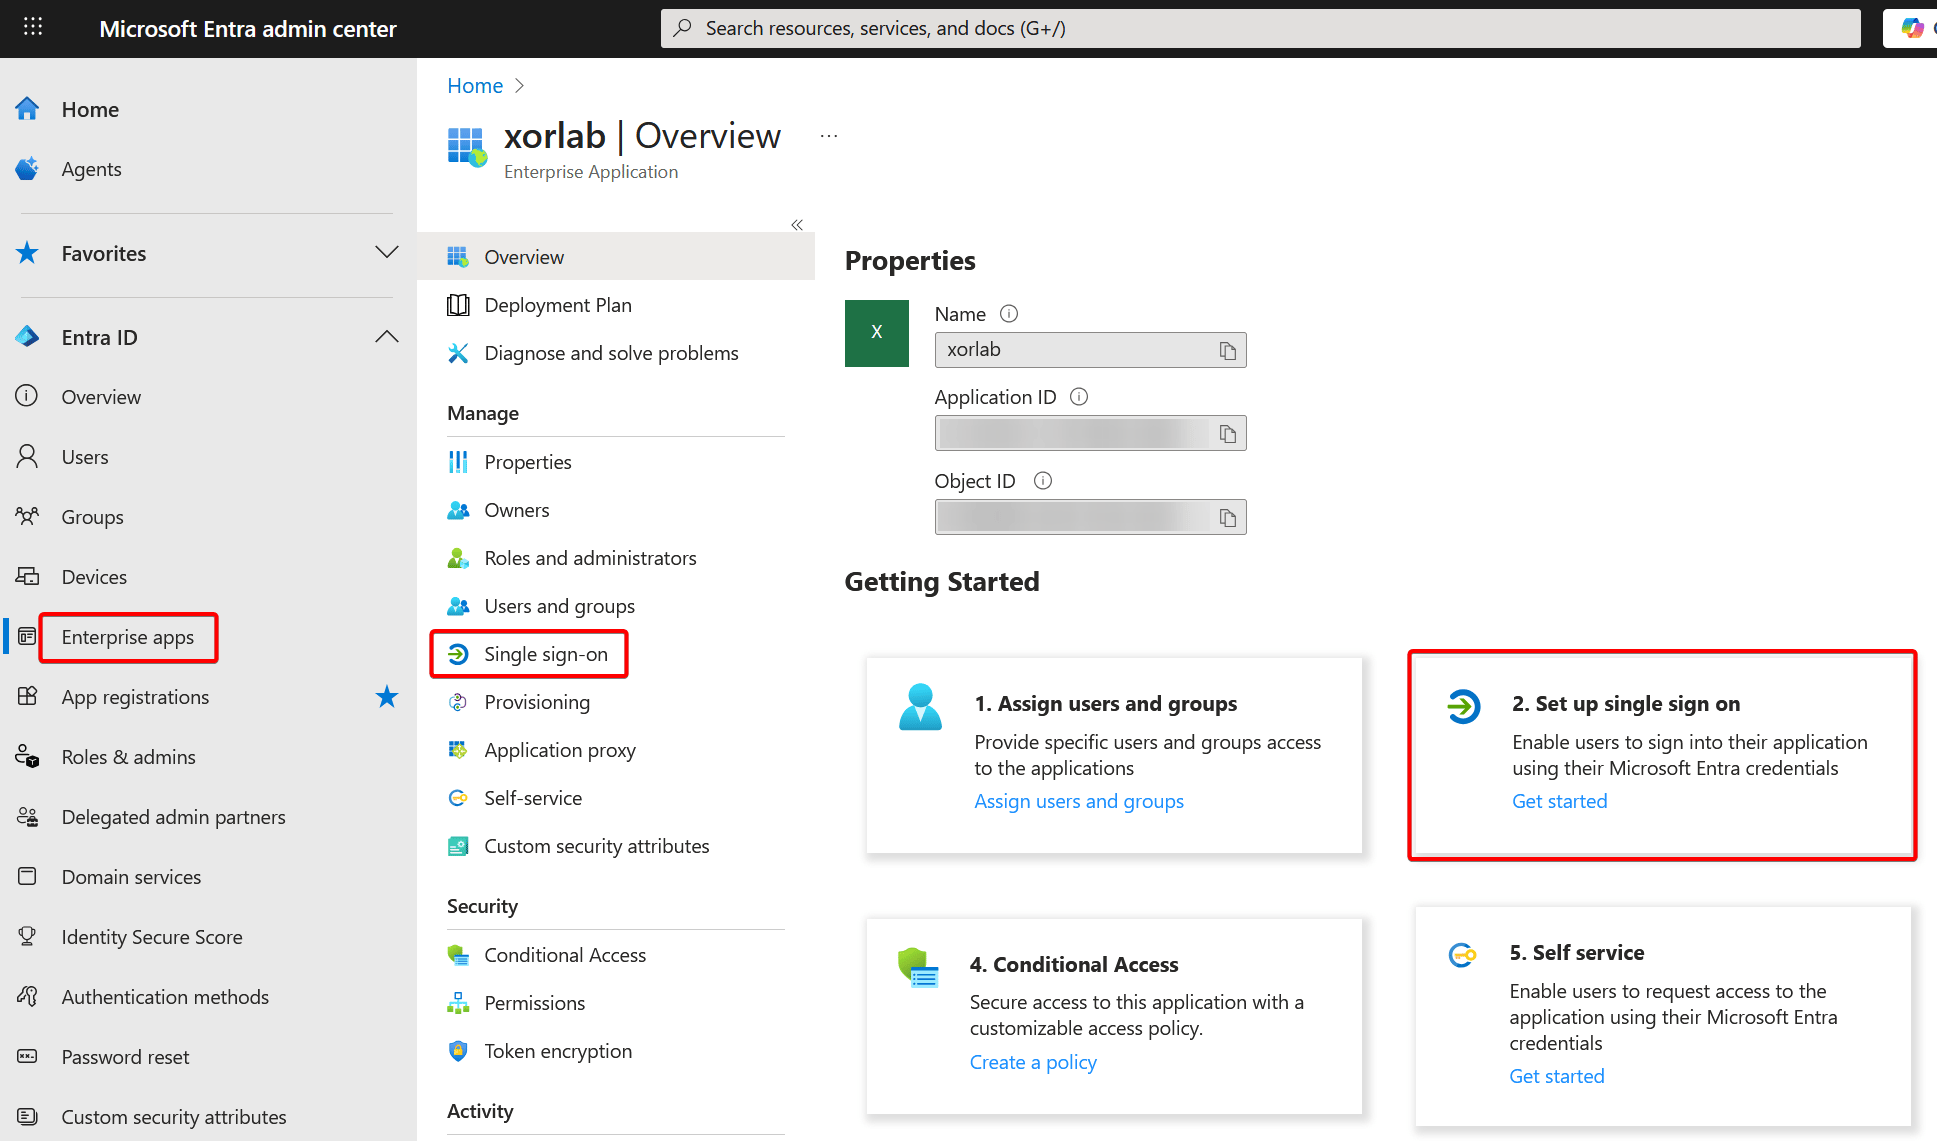 3. Choose **SAML**.
4. Edit the **Basic SAML Configuration**:
3. Choose **SAML**.
4. Edit the **Basic SAML Configuration**:
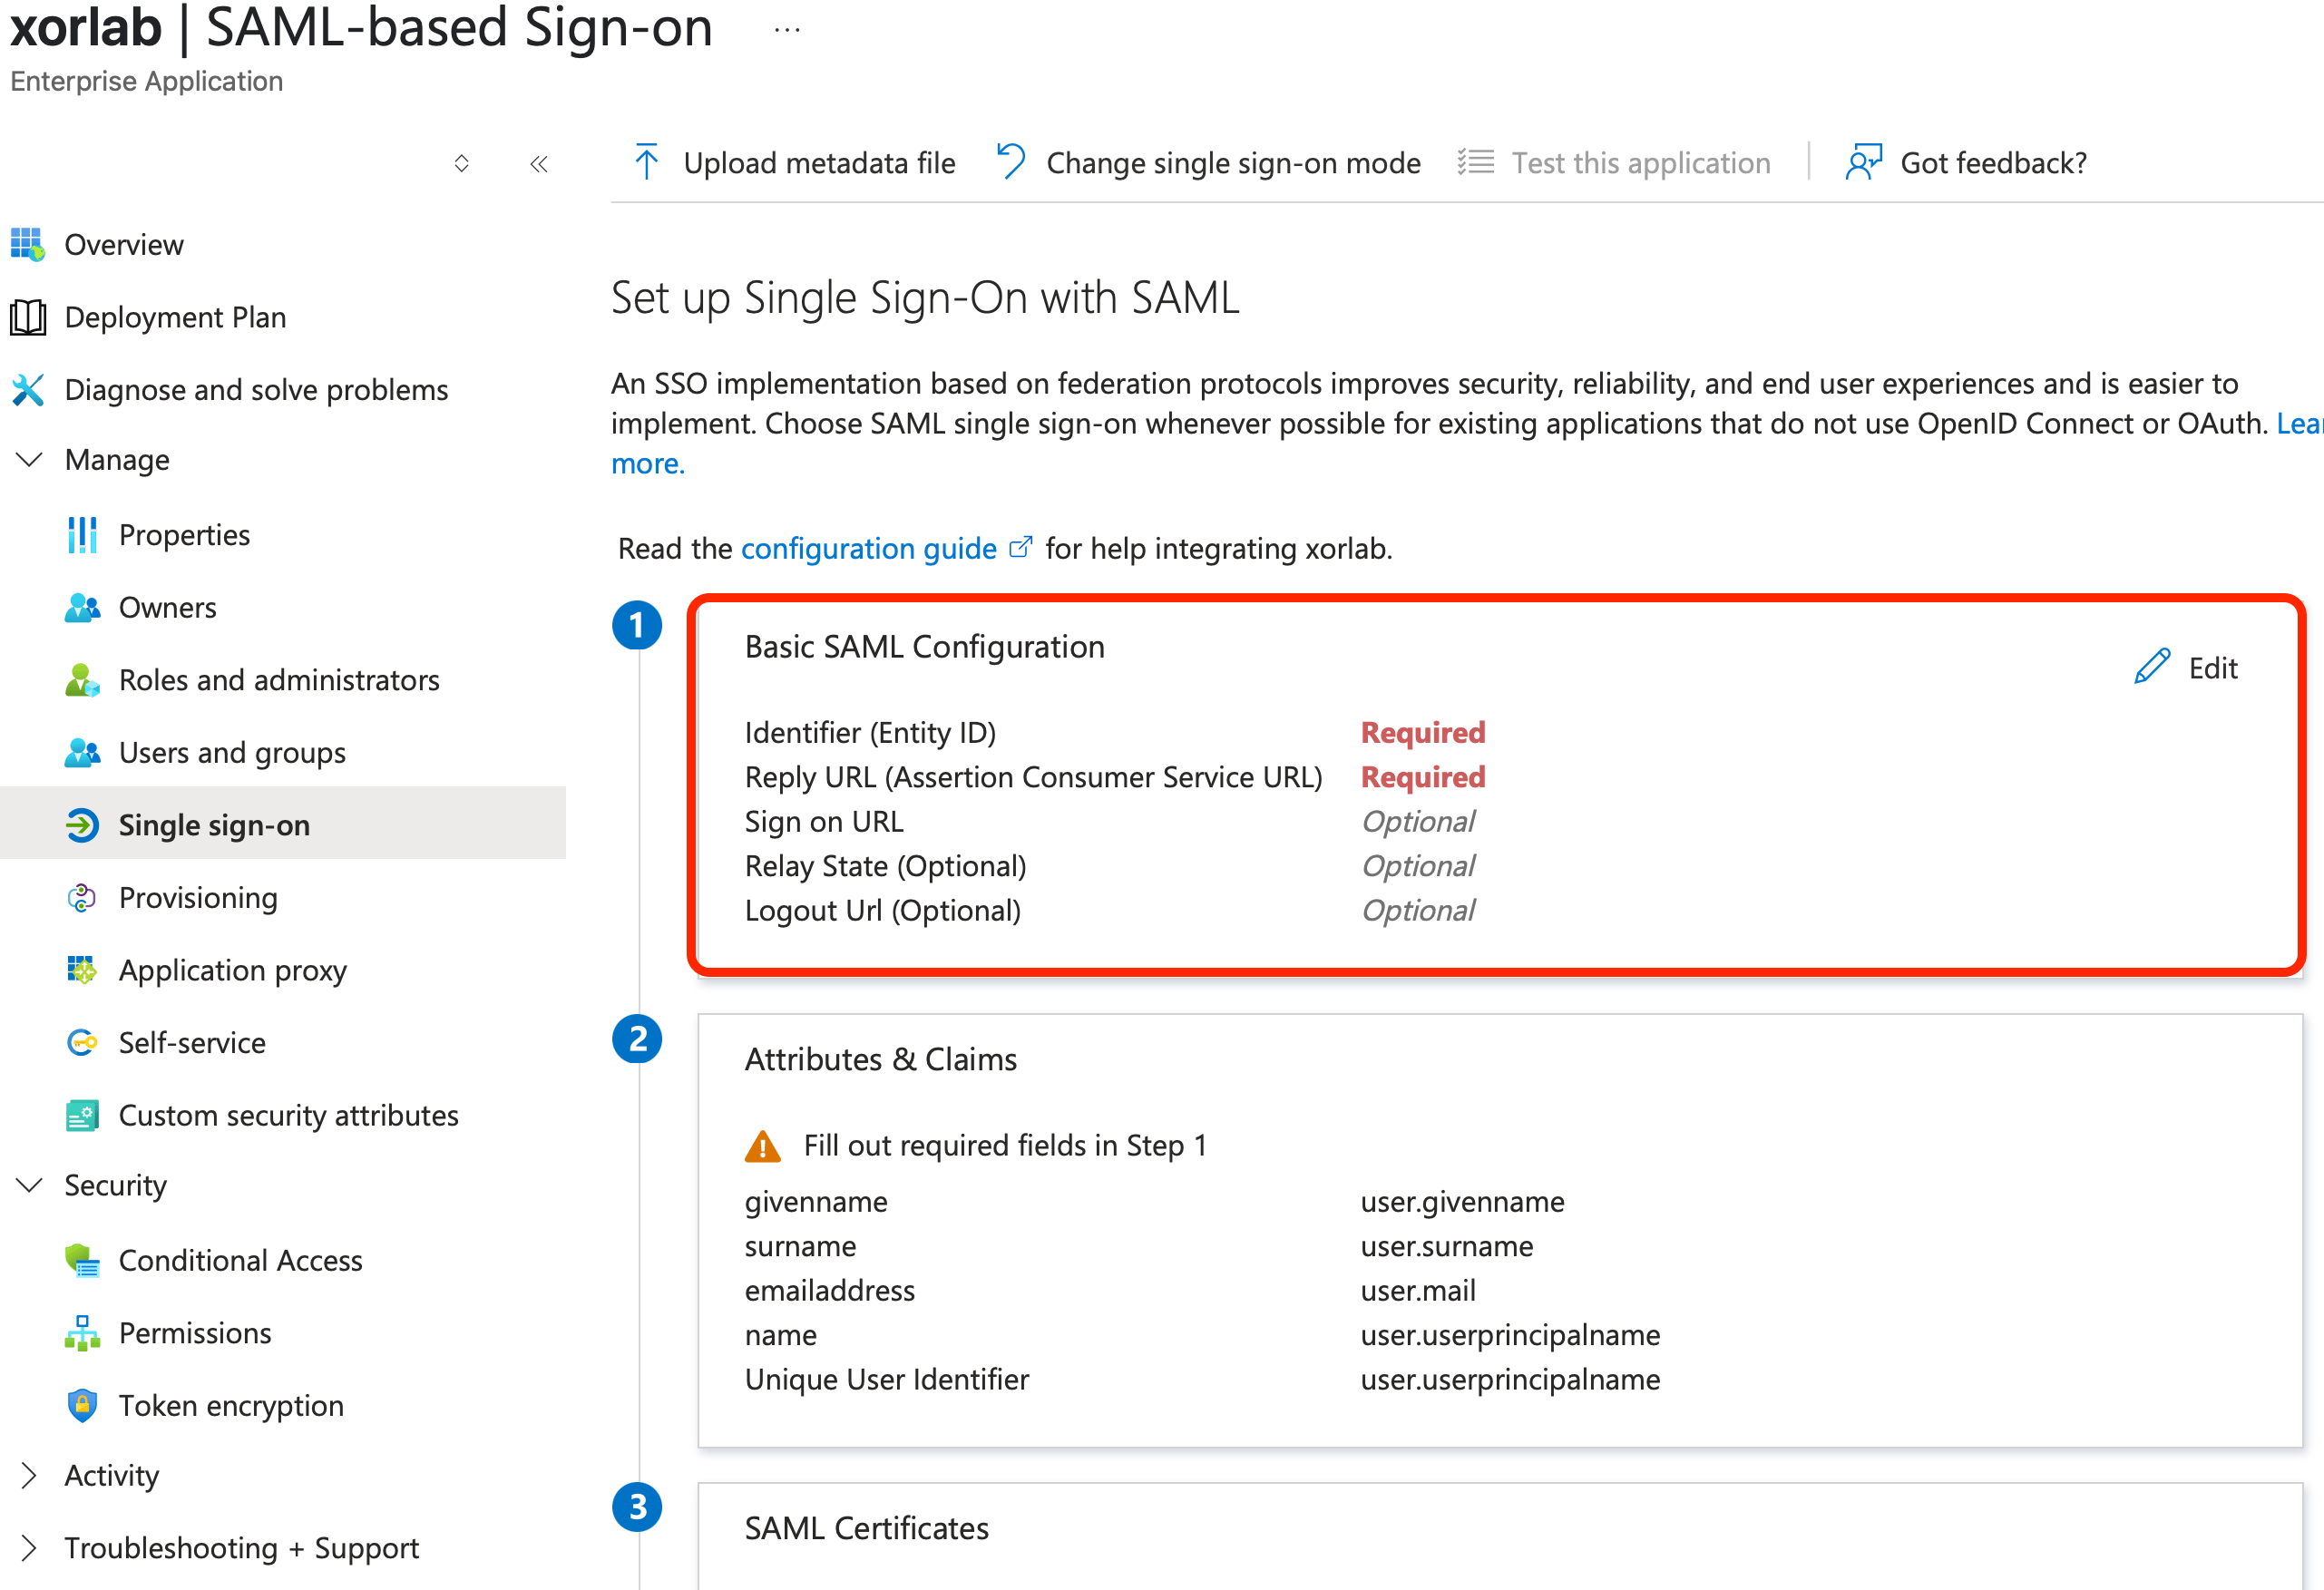 5. Add an **Identifier** and a **Reply URL** entry, where `xyz` is your customer ID.
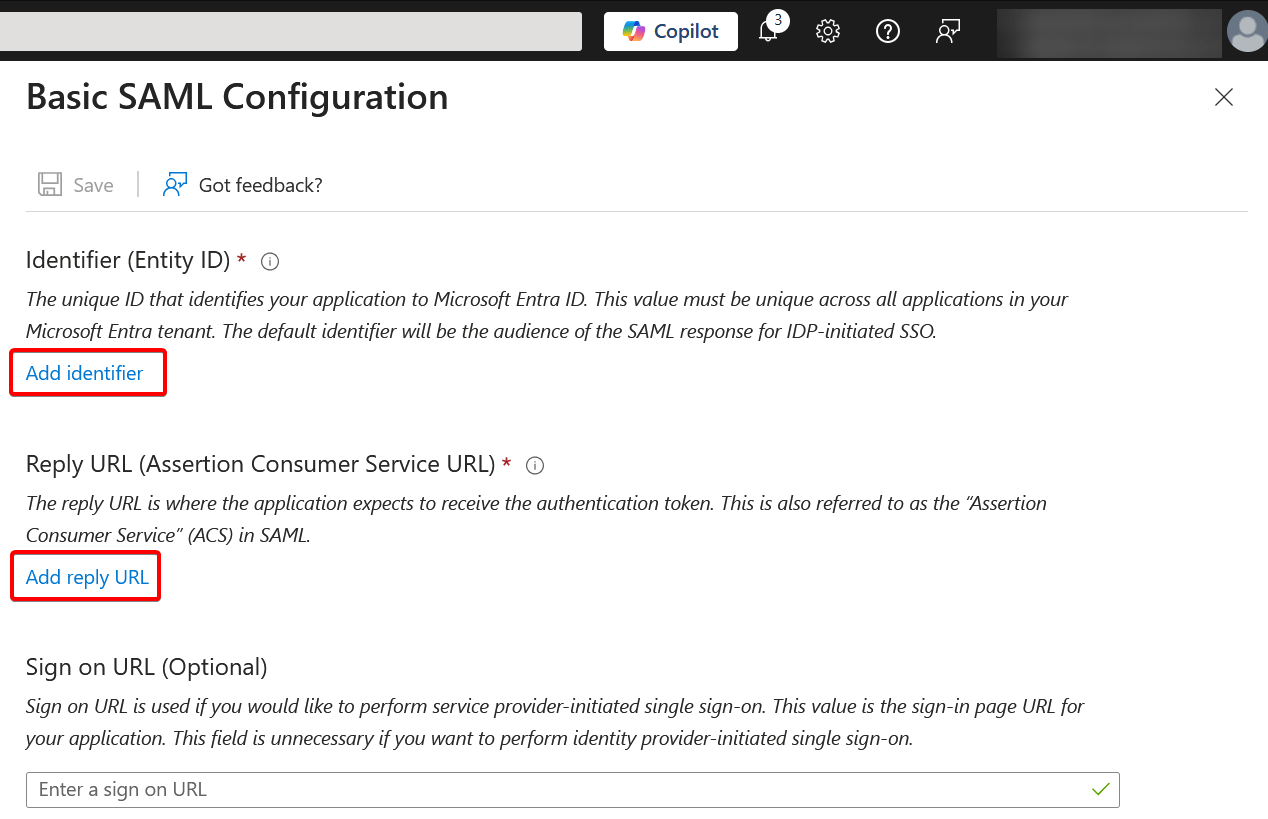 | Input field name | URL |
| :----------------------------------------- | :----------------------------------------------------------------------------- |
| Identifier (Entity ID) | `https://xyz.activeguard.cloud/auth/saml2/service-provider-metadata/entraSaml` |
| Reply URL (Assertion Consumer Service URL) | `https://xyz.activeguard.cloud/auth/saml2/sso/entraSaml` |
The `entraSaml` part of both URLs is the **SAML backend name**. You will need to use **exactly the same name** later when configuring the SAML authentication in xorlab. Each SAML backend must have a unique name. If you are configuring multiple SAML providers in a multi-tenant deployment, use unique names that identify the tenant (e.g `nameSAML`).
6. **Save** and click **No, I’ll test it later**.
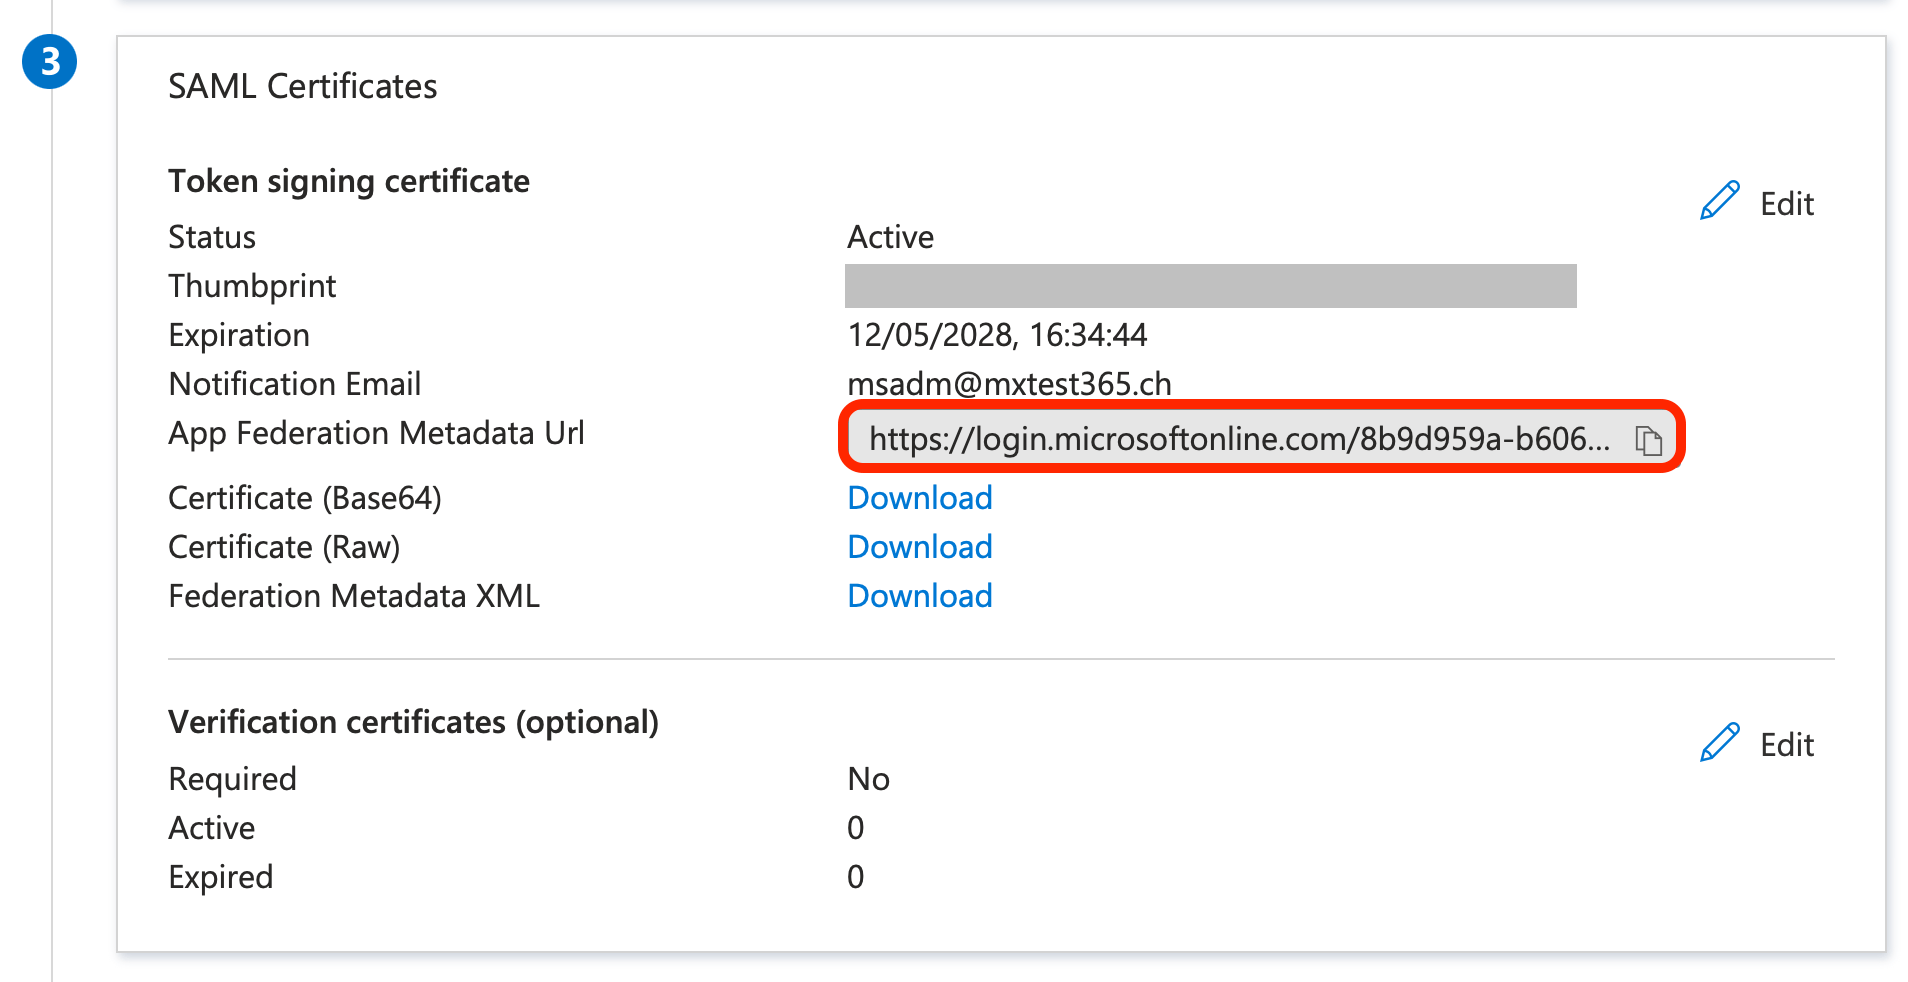
7. Copy and save the App Federation Metadata URL from **SAML Certificates**, you will need it later.
| Input field name | URL |
| :----------------------------------------- | :----------------------------------------------------------------------------- |
| Identifier (Entity ID) | `https://xyz.activeguard.cloud/auth/saml2/service-provider-metadata/entraSaml` |
| Reply URL (Assertion Consumer Service URL) | `https://xyz.activeguard.cloud/auth/saml2/sso/entraSaml` |
The `entraSaml` part of both URLs is the **SAML backend name**. You will need to use **exactly the same name** later when configuring the SAML authentication in xorlab. Each SAML backend must have a unique name. If you are configuring multiple SAML providers in a multi-tenant deployment, use unique names that identify the tenant (e.g `nameSAML`).
6. **Save** and click **No, I’ll test it later**.
7. Copy and save the App Federation Metadata URL from **SAML Certificates**, you will need it later.
 ## Configure users and roles in Entra ID
1. Go to [Entra ID Portal](https://entra.microsoft.com) → **App registrations** → **All applications** → click on the `xorlab` app.
## Configure users and roles in Entra ID
1. Go to [Entra ID Portal](https://entra.microsoft.com) → **App registrations** → **All applications** → click on the `xorlab` app.
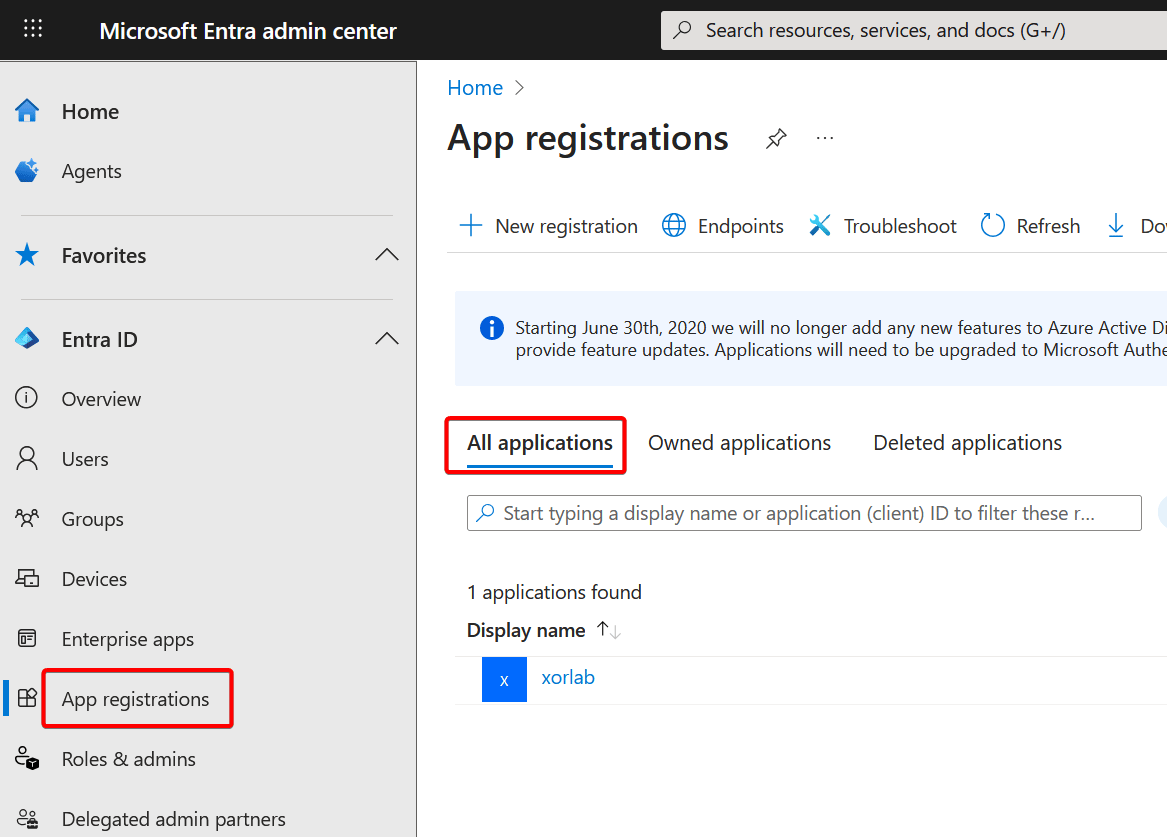 2. Click on **App roles** and then **Create app role**:
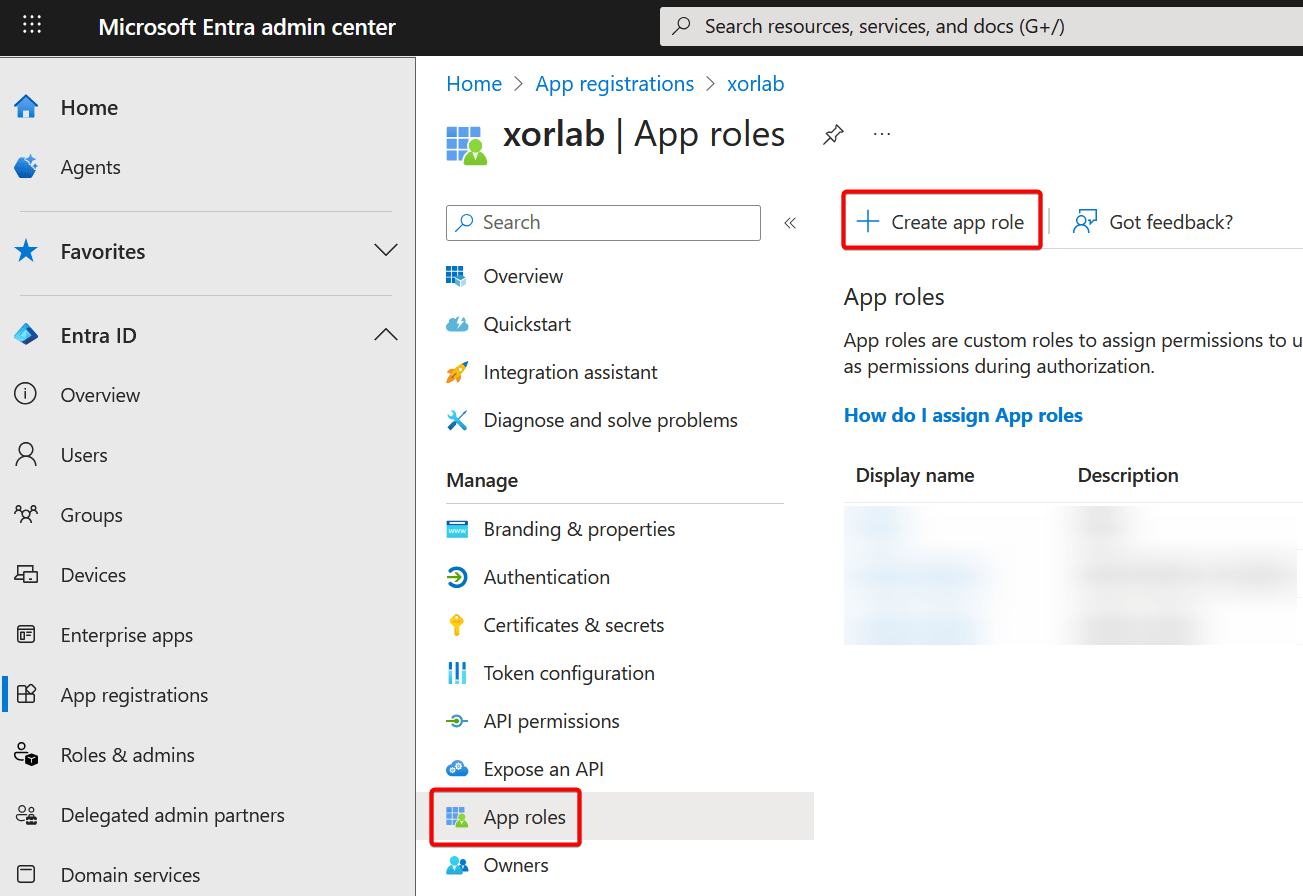 3. Create three new app roles via **Create app role**. The optional ones can be omitted if they are not needed.
| Display Name | Value | Required? |
| :-------------- | :-------------------------- | :-------- |
| Administrator | `entra_xor_admin` | Mandatory |
| Analyst | `entra_xor_analyst` | Optional |
| Quarantine user | `entra_xor_quarantine_user` | Optional |
3. Create three new app roles via **Create app role**. The optional ones can be omitted if they are not needed.
| Display Name | Value | Required? |
| :-------------- | :-------------------------- | :-------- |
| Administrator | `entra_xor_admin` | Mandatory |
| Analyst | `entra_xor_analyst` | Optional |
| Quarantine user | `entra_xor_quarantine_user` | Optional |
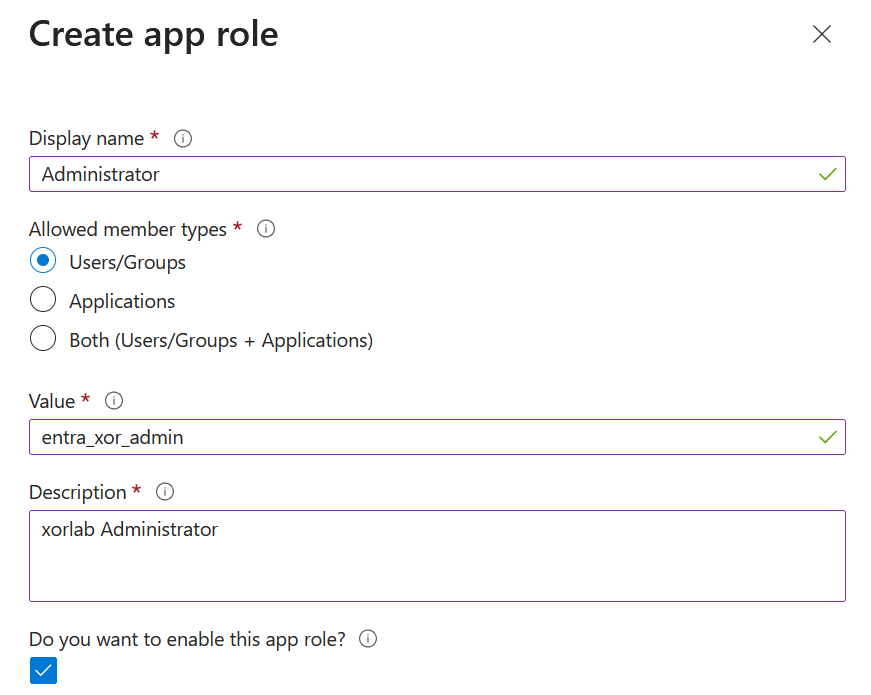 4. Open the **Enterprise apps** menu on the left side, choose again the `xorlab` app and click on **Assign users and groups**:
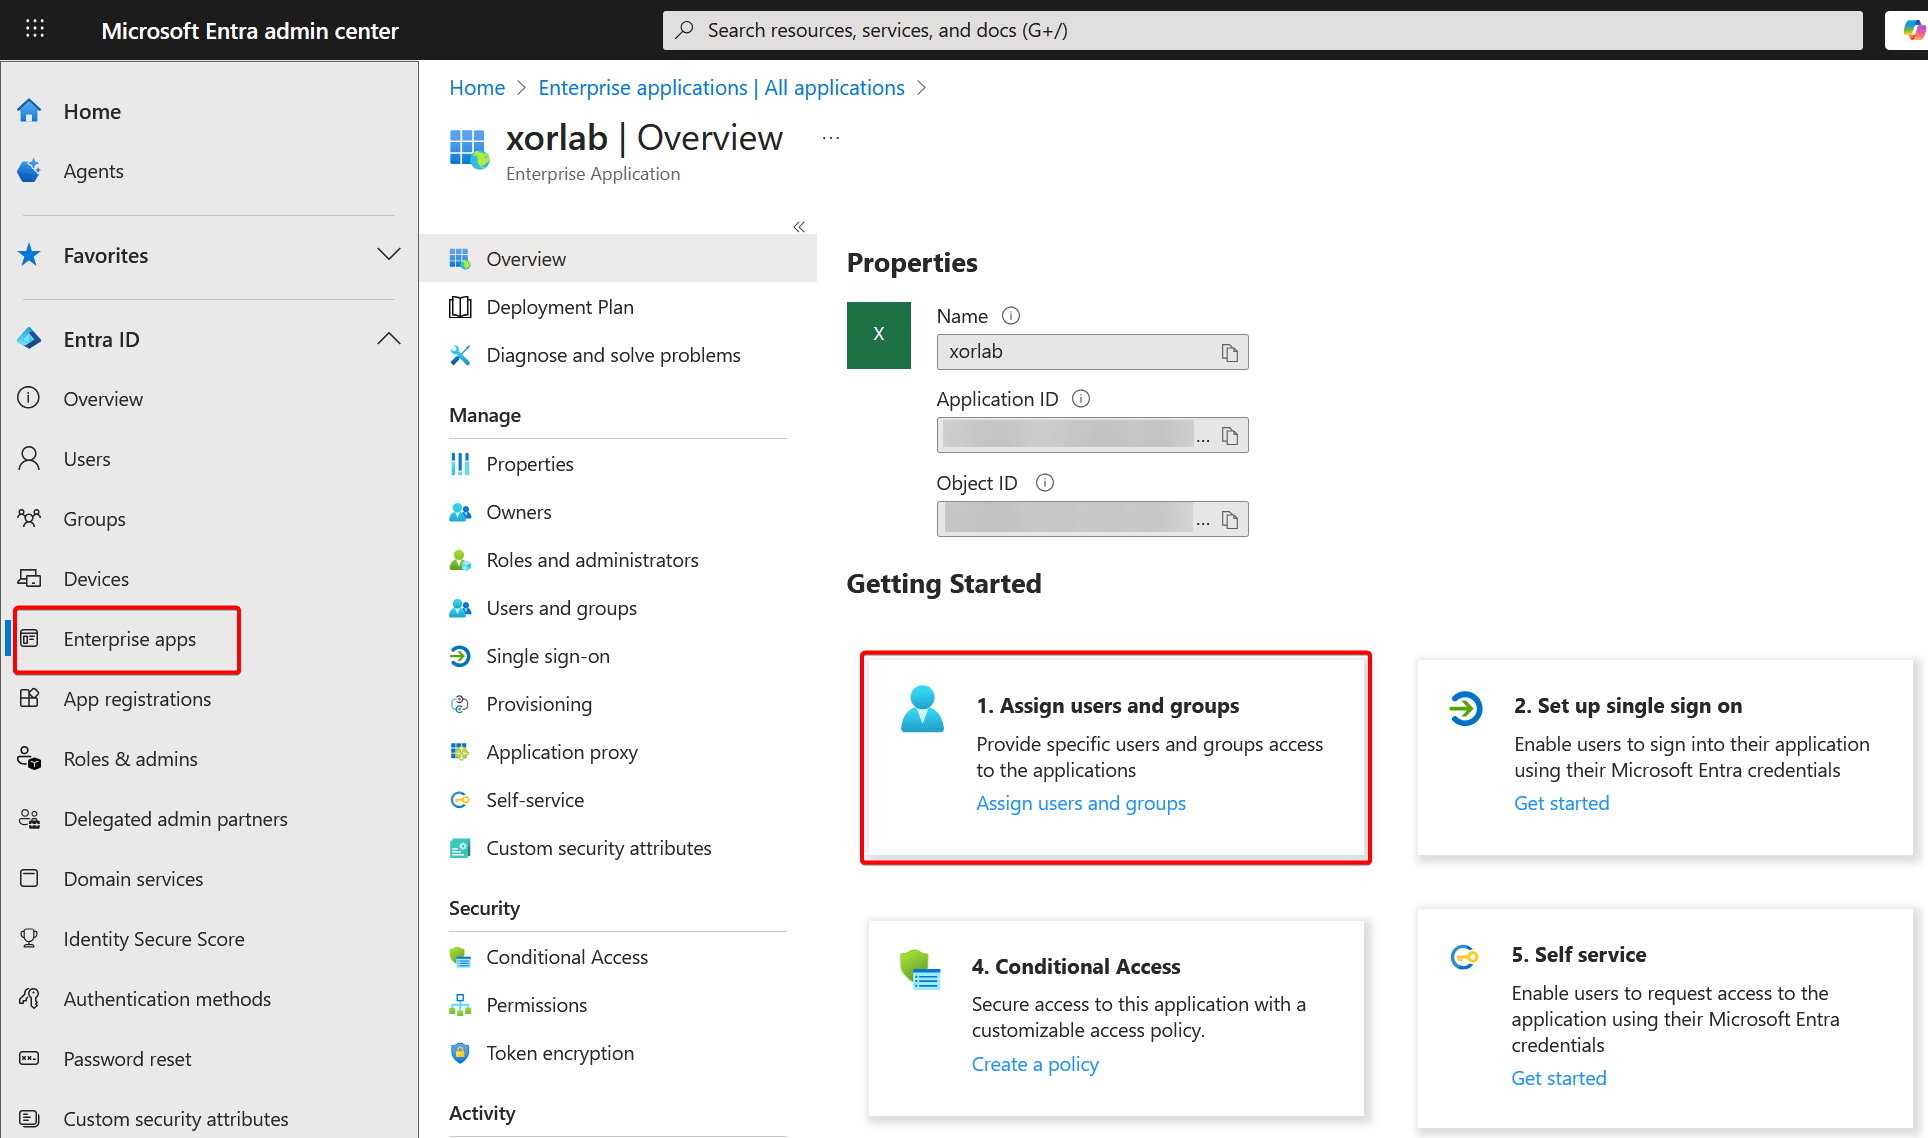 5. Click on **Add user/group**:
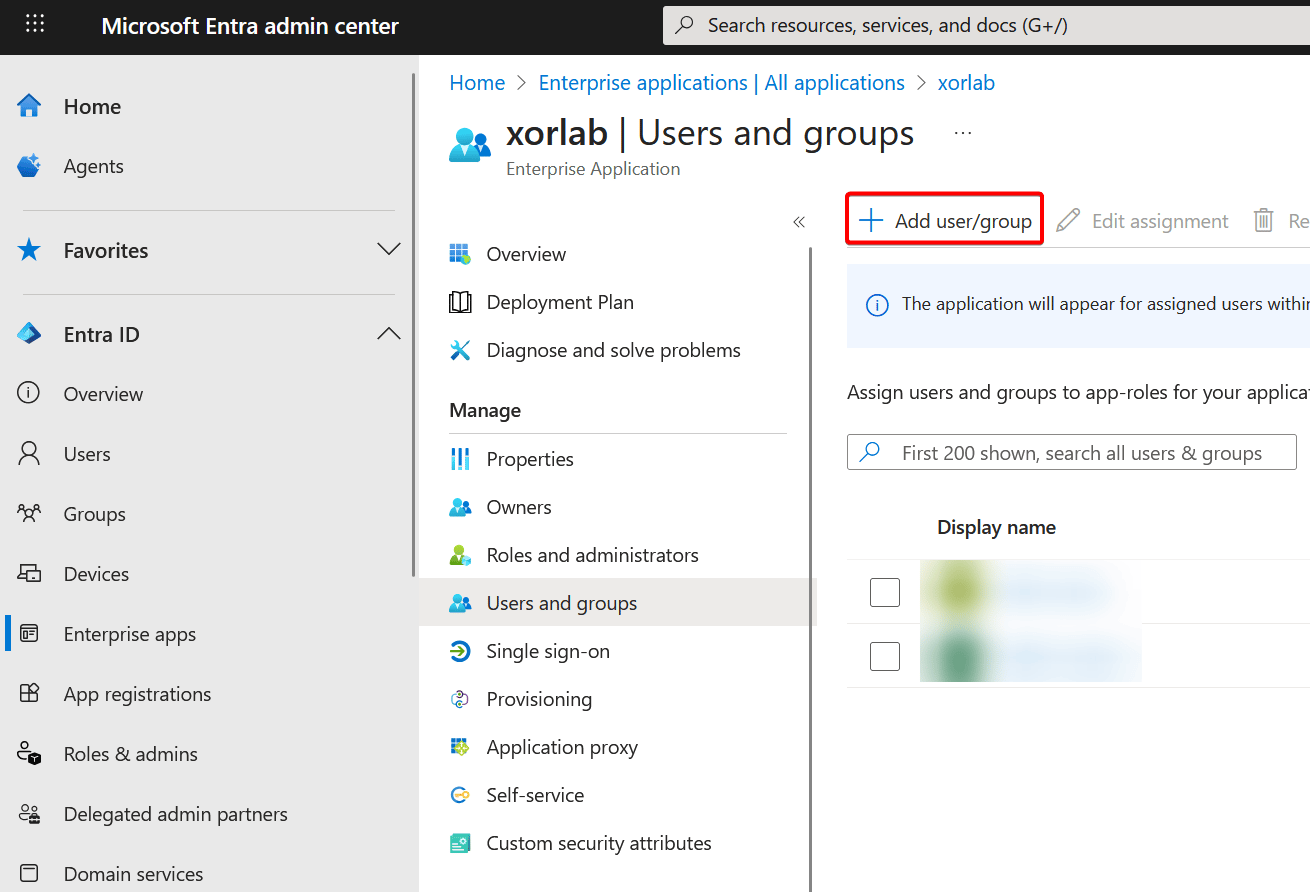 6. Add the users or groups who need access to xorlab and assign them one of the three created roles Administrator, Analyst or Quarantine user.
**Group assigning is only available in the Microsoft Entra ID P1+ license.**
## Activate SAML on xorlab
Now that you have the Entra ID configured, we will set up xorlab accordingly.
1. Open the file `auth/auth/auth.yml` and add a SAML backend.
```yaml auth.yml theme={null}
enabledAuthBackends:
# Add this to the list of enabled backends. If you put it as first entry, it will be the new default.
- entraSaml
saml2AuthBackends:
entraSaml:
idp:
# Enter the App Federation Metadata URL from Entra ID
metadataUrl: https://login.microsoftonline.com/*****************************
attributeMapping:
displayName: attr('http://schemas.microsoft.com/identity/claims/displayname')
emails: attr('http://schemas.xmlsoap.org/ws/2005/05/identity/claims/name')
roles: attr('http://schemas.microsoft.com/ws/2008/06/identity/claims/role')
```
**If you rename `entraSaml`, make sure to update the Identifier and Reply URL in Entra ID SAML configuration above.**
2. Enter the **App Federation Metadata Url** you copied before for the `metadataUrl` key.
3. Map your Entra ID roles to xorlab roles by adding a `roleMapping`. More information about xorlab roles can be found at [Built-in User Roles](/latest/built-in-user-roles)
```yaml auth.yml {14-27} theme={null}
enabledAuthBackends:
- entraSaml
saml2AuthBackends:
entraSaml:
idp:
# Enter the App Federation Metadata Url from M365
metadataUrl: https://login.microsoftonline.com/*****************************
attributeMapping:
displayName: attr('http://schemas.microsoft.com/identity/claims/displayname')
emails: attr('http://schemas.xmlsoap.org/ws/2005/05/identity/claims/name')
roles: attr('http://schemas.microsoft.com/ws/2008/06/identity/claims/role')
# Add your Entra ID roles to every xorlab role that is required.
roleMapping:
xcc_admin:
- entra_xor_admin
xcc_monitor:
- entra_xor_admin
xcc_analyst:
- entra_xor_analyst
xcc_insights:
- entra_xor_admin
- entra_xor_analyst
xcc_quarantine_user:
- entra_xor_admin
- entra_xor_analyst
- entra_xor_quarantine_user
```
The following example shows how to do a role pass-through without role mapping. In general this is not recommended because it is more error prone. However if you do it, make sure to:
* Specify all xorlab roles in Entra ID (including `xcc_insights` and `xcc_monitor`) and assign them to your users
* Provide only xorlab related roles in the SAML token to avoid an excessive token size
```yaml auth.yml {14} theme={null}
enabledAuthBackends:
- entraSaml
saml2AuthBackends:
entraSaml:
idp:
# Enter the App Federation Metadata Url from M365
metadataUrl: https://login.microsoftonline.com/*****************************
attributeMapping:
displayName: attr('http://schemas.microsoft.com/identity/claims/displayname')
emails: attr('http://schemas.xmlsoap.org/ws/2005/05/identity/claims/name')
roles: attr('http://schemas.microsoft.com/ws/2008/06/identity/claims/role')
# Specify PASS_THROUGH, otherwise xorlab will only consider roles that match the role mapping
roleMappingMode: PASS_THROUGH
```
4. Click **Publish**. The authentication configuration becomes active within about one minute.
5. Now the SAML integration is done and you can test the login with the link `https://xyz.activeguard.cloud/?_agAuthBackend=entraSaml`. Replace `xyz` with your customer ID.
**Custom trust store**
In case your xorlab configuration uses a custom trust store, you will also have to add the [DigiCert Global Root CA certificate](https://cacerts.digicert.com/DigiCertGlobalRootCA.crt.pem) when integrating SAML with Azure Active Directory. Please follow the steps described in [Certificate configuration](/latest/authentication-certificates).
## Next steps
Enable the protection mode for your tenant:
* Either [M365 Monitoring Mode](/latest/m365-monitoring-mode) or [M365 Inline Mode](/latest/m365-inline-mode)
Optionally, before going inline, import your existing emails:
* [Import Past M365 Emails](/latest/m365-retrospective-email-scanning)
6. Add the users or groups who need access to xorlab and assign them one of the three created roles Administrator, Analyst or Quarantine user.
**Group assigning is only available in the Microsoft Entra ID P1+ license.**
## Activate SAML on xorlab
Now that you have the Entra ID configured, we will set up xorlab accordingly.
1. Open the file `auth/auth/auth.yml` and add a SAML backend.
```yaml auth.yml theme={null}
enabledAuthBackends:
# Add this to the list of enabled backends. If you put it as first entry, it will be the new default.
- entraSaml
saml2AuthBackends:
entraSaml:
idp:
# Enter the App Federation Metadata URL from Entra ID
metadataUrl: https://login.microsoftonline.com/*****************************
attributeMapping:
displayName: attr('http://schemas.microsoft.com/identity/claims/displayname')
emails: attr('http://schemas.xmlsoap.org/ws/2005/05/identity/claims/name')
roles: attr('http://schemas.microsoft.com/ws/2008/06/identity/claims/role')
```
**If you rename `entraSaml`, make sure to update the Identifier and Reply URL in Entra ID SAML configuration above.**
2. Enter the **App Federation Metadata Url** you copied before for the `metadataUrl` key.
3. Map your Entra ID roles to xorlab roles by adding a `roleMapping`. More information about xorlab roles can be found at [Built-in User Roles](/latest/built-in-user-roles)
```yaml auth.yml {14-27} theme={null}
enabledAuthBackends:
- entraSaml
saml2AuthBackends:
entraSaml:
idp:
# Enter the App Federation Metadata Url from M365
metadataUrl: https://login.microsoftonline.com/*****************************
attributeMapping:
displayName: attr('http://schemas.microsoft.com/identity/claims/displayname')
emails: attr('http://schemas.xmlsoap.org/ws/2005/05/identity/claims/name')
roles: attr('http://schemas.microsoft.com/ws/2008/06/identity/claims/role')
# Add your Entra ID roles to every xorlab role that is required.
roleMapping:
xcc_admin:
- entra_xor_admin
xcc_monitor:
- entra_xor_admin
xcc_analyst:
- entra_xor_analyst
xcc_insights:
- entra_xor_admin
- entra_xor_analyst
xcc_quarantine_user:
- entra_xor_admin
- entra_xor_analyst
- entra_xor_quarantine_user
```
The following example shows how to do a role pass-through without role mapping. In general this is not recommended because it is more error prone. However if you do it, make sure to:
* Specify all xorlab roles in Entra ID (including `xcc_insights` and `xcc_monitor`) and assign them to your users
* Provide only xorlab related roles in the SAML token to avoid an excessive token size
```yaml auth.yml {14} theme={null}
enabledAuthBackends:
- entraSaml
saml2AuthBackends:
entraSaml:
idp:
# Enter the App Federation Metadata Url from M365
metadataUrl: https://login.microsoftonline.com/*****************************
attributeMapping:
displayName: attr('http://schemas.microsoft.com/identity/claims/displayname')
emails: attr('http://schemas.xmlsoap.org/ws/2005/05/identity/claims/name')
roles: attr('http://schemas.microsoft.com/ws/2008/06/identity/claims/role')
# Specify PASS_THROUGH, otherwise xorlab will only consider roles that match the role mapping
roleMappingMode: PASS_THROUGH
```
4. Click **Publish**. The authentication configuration becomes active within about one minute.
5. Now the SAML integration is done and you can test the login with the link `https://xyz.activeguard.cloud/?_agAuthBackend=entraSaml`. Replace `xyz` with your customer ID.
**Custom trust store**
In case your xorlab configuration uses a custom trust store, you will also have to add the [DigiCert Global Root CA certificate](https://cacerts.digicert.com/DigiCertGlobalRootCA.crt.pem) when integrating SAML with Azure Active Directory. Please follow the steps described in [Certificate configuration](/latest/authentication-certificates).
## Next steps
Enable the protection mode for your tenant:
* Either [M365 Monitoring Mode](/latest/m365-monitoring-mode) or [M365 Inline Mode](/latest/m365-inline-mode)
Optionally, before going inline, import your existing emails:
* [Import Past M365 Emails](/latest/m365-retrospective-email-scanning)