

Overview
xorlab supports manual as well as scheduled automatic backups that can be used to restore the system after a failure. Backups are either full or incremental:- Full backups are self-contained and do not depend on previous backups, which makes them more robust than incremental backups.
- An incremental backup only saves changes made since the last backup (full or incremental) hence it is faster, but it depends on earlier full/incremental backups. XCC will always trigger a full backup if no full backup can be found.
- A sequence that begins with a full backup and may include any number of incremental backups is called a backup chain.
/etc/xorlab/ are also not covered by the backups. Hence, it is recommended to regularly take snapshots of all VMs, at least after every update of xorlab.
Quick setup
-
Open the Expert Editor and navigate to the
/xcc/backend/xcc.yml. -
Enable the backup service, and if needed, adjust the schedule for full and incremental backups, and the retention policy.
In this example, incremental backups occur daily from Sunday to Friday at 12:00 and 21:00. A full backup is taken on Saturday at 01:00. Incomplete chains, e.g. incremental backups without a full backup, will be removed. Long running backups get aborted after 72 hours, which should be sufficient for typical email load and data retention settings. See Backup Settings for more details.
-
SSH to the XCC, open
/etc/xorlab/xcc/.envand adjust the location ofBKP_BASE_DIR, the directory where backups will be saved: -
Click Publish, then restart the
xcc_backendcontainer to apply the changes. The general backup settings inxcc/backend/xcc.ymlrequire an XCC restart; see How to Activate the Configuration: -
Optionally, we recommend integrating/sending the backup events
sys.backup.*to your SIEM or centralized monitoring system, if available. This will allow you to be notified if a backup fails.
Backup
Each backup (full or incremental) consists of theinfo.json metadata file and four module files:
- Assets - contains the assets required by the XCC web interface and the quarantined messages.
- ConfigRepos - contains the xorlab configuration for each platform component.
- Redis - contains the metadata used for similarity matching.
- Database - contains the database contents with the metadata of each message analyzed by xorlab.
backup- prefix followed by the UTC timestamp, which corresponds to the time when the backup was scheduled/triggered. The name further contains the type of the backup and the name of the module that created it. The file ending in info.json contains meta-data about the backup.
If the backup service is enabled, XCC saves backups to the chosen backup directory according to the backup schedules.
Backup directory
Backups will take up a significant amount of disk space. In order to not interfere with normal operations, e.g. by using up all available disk space, it is strongly recommended to keep the backup directory on a different mount point than the other production data. By default, the backup directory is set to/backups. You can change it in /etc/xorlab/xcc/.env:
BKP_BASE_DIR) is mapped to /var/lib/xorlab/xcc/backup/backups in the backend container, as configured in /etc/xorlab/xcc/docker-compose.yml:
Backup schedule
The backup schedule syntax uses the Quartz cron format, and can be edited in/xcc/backend/xcc.yml via the Expert Editor.
The pattern represents: second, minute, hour, day, month, weekday. Month and weekday names can be given as the first three letters of the English names. Here are a few examples:
0 0 6,19 * * *: at 6:00 and 19:00, every day.0 0 9-17 * * MON-FRI: every hour from 09:00 to 17:00, on weekdays.0 0 0 * * SUN: every Sunday at midnight."-": Never/disabled.
xcc/backend/xcc.yml settings require an XCC restart; see How to Activate the Configuration.
You can use online tools, such as Cron Expression Generator & Explainer or crontab guru, to verify that your cron schedule. Be mindful, that crontab guru follows the standard cron syntax (no seconds field).
Incremental backup scheduleEven if an incremental backup is scheduled, XCC will do a full backup if one of the following conditions apply:
- XCC runs on a more recent minor version (after an update full backup is scheduled automatically).
- There is an incomplete full backup that can be resumed.
- No previous backup is found in the backup directory.
Backup settings
By default, automatic backup deletion is enabled. Only the current backup chain is kept (and one additional one related to the last minor release), and the dangling incremental backups (without associated full backup as their base) will be deleted. Here’s the list of all backup configuration options that can be set in/xcc/backend/xcc.yml.
Manual backup
When you need to create backups manually—for example, when the automatic backup was performed a couple of days ago and you want to make some substantial changes such as upgrading to a new xorlab version—you can can trigger a backup manually from the XCC web interface.- Log in to the XCC web interface.
- On the main screen, click the tiles icon next to your account name and click the Admin icon in the displayed menu:
-
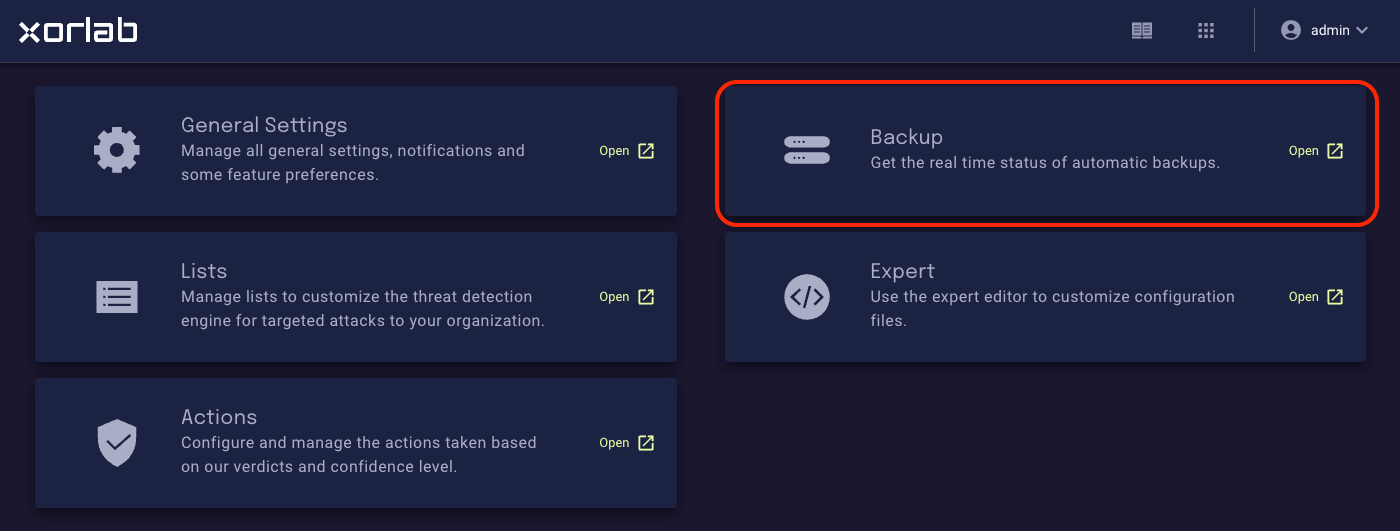
Open the Backup page:
-
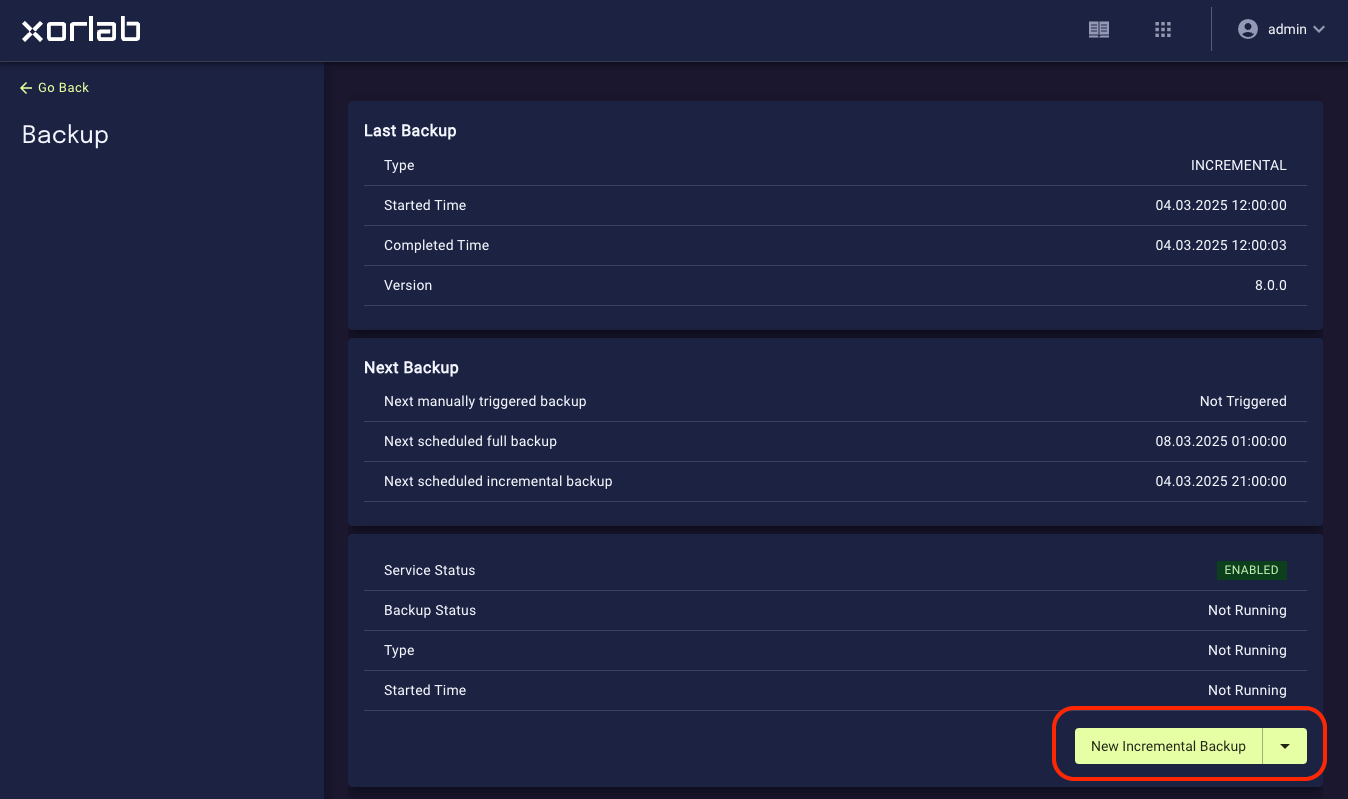
Press the New Incremental Backup button, or choose New Full Backup:
Recovery
If you require assistance, or are in doubt, do not hesitate to contact us via support@xorlab.com.
backend service finds backup files in the recovery directory during startup. It will commence with the most recent full backup and proceed to apply all subsequent incremental backups. It replaces the database with the one from the backup, so the existing database does not have to be deleted beforehand.
Here are the steps needed to perform a recovery:
- Restore host configuration
- Populate recovery directory
- Start recovery process
- Clear recovery directory
- Remove outdated search results
- Re-start XCC stack
Restore host configuration
Host configuration, that was changed during an update, is backed up to/etc/xorlab/backup/.
Populate recovery directory
The recovery directory is${WRK_BASE_DIR}/backup/recovery on the XCC, which is /var/lib/xorlab/xcc/backup/recovery with default settings. The default /etc/xorlab/xcc/docker-compose.yml already mounts it into the backend container, so it needs no setup.
Move the backup chain you would like to recover from the backup directory to the recovery directory: its full backup, and the incremental backups after it up to the point in time you want to restore. Assuming /backups is used as the backup directory:
/var/lib/xorlab/xcc, as recommended, moving the files copies them, so make sure there is enough free disk space for the backup chain.
Start recovery process
-
Make sure all containers from the xcc stack are stopped:
-
Start PostgreSQL—the database has to be running to recover its data:
-
Start the backend service:
and observe the logs. After a few seconds status reports similar to the following will be shown:
-
Once the recovery is complete, the JVM in the
xcc_backendcontainer will shut down with exit code 3, and you will see this line: - Ctrl+C to close the logs and stop the container.
Errors from
pg_restorexorlab uses pg_restore to restore backups. All log lines containing Found expected (non-)error from pg_restore can be safely ignored as they do not influence the recovery.Clear recovery directory
Move the backup chain back to the backup directory. The recovery directory must be empty before thebackend service starts again, otherwise it starts a second recovery. xorlab also only cleans up old backup chains in the backup directory.
Remove outdated search results
The recovery marks all emails for re-synchronization with Elasticsearch, and thebackend service re-synchronizes them from the database once it starts. Until then, the search index still holds the emails from before the recovery, and the XCC web interface shows them in the search overview. Delete the index while the backend service is still stopped; it creates the index again when it starts.
-
List the index and note its version number,
xcc_result_publish_version_<N>: -
Delete the index, replacing
<N>with the version number from the previous step:
Re-start XCC stack
The analyst dashboard will appear empty or incomplete while data is being re-synchronized. Depending on the amount of emails, it may take minutes to hours until this process is completed.
Patch rollback
If the patch upgrade was not successful, it’s possible to revert the changes. All components can be restored to the previous patch version (unless stated otherwise in the release notes) by performing the following steps:-
Set the version variables (
*_VERSION) to the previous patch version in the/etc/xorlab/<component>/.envfile. -
Restart the component:
11.0.1 to the 11.0.0:
-
Set the version variables to the
11.0.0:/etc/xorlab/xcc/.env -
Restart the xcc component: