

VM Setup Preparation
xorlab consists of two on-premises components: Control Center (XCC) and MTA, and various backend services operated by xorlab, such as Sandbox, xCloud, and others. MTAs are email processing nodes that can be operated redundantly, depending on the expected load and availability requirements. The Control Center consolidates the analysis results from the MTAs and hosts the user interface. Sandbox performs on-demand dynamic sandbox analysis of email attachments.Hardware requirements
The Control Center and MTAs are provided as images in the OVF format. Our Sizing Guide will help you determine the right configuration for the resulting VMs. Download credentials can be requested [via email](mailto:support@xorlab.com?subject=xorlab download request).Network requirements
Make sure that your network is configured as described in xorlab Network Guide before starting with the installation.DNS registration
-
Register DNS A records for the Control Center and MTA VMs with your internal DNS server(s). For the Control Center, you can also use a CNAME record instead of an A record. For the MTA VMs, A records are required; see also RFC 2181. The table below shows an example setup for example.com:
-
Add an MX record for every MTA in your setup. Use the same priority for all MTAs to achieve automatic load-balancing. In our example, we use
mx.example.comand the DNS query result is:
Preparing the VMs
- Download the Control Center and MTA images (OVF format). The link and credentials will be provided by us.
- Decompress the zip files and instantiate the Control Center and MTA virtual machines using your Hypervisor.
VM Setup process
OS & XSP config on the host
XCC and MTA VMs come with a setup script (xorlab-set-up-xcc, xorlab-set-up-mta) that can be safely run multiple times. It automatically configures the operating system and xorlab settings, skipping steps that have already been completed.
In the tables below, you can find all configuration settings needed to set up the XCC and MTA VMs with their respective config files; if they are covered by the setup script, and whether the change is mandatory or optional. Each Setting / topic links to a detailed description of the configuration changes. If the step is covered by the setup script, it is not necessary to manually execute these steps again.
- XCC
- MTA
SSH access
All our virtual machines are running Ubuntu Linux. The OS comes with a pre-configured admin account. Use the credentials provided to you by xorlab to open an SSH connection.Network configuration
The Control Center and MTA VM images have DHCP configured on all network interfaces, which names matchen*. If your environment requires static addresses, you need to change the network configuration on the VMs before proceeding with the installation.
-
Open a shell on the VM using your hypervisor, log in and open the
/etc/netplan/00-xorlab-config.yamlfile with elevated privileges (sudo). Comment the dynamic configuration out, uncomment the static configuration, and set the appropriate values. In this example, for theens192interface, the config file should look like this: -
In case you want to add a second interface (or more) to your VM, you need to add a configuration for each:
Static IP configuration example for more interfaces
nameserversblock can have eithersearchoraddresses, or both defined. -
Apply the configuration by executing
sudo netplan apply. - Restart all docker containers.
Disk resizing
Now, resize the disks of the VMs so that they meet the requirements from the Sizing Guide:- Configure your hypervisor to provide the correct amount of storage to the VMs. This step is not described any further here since it depends on your hypervisor.
-
Resize the partition and file system on the VMs. After you configured the disks for the VMs on your hypervisor accordingly, execute the following steps on every VM (XCC and MTAs):
- Use
lsblkto identify the block device—here we usesda. - Use
fdiskto identify the partition—here we usesda2. - Use
fdiskto delete and rewrite this partition so that it uses all available space. - Resize the file system using
resize2fs.
fdisk, you can accept the defaults by pressing the ++enter++ key. No changes will be written to the disk before you execute thewcommand. - Use
-
Answer
noto theDo you want to remove the signature?question. -
Resize the file system with:
-
Verify that the partition has the correct size with
df -h.
Setup Script
The first run of the script is always interactive. You answer a series of questions, inputting desired values, which you can save in the config file. Subsequent runs can be non-interactive, provided you have made changes directly in the config file. Settings common to XCC and MTA that you can change:- hostname - sets the hostname on the VM itself (via hostnamectl) and updates all relevant entries in xorlab configuration files.
- bind IP - the IP address of the interface to which xorlab stack components bind
- proxy - APT, Docker daemon, bootstrap, and
active_guard.ymlproxies.PROXY_USERandPROXY_PASSare optional settings
- client ID - unique ID number of the MTA VM
- XCC FQDN - fully qualified domain name (or hostname) of the XCC VM
/var/log/xorlab/host/host_bootstrap.log. In the file you can find commands with arguments that the script executes. It should be the first place to look whenever there are problems, or the script does not execute properly. To see the log file, open it with less -R, more, tail, or other program which interprets colors.
Config values entered by the user can be saved to a config file (/etc/xorlab/bootstrap_config), which also serves as a history of changes. New values are appended together with a time stamp, as shown in the example below:
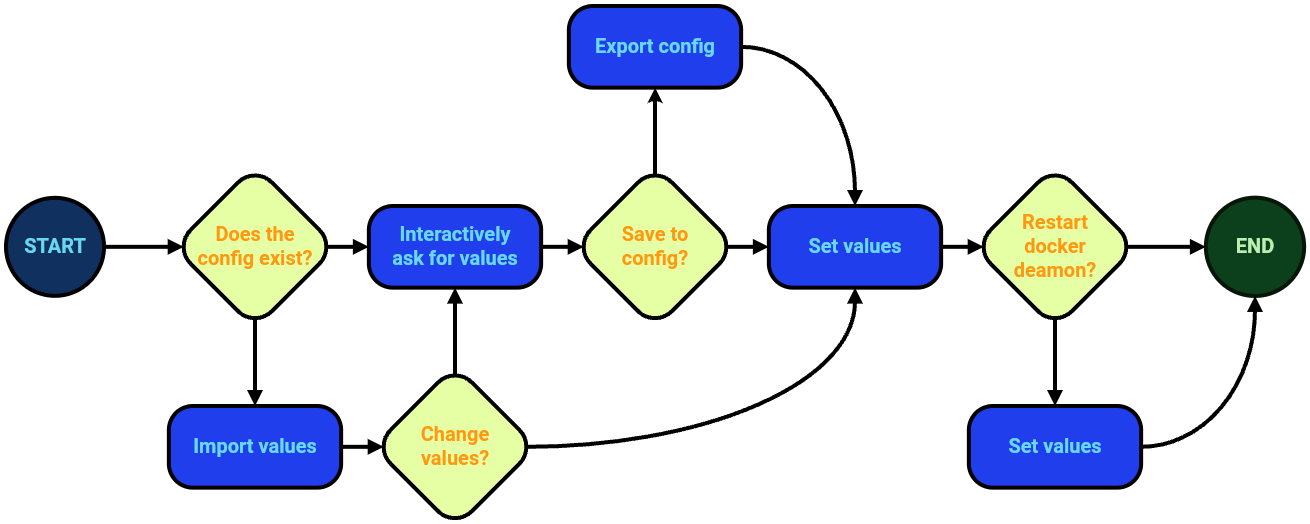
xorlab-set-up-xcc for XCC, and xorlab-set-up-mta for MTA.
Here’s the setup script in action during the first run, and showing some adjustments you might do later:
- XCC
- MTA
EHLO configuration
Set the hostnames used by the MTAs for theEHLO when the SMTP connection is established. For every xorlab MTA, you will see one main.cf.vmx.<id> file: main.cf.vmx.1 will be applied on MTA 1, main.cf.vmx.2 on MTA 2, and so on. If there is only one MTA, you will only find the main.cf file.
- Open Expert Editor.
-
Navigate to the
activeguard/mta/startup_cfg/postfix_custom/. -
Edit each
main.cf*file and set themyhostnameparameter to the hostname that points to this MTA in your DNS (A record).
activeguard/mta/startup_cfg/postfix_custom/main.cf file should look like this:
Resource configuration
Please refer to VM Resource Configuration to adjust all necessary resource parameters for your sizing profile.Optional settings
Docker network IP range
This section is only relevant if your local network already uses the172.16.0.0/12 IP address range. In that case you need to change the IP range used by the Docker network, otherwise you can skip this part.
By default, xorlab uses the IP range of 172.16.0.0/12 for its internal Docker networks. This network is not exposed beyond the VMs, however, it can cause routing problems if this IP range conflicts with the subnet in which the xorlab VMs are located.
If you use the IP range of 172.16.0.0/12 already in your network, please follow the instructions in this section to change the xorlab internal Docker network. This must be done for every xorlab VM (MTA and XCC). Otherwise, you can skip this section and continue withCertificates.
-
To verify that xorlab actually uses 172.16.0.0/12 internally, you can execute
ip ron the command line. The output usually looks like this: -
Now, open the
daemon.jsonfile:and specify the new IP range that xorlab should use internally. You have to set a subnet forbipand a different one fordefault-address-pools. Make sure you don’t use those subnets in your network. More information about the Docker configuration can be found on the official Docker documentation: Networking overview and dockerd. -
To activate the changes, stop all running containers by executing
docker compose downin the following directories:- MTA:
/etc/xorlab/activeguard, and/etc/xorlab/monitored_mta - XCC:
/etc/xorlab/xcc,/etc/xorlab/auth,/etc/xorlab/elastic, and/etc/xorlab/monitoring
- MTA:
-
Restart the Docker service with:
-
Recreate the existing networks by executing
docker network rm <network> && docker network create <network>for the following<network>:- MTA:
activeguard.xorandmonitored_mta.xor. You can display existing networks withdocker network ls. - XCC:
xcc.xor,auth.xor, andmonitoring.xor
- MTA:
-
Restart the VM:
Certificates
xorlab is delivered with pre-installed dummy certificates. These certificates allow for encryption of traffic but not for authentication. To install TLS certificates, you have to:-
Replace the dummy certificate files on both the XCC and MTAs in
/etc/xorlab/tlswith your certificate files in PEM format:In the following, ‘certificate’ will refer to a certificate chain in PEM format of one or more certificates, of which at least one needs to be signed by a CA trusted by the client. The equivalent Let’s Encrypt file would befullchain.pem. ‘Private key’ will refer to the corresponding unencrypted private key of the certificate in PEM format, the equivalent Let’s Encrypt file would beprivkey.pem.- XCC
- MTA
-
XCC WEB GUI
-
ssl.crtshould contain a certificate with the hostname of the Control Center. It will be used for HTTPS connections to the Control Center GUI. -
ssl.keyshould contain the corresponding private key. Go to the TLS Certificates for XCC page, where you’ll find information about setting correct permissions, ownership, and config reloading.
-
- If certificates are used that are not signed by a generally trusted CA, i.e. self-issued / locally trusted certificates, you need to configure XCC and MTA VMs to trust all certificates in your on-prem XSP environment. In order to achieve that, you have to set trust settings in the following files/locations:
- XCC
- MTA
-
/etc/xorlab/xcc/backend/bootstrap.yml(backendstack) -
/etc/xorlab/<stack>/bootstrap.env(authandmonitoringstacks) -
/activeguard/core/active_guard.yml(using Expert Editor) -
/monitored_mta/promtail/config.yml(using Expert Editor) -
/activeguard/mta/audit/audit.yml(using Expert Editor)
You must deploy the changes by restarting the Docker stacks on the Control Center, and MTAs.
Proxy
Most configuration changes needed for proxies are covered by the setup script and don’t need to be configured manually, see also Proxy Configuration. Only an (optional) VirusTotal integration requires manual changes.
virusTotal configuration block, in the /xcc/backend/xcc.yml. host and port are mandatory, username and password are optional.
NTP servers
xorlab uses the time provided by the OS. In order to configure the OS settings set theNTP line in /etc/systemd/timesyncd.conf:
Activating the firewall
By default, new MTA and XCC VMs have their firewalls disabled, although the necessary iptables config files are present. To enable the firewalls, for XCC and each MTA VM, execute the following command:Post-installation checks
- Log in to the xorlab MTA admin interface on port 8443.
- Go to Health Check and confirm that the status is
RUNNING. - Go to Configuration → System Tests and confirm that all System Tests are green.